 Did we miss anything in this section? Is there something we didn't discover?
Let us know!
Overview
Did we miss anything in this section? Is there something we didn't discover?
Let us know!
Overview
This dungeon is accessed during the main quest
Breaking an Entry, starting out at
#1. Use the metal rings on the wall to open the first door you come across to (more specifically, the one on the left). You'll see Sassan giving commands to another group of soon-to-be-dead bandits and then disappear behind the rocks. Explore the room, looting a few chests and then talking to Elijah (
#2).
If you let him go by pulling the metal ring next to the door, he'll tell you about the room next door that can also be opened in the similar manner. You can also get this information by mindreading him, however that would cost you 800 experience. Therefore, just explore all the cell rooms by opening them with metal rings and helping yourself with the goodies found inside. There's a fake wall at
#3. Remove it by pressing the small switch on the wooden beam.
Explore the room at
#4 and pick up the pair of explosives. You'll need one of them to clear an the rocks at
#5 and then a second set of rocks at
#6. Breaking the rocks at
#5 ends the quest Breaking an Entry.
Behind the rocks at
#6 you'll find a key (
#7a) next to Dragon Slayer's corpse. As you approach the archway leading into elevator at
#8, Sassan will come, congratulating you on the break-in and giving you the next quest
What's in a Name?.
There are buttons inside the elevator that navigate around the floors. If you take the basement, you'll enter the area marked with
#9. The abomination master (
#11a) drops another key. You'll also meet Grimm in here, Laiken's undertaker. If you head to the 2nd floor, you'll notice that the mapping for it is over the basement. You'll meet some more abominations here, and an abomination master will drop another key (
#12a). You'll also find two candles at the end of both left and right halls that, once lit, lift the wall in the middle, revealing another chest. Chest
#7b (opened by the key found at
#7a) is located on the 2nd floor as well.
Bring yourself to the first floor and use the key found in the basement (
#11a) to open the cellar door (
#11b). You'll find Erkling at
#13. As he isn't willing to help, mindread him and find out that he's going to read Gothe's Ballads. Try to examine the book yourself by selecting it from his bookshelf and a secret room will unveil. Open the chest and locket (
#12b) using the key from the 2nd floor (
#12a). The locket has a book with the demon's name : Razakel.
Now head to the third floor and continue to Sassan, who's eagerly awaiting you at
#14. Make sure you've finished all you've wanted in the Broken Valley or Sentinel Island in their current state. Proceed to the room at
#15 and obliterate the abomination Sassan. Afterwards, mindread the friendly Sassan to gain a stat point. Once ready, tell Sassan to spawn the demon, Razakel. He can be tough to beat as he has a lot of hit points and deals rather high fire damage. However, Sassan will occasionally heal you during the battle so it shouldn't be overly hard.
After you're done with the demon, you can mindread Sassan again to gain another stat point. The quest "What's in a Name?" will also end and you'll get the next one, "Laiken in his Lair". Afterwards, once you're ready to go and face Laiken, designate a role for her. Healing might be the most effective. Take the elevator up at
#16.
After a short cinematic, you'll strike up a conversation with Laiken. You can mindread him in case you want his sword to appear in his chest. Afterwards, an inevitable fight ensues. It can be rather tough, the demon tends to hit very hard. Once he dies however, Laiken will die as well and the quest will end. Another cinematic will commence with Damian and Zandalor and soon enough, you'll have to turn into a dragon. Exit through the large door where Sassan is standing.
Once in the dragon form, torch everything you see, especially the wyvern nests. After killing all the wyvern nests, another cutscene will play where Damian destroys Broken Valley.
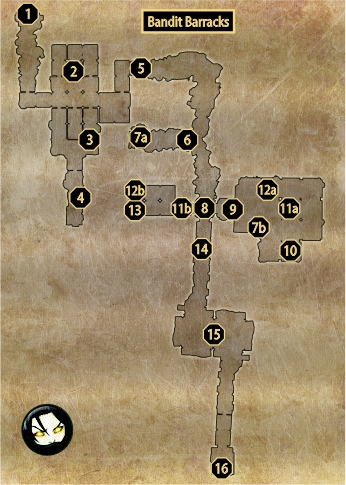
1 - Entrance
2 - Elijah
3 - Fake Wall
4 - Explosive Charges
5 - Rocks
6 - Rocks
7 - Key (a) and the Chest (b, second floor)
8 - Elevator
9 - Basement/2nd Floor
10 - Teleport Shrine
11 - Key (a, basement) and the Door (b, first floor)
12 - Key (a, 2nd floor) and the Chest (b, first floor)
13 - Erkling
14 - Sassan
15 - Razakel
16 - Entrance to the Battle Tower


