 Did we miss anything in this section? Is there something we didn't discover?
Let us know!
Overview
Did we miss anything in this section? Is there something we didn't discover?
Let us know!
Overview
This section covers the second half of the side quests found in Orobas Fjords.
 Grave Robbers
This quest can be started by talking to any of the grave robbers (the living ones) that are also the objective of the same quest. There are four people in total and they're looking for a special tomb to loot.
One of them, Laura can be found on top of the cliff at
#1. You can easily reach her with dragon form.
The second one, Arthur Gremory, is located inside the Imps' Lair at
#2. The cave itself is fairly straightforwards, just clear it out and the imp boss will drop the key along with a few other nice items. Use the chance to mindread Arthur if you've also mindread the other two family members (George in Broken Valley, Catherine on the Sentinel Island) to obtain the last piece of info on how to open their family chest.
The third grave robber is Jack Bolton (
#3). However, he's already dead once you arrive at his location, one of the wyvern nests. Be sure to grab the quest items he has on them, scroll and a seal. The fourth one, Jimmy Dean, is also dead, on a small hill above a teleporter at
#4. Loot his seal and the scroll.
Now head to the meeting place at
#5, which is also the entrance to the tomb. Once you enter the tomb, Laura will find a note from Bellegar, which says that the whole treasure they've been searching for is fake, which will make them turn back and quit searching. However, it's not really fake, just take a look around yourself.
The cave is fairly small with three levers around. One is right in front of the sarcophagus, one of them is hidden amongst the crates at the back and the third one is up on the wooden platform. A few platforms and a chest will spawn as you pull them. After looting the goodies from the chest, make sure to loot two malachite ore veins as well, as they might contain the valuable malachite gems.
Down the Hatch
This quest is started by Jedediah, a man who worships an imprisoned Dragon Knight in one of the ruined fortresses at
#6. To open the magically sealed trapdoor near him and set Orobas (the Dragon Knight) free, you'll need to bring Jedediah a Chalice of the Dragon and some Drudanae.
The chalice can be found at Tilian's (
#7). There are a few ways to obtain it. You can tell Tilian your intentions and then everyone in the camp will attack you (make sure that you've done the
Thorn in the Side quest, if you wish to maximize experience gained). The alternative options are to either mindread him and use the gained information against him, or you can trade Arben's Sword which for the key. The chest that contains the chalice is located one floor above the prison entrance.
The other item, Drudanae, can be obtained in the High Hall (
#8). You can either buy it from a man named Nicolas for a lot of gold (3750 coins) or you can search around his house for a key and then break into his basement, where you'll find the herb growing and you can just pick it up.
Return to Jedediah with the items and he'll perform the ritual that opens the sealed door. The crypt itself isn't very big. You'll soon come across the skeletal remains of Orobas in his dragon form and a special chest which will ask you three questions before letting you open it. The correct answers are "Three skulls", "One health potion, two apples, one droxlerite" and finally, "Four candles". You'll find a few goodies inside, along with a valuable dragon skill book. There's another dragon skill book and Arben's shield lying nearby.
At this point, all you can do is go back to Jedediah and tell him that Orobas is dead. However, soon enough, you'll have an encounter with Tibus and his gang. They've been posing as worshippers and hoped to lure you into a trap. Just defeat them and show them who's the real boss around here.
A Shaman's Ransom
This quest is received from Aurelius at the Champion's Harbour (
#9). You'll need to defeat the Red Hammer goblin tribe led by a shaman called Svadilfari. Travel all the way to
#10, eliminating hostilities and generators on the way to remove the barriers.
Inside the cave, head right first and try to open the door. This will start a conversation with a beholder named Groth and he'll give you a quest called Much Ado About Goblins. It might be wise to finish that one first before proceeding to the left where Svadilfari is.
As you approach Svadilfari, he'll make you an offer. This starts the quest Death of a Champion and is another solution to the situation between Slayers and goblins. The straightfoward option of course, is to just kill him along with his band of warriors. If you mindread him, his chest behind him will yield additional item (a piece of dragon armor).
Anyway, since all the goblins have turned hostile, just defeat them and then once Svadilfari drops low on health, he'll go outside and challenge you to a fight in your dragon form. Simply crisp him to death and his head will appear in your inventory. Only thing left to do is report to Aurelius.
Death of a Champion
The alternative solution, which seems like it doesn't involve killing the goblin king, is to bring a fake Svadilfari's head to Aurelius. Once you reach Svadilfari in his lair (
#10), simply accept his offer and then go back to Aurelius in the Champion's Harbour (
#9).
However, the fake head was poisoned and Aurelius will die on spot. After you return to Svadilfari and bring the news to him, he'll dismiss you and try to kill you, as he no longer has any use of your abilities. At this point, just defeat all the goblins in a similar fashion as you would in the quest A Shaman's Ransom.
Much Ado About Goblins
This quest is started in the Red Hammber Tribe Cave (
#10), by talking to Groth who can be found behind the barred doors on the right as you head down the initial corridor. You'll need to find a person who is able to understand goblin language and therefore write down the history of the goblin tribe.
You'll find only one person who can do that, Gwyn (
#8), located north on the way to High Hall. Just inform him about his job opportunity and he'll head to the tribe. Return to Groth and you'll find Gwyn as well. The quest will be finished and you can also access the area behind the door now. Take the keys as they open two chests to the far left near Svadilfari. of the cave. There's also a dragon skill book lying about near Groth, as well as a skill book on the bench nearby.
The Horror of High Hall
This quest is received from Beatrice in the High Hall (
#8). Apparently, something's haunting their well as the amount of water seems to be diminishing every day. If you mindread her, you'll learn what her real intentions are. She wants to sacrifice you to a demon in order to appease him and leave the village alone. Confront her about it, and she'll double the rewards if you succeed in defeating Zagan.
The quest is further described on the separate page, which covers the
Well Cave in detail. After defeating Zagan and teleporting back to the High Hall, tell Beatrice of your success and you'll get two (four if you mindread her) malachites for your trouble, along with the standard rewards.
Mysterious Cave
This one is not technically a quest, but it's a rather interesting encounter. It takes you to the Morals Cave at
#11. Since the cave has a lot of branches, it's further described on its own page -
Mysterious Cave.
After making your choices and collecting the reward, you'll spawn atop the hill (
#4) near Champion's Harbour once you use the teleporter.
Close to the Bone
This quest is done a bit later into the game, once you reach Keara's headquarters at
her flying fortress (
#12).
Since the quest happens in its entirety in that dungeon, check that page for all the additional reference. It's about Velanir, a ghost husband of Keara, whose body is being kept in the fortres and prevents him from leaving. After successfully penetrating the defenses of the headquarters and entering Keara's private chamber, you'll get a chance to convince Keara to free Velanir's spirit.
A Guild without a Master
This quest is started in the
ruined Broken Valley (
#13) in the tower at the Quarry.
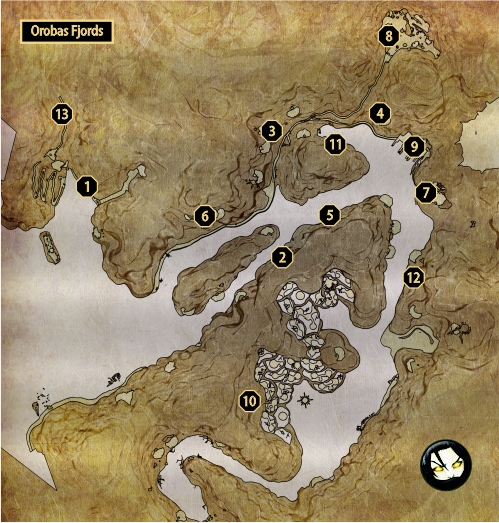
1 - Laura
2 - Imps' Lair
3 - Jack Bolton
4 - Jimmy Dean
5 - Diggers' Meeting Place
6 - Jedediah
7 - Tilian
8 - Drudanae
9 - Aurelius
10 - Red Hammer Cave
11 - Mysterious Cave
12 - Keara's Flying Fortress
13 - Ruined Broken Valley


