 Did we miss anything in this section? Is there something we didn't discover?
Let us know!
Overview
Did we miss anything in this section? Is there something we didn't discover?
Let us know!
Overview
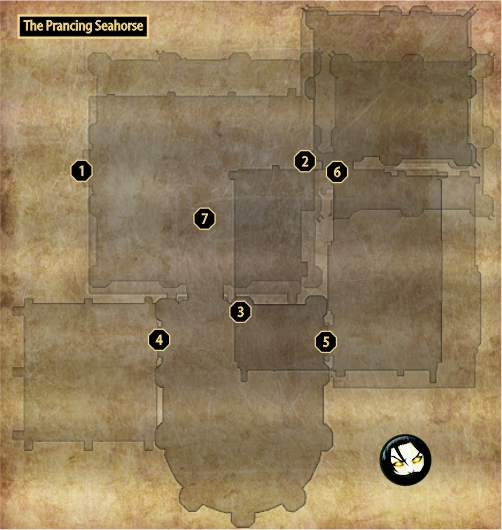
Upon entering The Prancing Seahorse from
Lanilor Lane (
#1), a barmaid named Noa will flee from the place, saying that a magician turned other people into vegetables. Take a look around and you'll find Ashraf's door (
#2) on the current floor and a talking picture to the right (
#3).
Talking to the picture reveals a few more details and that the sorceress' name is Ursula. After the conversation, you'll start the quest
Seahorse Salad, which is connected to the main quest
To Find a Wizard. Take a walk upstairs and you'll find a pedestal (
#3), a magical barrier and two rooms - Gardner's (
#4) and Thomas' (
#5). Ashraf's room (
#6) is on the ground floor.
There are two ways that you can breach the barrier: either by giving the correct number sequence to the book on the pedestal or by opening all three rooms and pulling the levers found inside them. This depends on what you intend to do with the people turned into vegetables - you can either talk to them and say that you'll help them out (they'll tell you passwords for their rooms, where you'll find three levers that you'll need to pull). You might also find another room on the top floor (
#7) which has a locked medicine chest. That one can be opened with a key that you get from Ashraf after restoring their human form.
The other option (if you've decided to eat the vegetables and gain those stat points) is to find three pieces of hidden notes scattered throughout Aleroth. One of them can be found on top of a bookshelf in the Ministry, another is found behind a bookshelf at Chez Chanelle's and the third one is located in Bernard's room in the Healers' House. They'll have a set of crypting messages along the lines of "1-1", "2-6" and "3-8". This means that the numbers you should input at the pedestal are 1, 6 and 8, respectively.
Anyway, after getting inside one way or another, you'll finally meet Ursula (
#7), the sorceress that started this whole mess. There are two ways that you can end the encounter - either by letting her go (she'll give you a nice bow to show her gratitude and she'll undo her curses) or you can fight her and put an end to her sorceries. Follow her into a fiery lair where she'll summon a bunch of skeletons to attack you. After they're down, you can't defeat her just yet, because she'll be constantly teleporting around.
Head to the metal end of the platform (the one that looks like a piece of drawbridge) and jump down onto a few more platforms where you'll find a lever that activates the teleports. After using that teleport, she'll stop teleporting and you can dispatch her fairly easily as she doesn't have a lot of health. If you mindread her during the initial conversation, she'll drop earrings from the Dragon Wizard set, along with the spell scroll to cure vegetables. The golden chest on the platform is also opened now. Exit the area by entering another large portal that was created after the fight.
You'll meet Thaddeus either way after your encounter with Ursula. He'll explain what you'll need to do in order to find Behrlihn's prison, which is covered in the main quest
To Find a Wizard.
There are two more things to be done in here before going somewhere else. Pick up the Elven Alphabet on one of the bookstacks nearby. That's needed for the side quest
Bark Up the Right Tree. There's also an Anti Demon's Grip Scroll lying nearby on a desk. It's need for the main quest, particularly Clue I.
1 - Entrance
2 - Ashraf's Room
3 - Talking Painting
4 - Gardner's Room
5 - Thomas' Room
6 - Pedestal
7 - Ursula, Thaddeus


