 Did we miss anything in this section? Is there something we didn't discover?
Let us know!
Overview
Did we miss anything in this section? Is there something we didn't discover?
Let us know!
Overview
This page lists the quests that are acquired in the Great Market.
 A Swindler Swindled
This quest is received from Willy by the gate at
#1, who'll be arguing with the guards, trying to persuade them that there are assassins in his house. You can of course, jump in and try to help him out.
Follow him to his house at Lanilor Lane (
#1a), where you'll be confronted by Brancussi, the assassin. If you side with Willy, he'll activate a device that will temporarily set everything on fire and you'll have to deal with the assassins as well. Willy didn't learn his lesson though and as soon as the fight is over, he'll try to pull another scam, this time on you. Simply brush him off and tell him to run as fast as he can. You'll get a chestpiece from the Shadow Archer set from the remains of Brancussi.
The other option is to side with the assassins. Willy will be given a half an hour headstart of running before Brancussi sends his best man to hunt him down. That way Brancussi will also become an ally and merchant, and sell you the Shadow Archer chestpiece.
Either way you choose, the quest ends successfully.
Damsel in Distress
Inside the Ministry, right at the entrance to the left, you'll meet Servus (
#2), a squire whose wife has been left behind in Crow's Nest.
After the tree Nericon lets you pass, you can explore Crow's Nest. Go to their house at
#2a, where you'll find Alina being threatened by several undead figures. Defeat them all and she'll immediately head to the Ministry after thanking you. Talk to Servus again and you'll finish the quest successfully.
Trail of Deceit
After talking to Hansel near the caged creature at
#3, you'll learn that it has apparently attacked him during the dinner. You can investigate what really happened so just follow the trail of sausages and bread scattered around the city.
The trail will eventually take you to a place called Cosy Dwelling in Lanilor Lane (
#3a). Take the stairs to the first floor and you'll be interrupted by a talking tomato. He's connected to the main quest
To Find a Wizard and you may leave him alone for now. Hansel's diary is located on one of the stools. Just read it to find out about his secret and how he actually lured the monster to kill Dorus so he could be with his wife, Gretel.
There are two ways you can handle the situation now. Either give the diary to Hansel (whether you read it or not) and he'll give you the key to his chest as a reward. You can also tell Dorus what you know if you read the diary and Hansel will drop the key once Dorus flattens him. Either way, the quest ends successfully.
Reminiscence of the Past
After talking to Ricky in the Phoenix Inn (
#4), your conversation will lead towards him giving you a quest to recover his mother's amulet from a house in Crow's Nest.
In order to get there, you'll need to be able to access that district (by completing the quest
Bark Up the Right Tree). Head to Henry and Eleanor's house (
#4a) where you'll find a few fleeting soldiers running away from the undead. Clear the area and find a small lockbox on the stool in the bedroom. That's where Eleanor's amulet is.
While you're still in the house, explore the cellar if you wish by pressing a secret button near the candle in the room where you've found the amulet. It will open a secret area where the cellar entrance is. Down there, you can find another exit, leading to the locked area of the house (which can then be opened from the inside). It contains two golden chests with divine charms and jewelleries. Once you're done, just return to Ricky.
Everybody's a Critic
This quest is received from Bourdain, the cook inside the Phoenix Inn (
#4). You'll need to do two things for him: to find a special ingredient for his recipe, a special cheese type (Gorgombert) and to unmask the food critic in his inn. The critic part is easy, just find Anona who sits nearby and mindread her. Confront her afterwards about her doings and tell Bourdain that you've found the critic.
The cheese part will require traveling to Mardaneus Plaza. Mindread Darvesh (
#5) to learn about Gula's kitchen and its back entrance in the Lanilor Lane. Then head to the back entrance (
#5a) where you'll find a key on the nearby barrel to open it. The cheese is on the table, waiting to get picked. Head back to Bourdain to give him the cheese and "wait" for him to prepare it. This means that you should change zones and then come back later. You'll get a skill book as well once you pick up the rewards.
Fire 'em Up!
This quest is received from Bedwyn on the upper floor of the Phoenix Inn (
#4) in the Great Market. He requires a special goblin magic orb in order to get his enchanting services going again.
You can buy such an orb from Kaan at Lanilor Lane (
#6). It costs 5687 gold if you mindread him to lower his prices. Afterwards, just return to Bedwyn and he'll offer his enchanting services to you.
Spectre at the Feast
As you explore the market, you'll come across a pyre with several soldiers mourning the loss of their comrade. Talk to the raging ghost of the fallen soldier, Caracalla (
#7)on top of the fire and you'll get a quest to avenge him.
After getting access to Crow's Nest, head to Crowell's house (
#7a) to defeat the invisible assassins. The first thing to do after meeting Caracalla again is to light the two candles near the iron door to the right. A few more clues will surface, pointing at a dead night and blood marks on the walls. Backtrack a bit to where the large red bloody "X" is on the wall and press a small button located in its lower left end to reveal a small chamber with a lever.
The lever opens the iron door, where you'll find dead champion's note and a key to the dining room on his corpse. Go north now into the dining room and you'll come across another note from a fallen warrior. You'll find another pair of candles to light near the iron door to the left. Now head north again where you'll find four more candles to light near the paintings on the walls.
Follow the red light and you'll soon encounter an entity known as Invisible Terror. In order to see the ghosts that attack you, you'll need to light four candles located in the corners of the room. After all the ghosts are down, the quest will be finished successfully and you'll get a skill book in addition to the usual rewards. The teleport leads into the small room behind an iron door that couldn't be opened. It contains several chests with treasuries.
Eternal Commitment
You'll receive this quest from a dying knight in the Healers' House (
#8), Decimus. His last wish is that he gets his wife's ring from their house in Crow's Nest.
After reaching Crow's Nest, head to Decimus' House at
#8a. You'll be stopped by Carmina, a bandit needed for another quest (
A Hunting We Shall Go Once More). Defeat all the bandits and then head to the eastern section of the house, where you'll find Livia's ring in one of the small lockboxes. Pull all the levers as well to reveal a golden chest at the other side of the house.
Return to Decimus once done and he'll be grateful. The quest ends with the usual rewards.
Appetite for Murder
During your visit to Healers' House (
#8), drop by the top floor and talk to Bernard, who's very upset over a bunch of thieves stealing food that's meant to be for the wounded soldiers and knights. He says that he's sent two healers to investigate, but they haven't returned since and points you to Darvesh as he might know something.
Darvesh (
#5) is located in Mardaneus Plaza. Simply talk to him and he'll mention a sewer entrance in Crow's Nest where he's seen some shady characters and has therefore sent off the two healers that visited him to there.
Once you can enter Crow's Nest, go to the sewers (
#9), where you'll meet Dwayne at the end of the corridor. Defeat him and free the healer that's still alive, Joramson. If you mindread Joramson, you'll get a +1 in Healing skill. Mindreading Dwayne reveals a hidden button near the torches found down near the water, not the ones up on the walls. There are three in total and they open the storage room with Order of the Viper leggings in one of the chests.
Take the ladders now (found near the prison cells) that lead outside, into Alzbeta's Emporium. Alzbeta will be quite surprised and will admit that she's part of the greater plan involving Gula. You can choose either to let her go for a discount at her shop, kill her, or arrest her and lead her to Bernard. Either way, once you talk to Bernard, you'll get a key to Gula's house and the quest is finished.
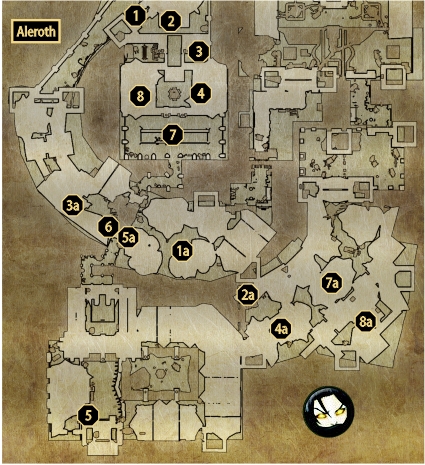
1 - Willy
1a - Willy's House
2 - Servus
2a - Servus and Alina's House
3 - Hansel
3a - Cosy Dwelling
4 - The Phoenix Inn
4a - Henry and Eleanor's House
5 - Darvesh
5a - Gula's Storage
6 - Kaan
7 - Caracalla
7a - Crowell's House
8 - Healers' House
8a - Decimus' House
9 - Sewer Entrance


