Register Lost Password?  Cookie?
  The time now is 12:03 AM GMT -6.  
Banshee Network
 
Divine Divinity
Game Information
Recent News
Walkthrough
Bestiary
Gameplay Tips
FAQ
The Story
Chapter One
Chapter Two
Chapter Three
Character Information
Attributes
Classes
Skills
Reputation
Equipment
Armor & Weapons
Charms
Food & Drink
Game Resources
Downloads
Screenshots
Divine Divinity Forum
Divinity Products
Buy Divine Divinity!
Buy Beyond Divinity!
Site Features
Submit News
News Archives
Join Our Staff
Forums
Community Blogs
Reviews
Previews
Interviews
Editorials
About GB
Advertise With Us!
Advertisement
 

Moriendor's Fortress


Encounter any problems with this walkthrough? Have comments? Let us know!


Area Note

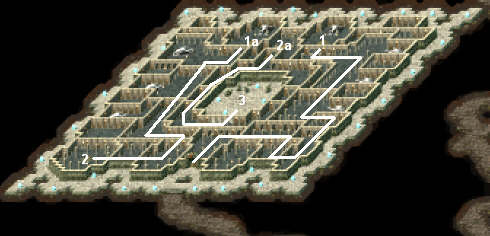
This fortress, like the other fortresses, is essentially a maze. The route to take is indicated by the white line on the map.


1 - Teleporter

The teleporter moves you between #1 and #1a.


2 - Teleporter

The teleporter moves you between #2 and #2a.


3 - Moriendor

When you get close enough, Moriendor will taunt you and then charge at you. So back up so you only have to face Moriendor alone. Moriendor can be nasty because he'll keep casting "blind" on you, and then, once you can't do anything, he'll start hitting you with "hell spikes."

There are a couple ways to deal with Moriendor. At the start of the fight he'll run up and attack you a couple times before casting spells. If you have a weapon with "freeze" on it, or the "freeze" spell itself, you can immobilize him and then whack away until he's dead. If you have a summoned creature, you can use that to distract him while you kill him. If you actually get blinded, realize that although you can't see him, he's still there, and so as long as you know about where he's standing, you can hit him with an area spell like "hell spikes."

Once Moriendor dies, you'll earn 212,500 experience, and a portal will open up in his room. The portal leads back to the main part of the dungeon. "AAAaaargghhh... No! Not like this! Aaahhh!"

Walkthrough
Intro & Advice
Introduction & Advice
Ferol, West
Overview
Aleroth
Catacombs, Level 1
Catacombs, Level 2
Catacombs, Level 3
Catacombs, Level 4
Catacombs, Level 5
Ferol, North
Overview
Farms
Rivertown
Nericon's Garden
Church
Rivertown Sewers
Cursed Abbey
Dr. Elrath's House
Dwarven Village
Stormfist Castle
Cemetery
Castle Treasure Rms.
Ferol, South
Overview
Poor Quarter
Barracks
Ravaged Village
Mine Shaft
Secret Orc Camp
Main Orc Camp
Robbery House
Verdistis
Overview
Merch. Guild Archives
Verdistis Sewers
Assassin's Guild
Thieves' Guild
Dark Forest
Overview
Elven Village
Burial Chamber
Imp's Castle
Warrior's Guild
Dwarven Halls
Dwarven Mines
Iona's Dungeon
Prison Level
Level 1
Level 2
Level 3
Cyrion's Lair
Council of Seven
Meeting Hall
Aleroth Revisited
Sphere of Magic
Wastelands
Overview
Black Lake Dungn.
Overview
Demona's Fortress
Cornelius' Fortress
Iona's Fortress
Moriendor's Fortress
Josephina's Fortress
Demons' Fortress
Other Quests
Activation Scrolls
Dragon Armor
Holy Weapons
Treasure Maps
Larian Armor
 
 
      Copyright ©2000-2008, GameBanshee.com