 Encounter any problems with this walkthrough? Have comments? Let us know!
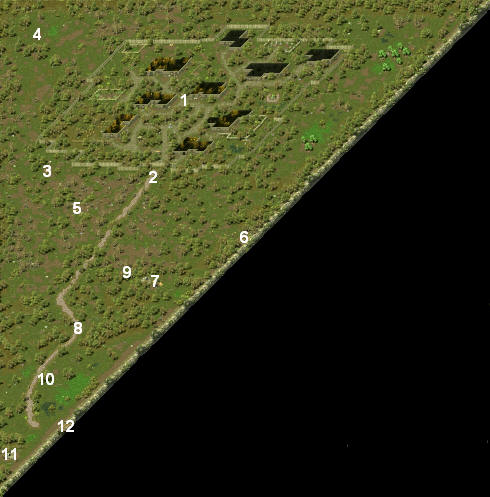
1 - Aleroth
Encounter any problems with this walkthrough? Have comments? Let us know!
1 - Aleroth
See the Aleroth section for more information.
2 - Lord Seth
When you leave Aleroth for the first time, you'll see Lord Seth and his (soon to be dead) companions fighting some orcs. When you talk to Seth, you'll learn that a plague has sprung up in the poor part of Rivertown, and that the healers of Aleroth are needed to combat it. However, when you talk to the healers for Seth, you'll learn that they won't leave Aleroth until the Ducal army sends them an escort. Lanilor will also tell you to seek out General Alix, and he'll mark the location of the barracks on your map. Seth can mark the location as well.
Note: Once Seth has triggered the quest, he isn't important any more. So if you're planning to use swords in the game, you might want to try killing Seth after you've gained a few levels, so you can acquire his sword
Brightblade. Seth is level 39 and has a 321 armor rating, so he can be tough to kill, but freezing him works pretty well.
Brightblade only requires 30 agility and 35 strength, so it can be an excellent early- to mid-game sword.
3 - Teleporter
When you first visit the teleporter, you won't be able to use it. Teleporters require activation scrolls, and you won't get the scroll for this teleporter until you meet up with Zandalor at #10.
4 - Familiar Location
When you arrive at the location, you'll notice a sword on the ground that looks familiar. This is the spot where the game's opening cinematic sequence took place.
5 - Campsite
It's an orc campsite, but you can use the bed there to sleep if you want.
6 - Ambush
If you follow the "piles" of coins (each one only contains 1 gold) to the coast, you'll be ambushed by a few orcs, including an orc drummer. However, doing this will net you 2500 experience. "Fool human fell for our trick!"
The orc drummer heals itself and nearby orcs when it plays its drums, so it can be tough to kill. At this point it will probably heal itself faster than you can damage it, but you might get lucky if you keep using the "freeze" spell against it so it can't do anything. You also might be able to lead it back to Lord Seth (#2). Seth will make short work of it, but you probably won't get any experience.
7 - Orc Camp
This orc camp has an orc chief and an orc drummer in it, so be careful. The cave next to the camp leads down into the catacombs below Aleroth.
8 - Seth's Companions
You'll find the remains of Lord Seth's companions in the middle of the road here. Near them, to the right, you'll also find a silver key. It unlocks the chest at #9.
9 - Chest
10 - Dragon Rider Encounter
Somewhere in the southern part of the area you'll trigger an encounter with a lizard joc -- er, dragon rider. The rider will kill you after a short conversation, but then the wizard Zandalor will show up to kill the rider and resurrect you. Between the two you'll learn that you're a Marked One, and that there are two other Marked Ones out there. Zandalor will ask you to meet him at the Dwarven Bread Inn as soon as possible, and he'll tell you something of the teleporters in the land. The scroll he gives you will allow you to use the teleporter at #3, but the teleporter won't do you much good yet until you can activate a second teleporter somewhere else.
11 - Troll Cave
Inside the cave you'll find the troll king. He'll talk to you, but no matter what you say a fight will start, and a bunch of regular trolls will appear all around you. The troll king is level 19, and he's immune to at least the first two levels of "freeze," so you might want to avoid him for a bit and come back when you're around level 15. When you kill the king, he'll drop a
composite key, which unlocks the chest south of the campfire. Inside that chest you'll find 1255 gold. There is also a
composite key in one of the chests north of the campfire, so possibly you could avoid killing the king and still steal his loot. However, you'll need to kill the king to complete Homer's quest in the farm area to the east, and so you might as well bite the bullet and try it.
12 - Bridge
You'll find a couple trolls fighting the guards at the bridge, but nothing seems to come of saving them.


