Register Lost Password?  Cookie?
  The time now is 11:41 AM GMT -6.  
Banshee Network
 
Divine Divinity
Game Information
Recent News
Walkthrough
Bestiary
Gameplay Tips
FAQ
The Story
Chapter One
Chapter Two
Chapter Three
Character Information
Attributes
Classes
Skills
Reputation
Equipment
Armor & Weapons
Charms
Food & Drink
Game Resources
Downloads
Screenshots
Divine Divinity Forum
Divinity Products
Buy Divine Divinity!
Buy Beyond Divinity!
Site Features
Submit News
News Archives
Join Our Staff
Forums
Community Blogs
Reviews
Previews
Interviews
Editorials
About GB
Advertise With Us!
Advertisement
 

Josephina's Fortress


Encounter any problems with this walkthrough? Have comments? Let us know!


Area Note

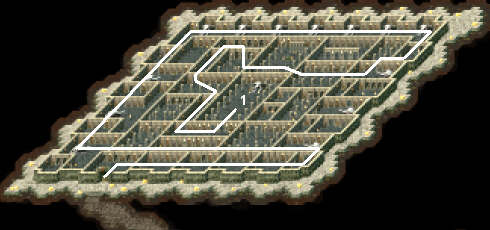
This fortress, like the other fortresses, is essentially a maze. The route to take is indicated by the white line on the map.


1 - Josephina

When you get close enough to her, Josephina will taunt you and then charge. So back up away from her so you'll only have to face her and not any of the nearby deathknights or gargoyles.

Josephina almost always starts off by casting a shielding spell, then summoning a dreadknight, and then blinding. Furthermore, it looks like she usually blinds the enemy closest to her. So that gives you some opportunities. While she's casting her first couple spells, you can charge at her, and, if you have "freeze" on your weapon, you might be able to kill her with barely a struggle. If you summon a helper and let the helper get blinded, then you should have even more time to attack her before possibly getting blinded yourself. Finally, if you do get blinded, Josephina's shield will always show where she is, and so you should be able to hit her with "hell spikes" even if you can't see her.

Once Josephina dies you'll earn 212,500 experience, and a portal will appear in her room. The portal leads to the main part of the dungeon. "You think you've defeated us? Aahh! Don't you know what we've achieved for our Dark Lord? Ahhhhh..."

Walkthrough
Intro & Advice
Introduction & Advice
Ferol, West
Overview
Aleroth
Catacombs, Level 1
Catacombs, Level 2
Catacombs, Level 3
Catacombs, Level 4
Catacombs, Level 5
Ferol, North
Overview
Farms
Rivertown
Nericon's Garden
Church
Rivertown Sewers
Cursed Abbey
Dr. Elrath's House
Dwarven Village
Stormfist Castle
Cemetery
Castle Treasure Rms.
Ferol, South
Overview
Poor Quarter
Barracks
Ravaged Village
Mine Shaft
Secret Orc Camp
Main Orc Camp
Robbery House
Verdistis
Overview
Merch. Guild Archives
Verdistis Sewers
Assassin's Guild
Thieves' Guild
Dark Forest
Overview
Elven Village
Burial Chamber
Imp's Castle
Warrior's Guild
Dwarven Halls
Dwarven Mines
Iona's Dungeon
Prison Level
Level 1
Level 2
Level 3
Cyrion's Lair
Council of Seven
Meeting Hall
Aleroth Revisited
Sphere of Magic
Wastelands
Overview
Black Lake Dungn.
Overview
Demona's Fortress
Cornelius' Fortress
Iona's Fortress
Moriendor's Fortress
Josephina's Fortress
Demons' Fortress
Other Quests
Activation Scrolls
Dragon Armor
Holy Weapons
Treasure Maps
Larian Armor
 
 
      Copyright ©2000-2008, GameBanshee.com