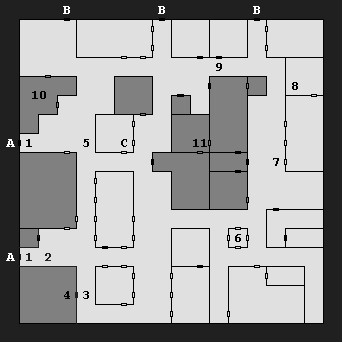
 Area Note
This is the last area where you'll face rakshasas, so if you have
blessed quarrels
remaining from the Burial Glen, feel free to use them all up here. The battle at #10 is a
good place to use them.
Important Note: When you enter the Grand Ruined Temple, you won't be able to get back out,
and you won't be able to rest inside. So do everything you need to do before going in.
1 - Starting Points
If you take the "woods" to the ruins, you'll start at the northern position. If you take the
"path" to the ruins, you'll start at the southern position.
2 - Tirsheya
Tirsheya is a rakshasa with "matted fur and a dour expression." He'll make you an offer to
get into Birsheya's storehouse (#4), which you'll record in your journal (
journal entry
5). If you accept his offer, then he'll lead you to #3.
3 - Storehouse Guards
You'll find an assortment of margoyles and hell hounds here.
If you came here with Tirsheya (#2), then after facing the regular storehouse guards, Beyrha
and other rakshasas will arrive and demand Tirsheya's head. If you side with Tirsheya, then
he will help you in the battle.
4 - Birsheya's Storehouse
If you "search" inside the storehouse, you'll find a random treasure. It doesn't seem to
matter whether you sided with Tirsheya (#2) or not.
5 - Man
You'll see a man here being chased by hell hounds. If you attempt to "rescue" him, then
you'll have to face a bunch of hell hounds, but the man will tell you about a hidden treasure
in a northeastern building before he dies. The treasure can be found at #8.
6 - Dense Brush
When you approach the brush, you'll see a "small child or hobbit" race into it, chased by a
hell hound. If you go to the rescue, you'll learn that it's yet another rakshasa trap, and
you'll be ambushed by the rakshasa plus several hell hounds and margoyles.
7 - Nameless
Nameless will tell you, "This direct approach is dangerous, but the temple is to the north.
Now get on with it!"
8 - Treasure Cache
If you attempted to rescue the man at #5, then you'll find his treasure cache here, provided
you "search" for it. You'll find three items: a
long sword +5, a
girdle of giant
strength (which sets strength to 24), and
gauntlets of dexterity (+1 dexterity).
9 - Margoyles
When you approach the doorway here, you'll see two margoyles torturing a "small animal." If
you attack them, then you'll kill them outright, but the doorway will collapse on you (causing
damage to your party) and a rakshasa will appear and begin looking over your bodies. If you
"play dead," then you'll be able to surprise and attack the rakshasa. Otherwise, he'll run
away.
10 - Gambling House
If you don't "flee," then you'll have to face several rakshasas and margolyes here, but you'll
find a random reward when you've killed them. If you do "flee," then you'll avoid the fight,
but the gambling house will be empty when you return.
11 - Rakshasa Leader
If you "parlay" with the leader and choose "haughty," then he'll agree to help you in your
fight against Tyranthraxus (
journal entry 57). Our understanding is that this help
means you'll face fewer enemies in the final battle. If you make any other response to the
leader, then you'll have to fight him and his entourage, which includes several other
rakshasas plus hell hounds and margoyles.
Exits:
-
Gate to the Burial Glen.
-
Gate to the Grand Ruined Temple.
-
Sewer entrance into the Grand Ruined Temple.


