 Area Note
As you make your way through the sewers, you'll encounter many random things. Most of the
things will be dead bodies or the sounds of people moving around in the sewers, but you might
also find bits of trolls (if you watch them then they'll regenerate and you'll have to fight
them) or a piece of paper (
journal entry 41).
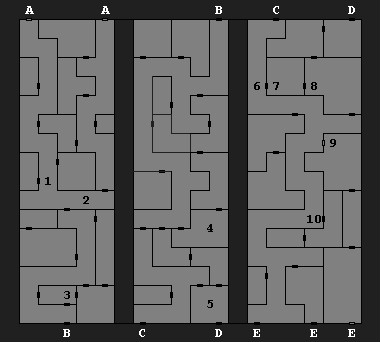
1 - Checkpoint
If you surrender to the Fire Knives here, then they'll take 75% of your money and jewels and
allow you to move along. If you decline their invitation, then you'll have to fight them.
2 - Swatch of Cloth
If you have a thief in your party, then the thief can climb up and retrieve the cloth. You'll
recognize it as coming from the woman (Princess Nacacia) who was kidnapped in the tavern.
3 - Otyughs
You'll face five otyugh here. They won't drop anything when they die, but you'll be able to
use their room to safely rest in.
4 - Otyugh Lair
"Piles of excrement have been shaped into pyramids here. Many otyugh are smoothing the sides
and making artistic embellishments."
You'll see the glint of something metal in the excrement. If you "attack" the otyugh to get
it, then you'll have to fight a whole mess of otyugh, including some nasty neo-otyugh. A better
approach is to "bargain" with the otyugh. Then they'll ask you to retrieve for them "two fine
smelling piles of food" from the otyugh to the south (#5).
Once you've acquired the food and brought it back to the otyugh, they'll give you the metal
-- a "glittering piece of jewelry, ornately sculpted in the in the symbol of the Zhentrim"
-- plus some gems and jewelry. You'll also receive about 5650 total experience.
5 - Otyugh with "Food"
You'll face four regular otyugh and one neo-otyugh here. They won't drop anything when they
die, but you'll be able to grab the piles of "food" for the other otyugh after the battle is
over. You'll also be able to rest here safely.
6 - Symbol of Moander
Burnt into the wall here you'll find the symbol of Moander.
7 - Trolls and Crocodiles
This battle can be pretty tough if you don't have a magic user with the "fireball" spell
yet. You can try to get by with some judicious use of the "stinking cloud" spell instead,
but you might want to skip these battles for a time and visit the secret training hall
(#9) first.
Once you've defeated the trolls and crocodiles, you'll be able to rest here safely.
8 - Trolls
The trolls here will be surprised that you're not somebody named Bonegrinder, and then
they'll attack. When they're dead you'll find
bracers of AC 4, a
girdle of
the dwarves, a
pink and green ioun stone, a
flail +1, and a
staff
sling +1.
Once you've defeated the trolls, you'll be able to rest here safely.
9 - Secret Training Hall
The training hall includes both rooms to the south.
10 - Former Checkpoint
When you arrive at the checkpoint, you'll find that the Fire Knives here have been
slaughtered, and then a man wearing the livery of the Knights of Myth Drannor will approach
you. If you tell him you're aligned with "Princess Nacacia" or "no one" then he'll let you
pass and tell you to watch out for Gharri of Gond, who is trying to rescue the princess.
If you say you're with the "Fire Knives" then you'll be able to attack the knight, but he's
not carrying anything interesting.
Exits:
-
Passage back to the Thieves' Guild.
-
Sewer Passage.
-
Sewer Passage.
-
Sewer Passage.
-
Passage to the Fire Knives Hideout.


