 Area Note
In this area you'll have random encounters with thri-kreen, giant spiders, and phase spiders.
The thri-kreen will ask you who your master is, and if you answer "Tyranthraxus" then they'll
leave you alone. The giant spiders are extremely annoying since they can kill characters with
one hit, so try to kill them as quickly as possible when you face them.
You can also meet a group of knights in the glen. If you "parlay" with them in a "nice" way,
then they'll agree to help you out later. That being said, if they ever helped us, we never
noticed it.
Finally, you can run into thri-kreen who are looting graves. After defeating them, you'll be
given the option of looting the grave yourself or of reburying the skeleton. Looting will net
you some gems, but it will also anger some of the spirits in the glen (like the spirit at #4).
When you first enter the glen, you won't be able to rest because enemies will keep interrupting
you. However, after you've fought ten random battles, it should be safe to rest anywhere.
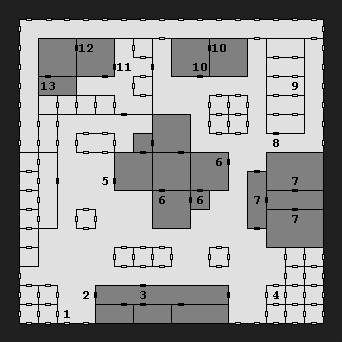
1 - Starting Point
2 - Elfish Spirit
If you "greet" the spirit, then she'll tell you about the glen and about the magic word
"krrkik" that you can use at #3 (
journal entry 25). If you "attack" her, then she'll
just disappear.
3 - Red Web
If you "enter" the web, or if you "speak" the magic word "krrkik" and then "enter" the web,
your movement points will be cut way down, and you'll be attacked by four giant spiders.
Then the spirit from #2 will reveal itself to be a rakshasa and attack you as well. If
you instead "hack" the web, then you'll still have to face the spiders, but you'll avoid
the rakshasa.
4 - Spirit of Princess Daemir
Provided you haven't been digging up any skeletons in the burial glen, the spirit of Princess
Daemir will offer to give you her blessing. The blessing is worth +2 THAC0 while you're in
the glen. If you refuse her blessing, then you'll be hit with a permanent -2 THAC0.
If you've been digging up skeletons, then Daemir will offer to forgive you. Refusing her
forgiveness gives the same penalty as refusing her blessing.
5 - Figure
When you reach this spot, a figure will appear from the shadows. If you "parlay" with him
then he'll tell you a little about Tyranthraxus and your bonds (
journal entry 56).
6 - Thri-Kreen Battles
If you enter the building from the east, then you'll have battles with thri-kreen in all three
of these places. If you enter from the west, then your first battle will draw all three sets
of thri-kreen, and you'll have to fight them one after the other. After the last battle,
you'll find a random treasure.
7 - Spider Battles
You'll fight spiders in these thee locations. In one of the rooms the spiders will be
guarding a pile of bones. If you don't want to anger the spirits of the glen, then you
should "replace" then bones in their crypts, rather than "loot" them.
8 - Red Plume
If you "parlay" with the Red Plume, then he'll tell you his tale (
journal entry 33).
If you "agree" to help him, then he'll offer you a magical bow, and he'll lead you into an
ambush at #9. Along the way, a spirit might warn you about the trap. If you don't agree to
help the Red Plume, then nothing will really change. You'll still meet up with him at the
ambush.
9 - Ambush
At this spot you'll fight six phase spiders, plus the rakshasa who might have tricked you at
#8. The rakshasa can't be hit by spells, so try to clear a path to him thorugh the spiders
as quickly as possible. At the end of the battle you'll find a
long bow +3 and 20
arrows +3.
10 - Spider Battles
11 - Ghostly Shape
Provided you haven't been looting the skeletons in the burial glen, the ghost here will welcome
you into the building and invite you to meet their queen.
12 - Suits of Armor
The suits will crumble if you try to take them or attack them.
13 - Queen
If you kept the spirits of the glen happy, then the queen will reward you when you meet her.
She'll give you 12
blessed quarrels, a
light crossbow +5, a
ring of
invisibility, a
scroll of protection from paralyzation, a
ring of protection
+2, and a
staff sling +3. If the queen isn't happy with you, then she'll give
you some cursed treasure.
Note: The quarrels can be used to kill rakshasas in one hit.
Exits:
-
All exits on the northern, southern, and western edges of the burial glen lead to the Wilderness.
-
All exits on the eastern edge of the glen lead to the Ruins of Myth Drannor.


