 Area Note
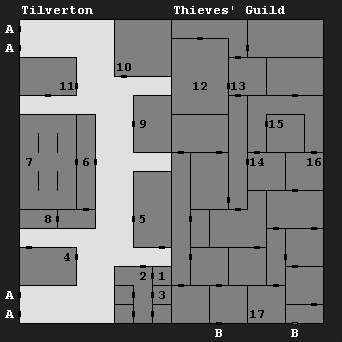
This area is divided into two halves: Tilverton to the west and the Thieves' Guild to the east.
The two halves are completely separate, but since they're shown this way when you use the
"area" command, we decided to leave them together rather than separate them.
When you first try to exit Tilverton (through Exit A), you'll be told that the way is closed
because a royal carriage is expected soon. Later, when you try to exit the city again (after
visiting Filani the Sage at #9), you'll witness the carriage, but then your bonds will begin
to glow, and you'll attack. You'll have to fight off a group of royal guards, but then you'll
be given the option of surrendering or fighting some more. Regardless of what you choose,
you'll shortly end up in the Thieves' Guild. You'll be able to rest right away in the
Thieves' Guild, so feel free to use up your spells against the royal guards.
Once in the Thieves' Guild, you'll start a long segment of the game where you won't be able to
visit any shops, and you'll only have access to one training hall. So make sure you prepare
as necessary before you trigger the carriage fight. You will find some arrows and darts in
the Thieves' Guild, but you won't find any quarrels.
1 - Starting Point
This is where you'll start out in the game. It is perfectly safe to rest here, so the first
thing you should do is encamp and memorize spells.
2 - Windlord's Inn
The first time you arrive in this spot, the innkeeper will explain how you managed to arrive
in her inn (
journal entry 31), and she'll suggest you visit Filani the Sage to the
north (#9).
3 - Disheveled Man
You'll find the man having a nightmare. He'll mumble, "Flaming giant... blood red mage...
the glinting knife... plants that walk... aieghhh!" Then the innkeeper will enter the room
and usher you back outside. However, she'll mention that the man was found on the night
that you were brought in.
4 - Weapons of Cormyr
This is the weapon and armor shop. Since your party starts out naked, obviously you should
take the time to get them equipped here. "May you always strike true."
5 - The Curse
When you enter the tavern, you'll be given the option to "punch the barkeep" or "have a drink."
The former is a good way to start a brawl (and pick up some minor experience). The latter is
a good way to hear a tavern tale.
The first time you enter the tavern, you should witness a woman wearing a purple sash arriving,
and you'll be asked to leave. You'll then hear a commotion by the side door, but by the time
you arrive there, all you'll find is an ornate knife. You'll mark down what the knife looks
like in your journal (
journal entry 17), but that's all you'll be able to do.
6 - Temple of Gond
If you walk among the pews in the next room, you'll hear a sermon. The sermon deals with the
Cormyr Defense Force (aka the "occupation").
7 - Altar
This is where you can receive healing -- for a price.
8 - High Priest
If you tell the priest your story, he'll attempt to cast a "remove curse" spell on you. It
won't work, but you'll record the proceedings in your journal (
journal entry 19).
9 - The Sage Filani
Filani will offer to analyze your bonds for half of your funds. If you "lie" about how much
you have, she'll simply order you out of her house, but then you'll be able to try again.
Filani will recognize three of the bonds -- one each from the Fire Knives, the god Moander,
and the Zhentrim -- and she'll suspect a fourth has something to do with a sage from
Shadowdale. You'll record her words in your journal (
journal entry 38).
10 - The Hall of Training
Unlike Pool of Radiance, you won't have to go to individual trainers for each class. This one
spot will handle everybody.
11 - Tilverton General Store
You can buy
mirrors and
flasks of oil here.
12 - Thieves' Guild
When you're brought to the Thieves' Guild after attacking the carriage, this is where you'll
end up. You can rest here if you need to, but as soon as you try to move, the thief guildmaster
will tell you that the Fire Knives kidnapped the king's daughter Nacacia in an attempt to lure
him into a trap. (You might have heard Nacacia being kidnapped while at The Curse. The trap
was you attacking the carriage.) Then the Fire Knives will burst into the room, kill the
guildmaster, and attack.
This is sort of an annoying battle, since there will be thieves with you and thieves against
you, and they'll all look the same. If you have any big magic user spells (like "fireball")
go ahead and use them, and then we'd recommend you just let the computer fight the battle.
After the battle, you'll find a map of the sewers on the body of the guildmaster (
journal
entry 4).
13 - Guest Book
One entry in the guest book is "O. Ruskettle, Bard of the Realms -- Touch the harp and lose
your hand." You might catch glimpses of Ruskettle as you escape from the guild, and you'll
meet up with her later (in Zhentil Keep).
14 - Kennel
You'll battle a Fire Knife and some fighting dogs here.
15 - Treasure Room
The door to the room is difficult to open, and chances are that you'll need to use the "knock"
spell to enter. Inside you'll find a
potion of giant strength, a
potion of
invisibility, a
potion of speed, a
potion of extra healing,
dust of
disappearance, a
long sword +1,
banded mail +1, two
magic user scrolls,
and some money and jewels.
Note: The
dust of disappearance is very powerful. If you use it before a battle, then
enemies won't be able to target you with spells, and they'll only be able to target you for
melee attacks if you're standing adjacent to them. So save it for something special, like
the big battle at the end of Oxam's Tower.
You'll also find a
deep red ioun stone here. These stones can be readied even if you
have a shield equipped, and each one raises an attribute value. The
deep red ioun stone
raises dexterity by 1.
The room description also indicates that you can rest safely here, but as far as we've noticed,
it's pretty safe to rest anywhere in the guild.
16 - Monkey Room
In this room you'll face monkeys, Fire Knives, and a pair mages. Take down the mages first so
you can avoid their "stinking cloud" spells.
17 - Dead Woman
Near the dead woman you'll find a staff "surmounted by a hand with a mouth for a palm"
(the symbol of Moander). On the woman you'll find a piece of paper that reads, "Keep watch
on the chosen ones." This woman might be found in random locations.
Exits:
-
Gate to the Wilderness.
-
Passage to the Sewers.


