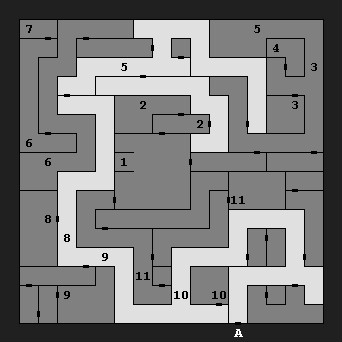
 1 - Dexam the Beholder
This is where you'll start out in the cave. Dexam will explain how he'd like to examine
your bonds, much to your discomfort and death (
journal entry 30), but then High Lord
Fzoul will show up to chastise Dexam (
journal entry 7). Dexam won't take kindly to
Fzoul's words, and he'll blast Fzoul into a "heap of ash." That will cause Fzoul's bond
on your arm to fade, and since that will also make you worthless to Dexam, he'll order
his minions to kill you, and then he'll leave. So your goal in the cave is to track down
and kill Dexam (#8) and then to escape (Exit A).
Note: It is not safe to rest in the room where you start, and, in fact, you'll probably have
a battle each step of the way as you head for one of the room's exits.
2 - Ogres
You'll face a dark elf lord and a group of ogres in one of these two spots (and randomly
elsewhere).
3 - Otyughs
You'll face half a dozen otyughs in one of these two spots (and randomly elsewhere).
4 - Dead Elf Fighter
If you "examine remains," you'll find a leather pouch containing a map (
journal entry
59) and some random treasures. The pouch is trapped, but one of your characters might
notice and be able to disarm it. Once you've picked up the map, you'll be able to use the
"area" command to see your surroundings.
5 - Minotaurs and Priests
You'll face minotaurs and priests in one of these two spots (and randomly elsewhere).
6 - Gryphons
You'll face a dark elf lord and a bunch of gryphons in one of these two spots (and randomly
elsewhere). The more northern of the two options is the easiest to defend.
7 - One-way Teleporter
The teleporter will take you to #4, and it will damage you in the process.
8 - Dexam
In one of these two places you'll run into Dexam (who is a beholder), the hooded woman (who
is a medusa), and a bunch of minotaurs. Dexam casts a variety of annoying spells, and he
and the medusa can kill characters outright. Worse, Dexam, who is the more dangerous of the
two, can't be hit by spells, and hitting him won't disrupt him from casting. Plus, the
minotaurs will probably do a good job of blocking your melee fighters from reaching him.
So what should you do? Well, obviously, you should cast buffing spells -- like "bless,"
"prayer," "enlarge," and "haste" -- before the battle starts, and then you should try and
clear a path to Dexam as quickly as possible. With buffed up fighters, and a "fireball" to
help clear the way, you should be able to reach and kill Dexam by the end of the second
round. Then it's just a matter of hoping Dexam doesn't kill anybody in the round or two
that he casts spells. This is random, so you might need to do a lot of loading to get the
battle to go your way.
Once the battle is over, you'll find some random treasures on the corpses, and you'll also
pick up the Amulet of Lathander, a quest item that won't show up in your inventory.
Note: Fighting Dexam in the room (the most western of the two options) rather than the hall
works better, because your enemies will be more spread out, and it'll be easier to move
through the minotaurs to reach Dexam.
9 - Minotaurs and Priests
You'll face minotaurs and priests in one of these two spots (and randomly elsewhere).
10 - Manticores
You'll face a dark elf lord and a bunch of manticores in one of these two spots (and randomly
elsewhere).
11 - Minotaurs and Priests
You'll face minotaurs and priests in one of these two spots (and randomly elsewhere).
Exits:
-
Stairs to the Wilderness. When you leave the cave, Olive Ruskettle will appear and tell you
how "surprised" she is that you've survived. Well, thanks. Then she and Dimswart will leave.


