 Did we miss anything on this map? Is there something we didn't discover? Let us know!
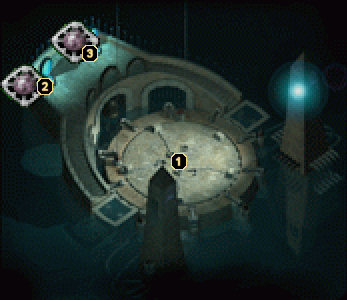
1 - Demogorgon
Did we miss anything on this map? Is there something we didn't discover? Let us know!
1 - Demogorgon
Your party will instantly feel the presence of a powerful entity when they arrive in this sealed prison and a telepathic conversation with the invisible being will occur. The Imprisoned One will try and convince you that the Knights of the Vigil sent you to your doom and that once you invoke the scroll to seal the prison, you will also be trapped here.
You basically have two choices. You can either believe the Imprisoned One and agree to help him carry out revenge on the false Helmites or you can accuse him of manipulation and enter battle instead. Which one you choose does not ultimately affect much, but unless your party is capable of destroying the most difficult monster ever introduced into a Forgotten Realms game, you'll probably want to side with the creature.
Assuming you've chosen the latter approach, the Imprisoned One will be pleased and allow your party to exit via area #3. When you return to Odren at the top of Watcher's Keep and tell him that the Imprisoned One has been destroyed, he and his companions will enter the dungeon to verify the claim.
When Odren and company enter the dungeon, a Ghostly Apparition will appear and confirm that the false Helmite had planned to seal you in the lower levels of Watcher's Keep along with the Imprisoned One. She'll also tell you that he did not tell you the scope of the evil that you would be dealing with... the Imprisoned One is actually Demogorgon, Prince of Demons.
At this point, the apparition presents you with three choices: you can simply leave and allow Odren to be slaughtered and Demogorgon to go free, you can show compassion and face Demogorgon to save Odren's life, or you can use a new ritual scroll that will seal both Odren and Demogorgon within the keep.
If you choose to leave, then Watcher's Keep is complete for you. If you choose either of the last two options, the apparition hands you the scroll so that you can always choose to seal Demogorgon inside rather than banishing the Prince to the Abyss. Your party will be awarded 25,000 experience points as soon as the new scroll is in your hands. If you ultimately decide that using the scroll is your best option, all doors into Watcher's Keep will be sealed and your party will earn an additional 80,000 experience points.
Keep in mind that you can always ignore all of these options and instead choose to face Demogorgon in battle. This will actually end up earning you even more experience than the non-combat approach. The two-headed Prince of Demons is very difficult, though, and can call a pair of demons to his aid at will. For help getting through this major battle, check out our
Strategy Guides section. When you've finally managed to send the Prince back to the Abyss, you'll be awarded 100,000 experience points (in addition to 36,000 experience points for Demogorgon himself). You'll also earn an additional 20,000 experience points when you return to Odren and report your success.
Congratulations on finishing Watcher's Keep!
2 - Exit
This portal leads back up to
the fifth level of Watcher's Keep.
3 - Exit
This portal leads out to the
Watcher's Keep perimeter.


