 Did we miss anything on this map? Is there something we didn't discover? Let us know!
1 - Arrival
Did we miss anything on this map? Is there something we didn't discover? Let us know!
1 - Arrival
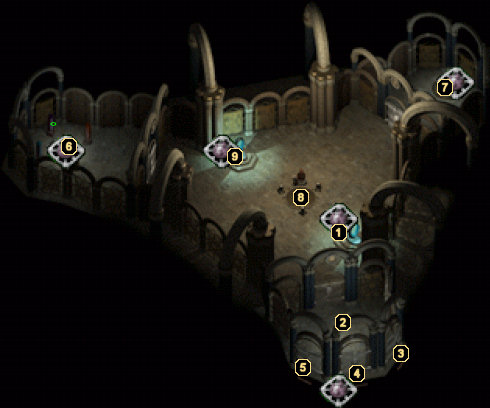
The entrance onto the fifth floor of Watcher's Keep is luckily very quiet and free of resistance. Your goal of this floor is to open the seal into the Imprisoned One's... well, prison. You can begin by speaking to the Helmite Ghost at area #2.
2 - Helmite Ghost
The ghost of a devoted Helmite appears in front of your party here and tells you that you must first pass three tests to prove yourself worthy. Accept his challenge, then begin with area #3, #4, or #5.
Once you have completed all three challenges, the Helmite Ghost will congratulate you one final time and reward you with the Heart key to the Imprisoned One's seal and an additional 10,000 experience points.
3 - Mental Challenge
The small room beyond this door houses an Imp whose sole purpose is to challenge you mentally. His first attempt is a riddle involving a number of brothers and sisters, which you can answer correctly by stating "Seven." This will earn your party 10,000 experience points.
His second challenge is a game of coins. He'll present you with eleven coins and you must take turns removing 1, 2, or 3 coins. Whoever takes the last coin loses. To outsmart the Imp, start off by taking two coins (he'll grab one), follow it up by taking three coins (he'll take three as well), and then finish the match by taking one coin (leaving only one left for the Imp). This will earn your party 10,000 experience points.
At this point, the Imp will teleport away and the Helmite Ghost will appear in its place to congratulate you. A final reward of 21,000 experience points will be given to your party, after which you can loot the three containers in the room for some magical ammunition and other minor treasure.
4 - Courage Challenge
This doorway leads into a large chamber similar to the one Lord Jierdan Firkraag resided in back in the Windspear Hills, so you can about imagine what's ahead of you. When you reach the back of the chamber, you'll encounter a large Green Dragon. The dragon will indulge you with a short bit of dialogue, then attack.
While he may not be as difficult as Saladrex, you'll still want to make any preparations you can to help turn the tide of battle. When the dragon finally dies, you'll receive 62,000 experience for the battle itself and another 21,000 experience to your entire party from the Helmite Ghost for completing the challenge. You can also loot the Warrior's Skull (needed for area #7),
Hindo's Doom +3, and 1500 gold pieces from the dragon's corpse before returning to area #2.
5 - Perserverance Challenge
A horde of Orc Warriors, Archers, and Mages await you behind this door. As you hack them down, more will continue to spawn into the room. After dealing with the Orcish horde for some time, the Helmite Ghost will appear to congratulate you for having great stamina and award your party 21,000 experience points.
Search the pool at the back of the room for a few stacks of magical ammunition and
Ixil's Nail +4, then return to area #2.
6 - Globe Machine
This strange contraption is composed of four colored buttons and pillars. Each time you press one of the buttons, a globe of the same color will be dispensed and you'll be forced to battle several foes.
The idea is to get a globe of each color and place it in its respective pillar. This essentially means that you only have to press each button once to get all the globes you need, but you can press each button up to four times in order to trigger the arrival of more foes to combat (it's good experience, after all). Additionally, the globes you don't need for the machine can be used to bestow temporary effects as if they were potions.
When you grow tired of fighting, place the four different colored globes into their designated pillars and the Mind Key will materialize. At this point, your party will receive 10,000 experience points and should have two of the three keys necessary to break the seal at area #8.
7 - Spirit Altar
After you've defeated whatever resistance awaits you in this room, place the Warrior's Skull (found on the Green Dragon's corpse at area #4) onto the altar. As soon as you do, your entire party will be teleported into some sort of Spirit dimension where they'll take control of a single Spirit Warrior.
You must navigate the Spirit Warrior through the twelve rooms of this dimension in order to obtain the final key to the Imprisoned One's seal. The whole level is set up like an old text RPG where you're given a short description of the room and can only choose simple search, attack, evade, or move commands. Navigating the entire level isn't all that difficult, but there is experience to be gained if you know where to look, so here's a helpful list of exactly what to do in order to maximize the rewards and make it through alive:
- Exit to the North
- Exit to the North
- Attack the Ghost
- Open the chest to obtain Helmet (4000 experience)
- Exit to the South
- Exit to the South
- Exit to the East
- Attack the Goblin
- Exit to the East
- Open the chest
- Attack the Skeleton
- Open the chest again to obtain Wand of Missiles
- Exit to the North
- Attack the War Dog
- Search the room to obtain the Iron Key and Blue Healing Potion (4000 experience)
- Exit to the West
- Search the room to obtain a Scroll with a Gibberling picture (4000 experience)
- Exit to the North
- Exit to the East
- Open the poisoned desk drawer to obtain the Combat Bracers (4000 experience)
- Exit to the North
- Use the Scroll with the Gibberling picture (4000 experience)
- Exit to the West
- Open the chest with Iron Key to obtain Blue Healing Potion
- Go through the ominous archway
- Pass through the arch and enter the crypt
- Use the Wand of Missiles
After the Spirit Warrior strikes down the Mummy, you'll be awarded 21,000 experience points and returned to the altar where you can once again resume full control of your party. If you already obtained the first two keys, you're now free to open the seal to the Imprisoned One with the acquisition of the Spirit Key.
8 - The Imprisoned One's Seal
In order to break the seal to the Imprisoned One, you must first obtain the Heart, Mind, and Spirit Keys from areas #2, #6, and #7 (respectively). Once you have all three keys, place each one into the three locks surrounding the symbol of Helm on the floor. You'll be awarded with 20,000 experience points for each inserted key, for a total of 60,000 experience points.
After you've inserted the keys, you must then turn each one. Make sure you're prepared for battle before turning any of them, though! Each time one of the keys is turned, you'll be faced with a very difficult battle. Starting with the right pedestal and moving clockwise, the battles get increasingly more difficult.
Unlocking the right pedestal teleports in five Ferrumach Rilmani priests and one Aurumach Rilmani mage. The mage is capable of casting Time Stop and other devastating spells, so focus on him first. Once he goes down, the priests can be dealt with easily. When all six Rilmani have been dealt with, grab the
Club of Detonation +3 from the mage's corpse and proceed to the next pedestal.
Unlocking the lower pedestal teleports in a Lich by the name of Azamantes, as well as three Flaming Skulls. The Lich is just as wicked as the Aurumach Rilmani mage you dealt with earlier and the Flaming Skulls will pound your party with Fireballs. To make matters worse, each time you kill a Flaming Skull, it explodes into one final Fireball that can inflict some serious damage. If you prepare your party with plenty of fire protection items and spells beforehand, the fight can be done without any casualties. Search the Lich's remains once he falls to find a
Serpent Shaft and an
Erinne Sling +4, then move on to the final pedestal.
The foes that appear after unlocking the far left pedestal are some of the toughest you'll meet in Baldur's Gate II. Prepare as best you can with any protective and enhancements spells you have at your disposal, then save your game before the hell starts. As soon as you turn the key, an entire group of baddies descends upon you, including Nalmissra (a level-draining succubus), Y'tossi (a scimitar-wielding demon), Hive Mother (a nasty Beholder), Xei Win Toh (a dual-wielding Fighter capable of using Whirlwind Attack), Ameralis Zauviir (a highly proficient Cleric), and The Huntress (an Archer with a crazy powerful bow). For help getting through this this difficult battle, refer to the Nalmissra page under our
Strategy Guides section. In addition to gaining over 160,000 experience points from the battle, your party can also loot a Scroll of Wish from Nalmissra, some
Gauntlets of Extraordinary Specialization and a
Rogue Stone from Y'tossi, a Scroll of Summon Nishru and 1230 gold pieces from Ameralis Zauviir, and
Taralash +4 from The Huntress.
Once you have successfully defeated all of the seal's protectors, turn the wheel near the symbol of Helm to open a portal to
The Imprisoned One.
9 - Exit
This portal leads out to the
Watcher's Keep perimeter. Make sure you stock up on supplies before facing this level's major foes and before confronting The Imprisoned One.


