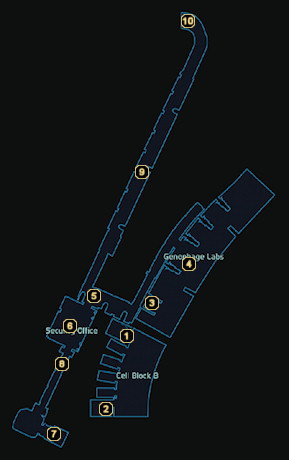
 Did we miss anything on this map? Is there something we didn't discover? Let us know!
1 - Arrival to Cell Block B
The only thing worth mentioning here is Menos Avot, a Salarian Commando in the second cell. He seems a little crazy, but you can let him out anyway for several Paragon points. Once he's free, all the cells open and you'll be forced to fight Menos and three other Indoctrinated. Oh well, at least they're harmless.
2 - Exit to Storage Room
These stairs will bring you down to the storage room on the
Virmire: Base Entry map.
3 - Arrival to Genophage Labs
Having taken the elevator on the
Virmire: Base Entry map, you'll reach the facility's main laboratory.
4 - Doctor Droyas and Company
Your arrival in the labs will be met with hostility from a Krogan named Doctor Droyas, an Asari Scientist, and some Husks. Loot the wetware kit and upgrade kit near the elevator and the medical station at the far end of the room once they're all dead.
5 - Geth Troopers
Two Geth Troops stand guard outside the security office.
6 - Rana Thanoptis
Rana is an Asari neurospecialist who helped Saren administer his indoctrination to prisoners. She's not stupid, though - she knows it's just a matter of time before she winds up getting her brain dissected too. To persuade you to let her go, she opens the door to the south leading into Saren's private lab and promises you access to all of his private files.
Unfortunately, letting her live has no rewards, though executing her is worth several Renegade points. When Rana is gone or lying on the floor in a pool of blood, plunder the secure weapon locker and keep moving toward the south.
7 - Exit to Communication Tower
Take this elevator up to the top of the communication tower, where you'll discover another Prothean beacon. Approach its communications panel and Shepard will once again levitate in the air as visions of the extinct species floods his/her mind. This time, however, our protagonist is actually able to open their eyes and see the images more clearly. Perhaps that means that more information will be gleaned from the exchange than last time...
When you're finished with the device, move up the ramp to find yourself in a conversation with a holographic projection of Saren's ship, Sovereign. As it turns out, Sovereign is not just a ship - it's an actual Reaper. After addressing your squad as "rudimentary creatures of flesh and blood", it will belittle the existence of organic creatures while also revealing plans to eradicate your civilization as the Reapers have done countless times before. You'll also learn that the Citadel and the mass relays were not constructed by the Protheans, but instead by the Reapers themselves to ensure that each society develops along the path they desire.
After quizzing Sovereign about the Reapers' origin and motives, the machine declares that he is "the vanguard of your destruction" and goes quiet just as the tower's windows shatter around you. Joker notifies you that Sovereign is headed your way, so it's time to move. Head back down the elevator and continue following the pathway to the north.
8 - Geth Destroyer
A Geth Destroyer guards this platform when you return from the communication tower.
9 - Krogan Warriors
When the drawbridge lowers after your return from the communication tower, you'll have to face three Krogan Warriors along this pathway.
10 - Exit to Main Level
Passing through the door at the end of this curved hallway will bring you to the
Virmire: Base Main Level map.