 Did we miss anything on this map? Is there something we didn't discover? Let us know!
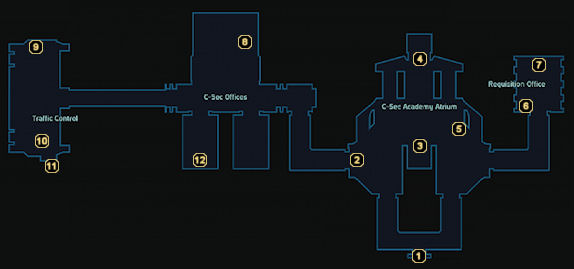
1 - Arrival
Did we miss anything on this map? Is there something we didn't discover? Let us know!
1 - Arrival
If you've been following the walkthrough so far, then this elevator will mark your arrival at the C-Sec Academy from the
Citadel: Lower Wards map.
2 - Urdnot Wrex
Wrex is the Krogan bounty hunter that the Shadow Broker hired in retaliation against Saren and Fist's betrayals. As you wander nearby, you'll witness a few C-Sec Officers harassing him for making threats toward Fist. He brushes them off, then approaches you out of curiosity. When he realizes that you're going after Fist too, he offers to join your squad. Take him up on his offer -
Urdnot Wrex is arguably the toughest fighter you have access to throughout the game.
3 - Exit to Docking Bay
Not only is this elevator the only means up to the Normandy's docking bay, but it's also where you'll pick up Garrus and Wrex on your way to leave the Citadel if you missed the opportunity to add them to your squad earlier. There's just no leaving either of them behind.
4 - Exit to Presidium
The north elevator here will take you up to the platform below the embassies on the
Citadel: Presidium map.
5 - Citadel Rapid Transit (C-Sec)
Public transportation is important to the galactic community, so the fine people of Citadel Station have installed these nifty vehicles to quickly transport you to any of the station's major locations. You'll have to discover each one on foot first (or obtain a quest directly related to the location), though, otherwise the transit vehicle won't allow you to choose it as a destination.
This particular destination will be labeled as "Wards Locations - C-Sec" if you need to travel here from one of the other transit vehicles.
6 - Keeper #18
This is yet another of the 21 different Keepers that are part of Chorban or Jahleed's "Citadel: Scan the Keepers" assignment. Scan it to earn some extra experience points and credits.
7 - C-Sec Requisition Officer
As with the Alliance requisition officer on the Normandy, you'll most likely be paying more than a few visits to the C-Sec requisition officer during the game. The stock he allows you to purchase from is dependant on whether or not you're a Spectre, though he will always carry both tiers of "Spectre - Master Gear" once you've nabbed the game's Rich achievement and are of sufficient level. You'll also want to pick up his Grenade/Medigel Upgrades and the
Aldrin Labs License,
Ariake Technologies License, and
Kassa Fabrication License once they're available.
8 - Jahleed
You'll stumble upon a Volus scientist named Jahleed talking to a C-Sec officer here. Jahleed has been working alongside Chorban (the guy you nabbed the "Citadel: Scan the Keepers" assignment from) recently, but now he suddenly thinks that Chorban wants to have him killed. He seems really paranoid and even claims that Chorban has been following home, so it might be worth checking out. Offer to help him and you'll receive the "Citadel: Jahleed's Fears" assignment.
After speaking with Chorban about the situation down on the
Citadel: Lower Wards map, you can accuse Jahleed of lying to you earlier. He claims to have thought that Chorban would kill him to get the Keeper data that he's been analyzing. Convince him that it's in their best interests to stop fighting and he'll respond with "if Chorban can forgive and forget, so can I." With that, he goes off to continue analyzing data and you receive some experience and credits for playing your part.
It's also worth noting that you can technically deal with Chorban and Jahleed in an opposite fashion by talking to Jahleed first. In that case, you'll wind up receiving the "Citadel: Scan the Keepers" assignment from Jahleed rather than Chorban.
9 - Keeper #19
This is yet another of the 21 different Keepers that are part of Chorban or Jahleed's "Citadel: Scan the Keepers" assignment. Scan it to earn some extra experience points and credits.
10 - Tracking Terminals
The three tracking terminals along the east and south wall can be inspected to unlock the
Starships: Cruisers,
Starships: Fighters, and
Starships: Frigates codex entries.
11 - Weapons Locker
Take a closer look at the fifth locker from the left to unlock the
Small Arms codex entry.
12 - Detective Chellick
Chellick only shows up in this office after your quick encounter with him in Chora's Den during the "Citadel: Rita's Sister" assignment. Speak to him about Jenna's position as an informant and he'll mention that there's something you might be able to do "if you're so concerned about her safety." If you have a sufficient amount of Charm or Intimidate, you can feed him the "You don't need her" or "Pathetic" dialogue options. Either will convince him to take Jenna off the case immediately and award you with Paragon or Renegade points, respectively. If you can't issue either of these lines, then you'll have to give him the "What do you need?" option.
In that case, Chellick tells you that he's trying to track down an illegal arms producer but doesn't have any of their product. He needs you to go to a seller named Jax in the lower markets area of the
Citadel: Lower Wards map (area #19), purchase some illegal mods, and bring them back. He also points out that you shouldn't give Jax any reason to think C-Sec is involved or you'll ruin all of Chellick's other leads.
After completing the task, Chellick will either be very angry (if you killed Jax) or appreciative (if you brought the goods back). The former approach will earn you Renegade points, while the latter approach will earn you Paragon points and an extra reward. Since Chellick has more than enough evidence, he gives you one of the upgrades as part of your payment. In either case, he immediately cuts Jenna loose from her dangerous job in Chora's Den.


