 Did we miss anything on this map? Is there something we didn't discover? Let us know!
1 - Arrival
Did we miss anything on this map? Is there something we didn't discover? Let us know!
1 - Arrival
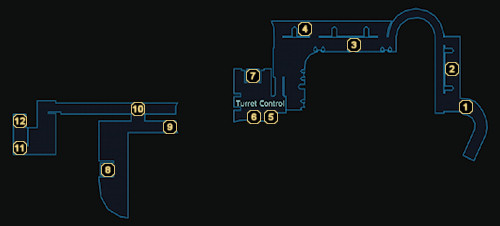
Finished with the
Virmire: Labs map, you're now ready to tackle the AA guns positioned atop the base.
2 - Loot
This small landing is home to a crate, a secure crate, and a locked crate.
3 - Geth Resistance
As you press closer to the AA guns, a Krogan Warrior, Geth Stalker, and three Geth Rocket Drones will attempt to slow you down.
4 - More Loot
Check this secure crate and upgrade kit for some more valuables.
5 - Supply Container
Might as well grab the contents of this container before continuing.
6 - Turret Controls
Deactivating the first turret atop the base earns you some experience and Omni-gel, but it also triggers the approach of a Geth Rocket Trooper and Geth Shock Trooper from the path you just came from (area #3). Additionally, a Geth Shock Trooper and two Geth Troopers will suddenly appear inside the elevator at area #7. Slay them all.
7 - Elevator to Krogan Breeding Grounds
Grab the contents of the secure weapon locker around the corner, then take this elevator to the eastern side of the
Virmire: Krogan Breeding Grounds map.
8 - Elevator to Krogan Breeding Grounds
You'll be coming up this elevator from the west side of the
Virmire: Krogan Breeding Grounds map in an attempt to save either Ashley or Kaidan from an attack by the Geth at the second AA gun.
9 - Crate
No decryption is necessary to ransack this crate.
10 - Pivotal Point
When you reach the top of this ramp, a Geth dropship will approach and set down at the bomb site. The squad member in charge of the nuclear device is worried that the Geth will kill them before it can be triggered, so they immediately activate the nuke.
Welcome to the game's toughest decision. You can either continue to the west and go help the squad member pinned down with Kirrahe at the AA gun or you can backtrack and save the squad member in charge of the nuke. The squad member you lend your aid to will survive - the other will not. The only thing you can do is offer some words of encouragement (or be smug) to the person you're leaving behind to earn a couple of Paragon or Renegade points.
11 - Aid Station
Make sure your Medi-gel stock is full. You may need it when you get to the roof.
12 - Exit to AA Tower
If you're heading up to the roof to save the squad member with Kirrahe, then this is the elevator you'll need to take. Once you're on the roof, you'll have to deal with three Geth Shock Troopers and two Geth Destroyers. After bringing them down, a cutscene will commence showing Saren himself dropping down onto the roof from his personal hover vehicle.
You'll exchange a few words with Saren about his alliance with the Reapers, but unfortunately he won't listen to reason. He firmly believes that surrendering to the Reapers will ultimately save organics, though it's obvious that Sovereign's indoctrination has gotten the best of him now. After indulging him with a bit more conversation about the Geth and the Conduit, you'll be offered a chance to persuade him with Charm ("Join me.") or Intimidate ("Sovereign will betray you."). Neither of these persuasion methods are enough to counter Sovereign's mind control, though, so a battle ensues.
This really isn't a difficult fight. Simply avoid Saren's attacks and repeatedly fire at him (or use biotic or tech abilities) until his health drops below half. At that point, a cutscene will show him jumping back off his hovering vehicle and picking you up by the neck. The alarm on the nuclear device back at the bomb site will sound, giving you a chance to punch the rogue Spectre in the face and avoid his wrath. With that, Saren escapes and your team boards the Normandy only to watch as the nuclear explosion back on Virmire kills the squad member you left behind.


