 Did we miss anything? Is there something we didn't discover? Let us know!
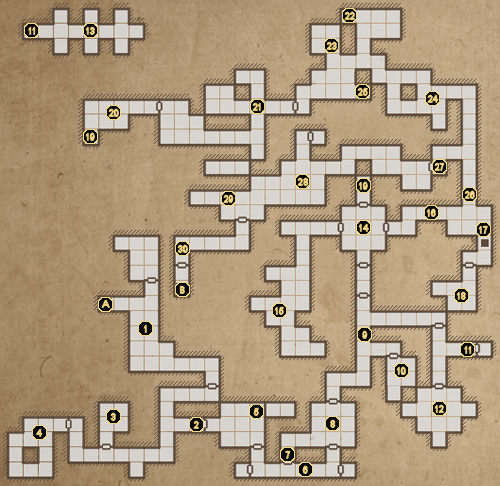
1 - Arrival
Did we miss anything? Is there something we didn't discover? Let us know!
1 - Arrival
The Old Tunnels is where the game begins to open up and stops holding your hand. Enemies are stronger, supplies aren't quite as easy to come by and the puzzles get tougher. You've also probably figured out the basics by now, so this guide will stop covering every single enemy you'll find and highlighting every door to open... you've got this far, after all, and things are going to get a lot tougher from here. Onward!
Upon entering Level 2, you'll notice a room to the north, behind a gate. If you fell down a pit on Level 1, you might have already been here and claimed the items. If not, head inside to claim a Rock and Peasant's Cap.
2 - Locked Door
This door is locked tight. You'll need the Iron Key from (3) to get past it.
3 - Supplies
Check the floor of this room for a Doublet, Silk Hose, a Dagger, and some Mole Jerky.
4 - Key Room
In this room, you'll come across a new type of Herder, a Small Herder. These mushroom-men may look less threatening than the larger ones you've seen before, but have a ranged poison bolt attack. Be sure to keep your distance and dodge out of the way.
On the floor of this room, you'll spot several pieces of equipment: a Machete, your first Sword-type weapon, a Compass, which always points north (handy if you are playing without the automap, or just keeping your bearings in general), and the Iron Key needed to open the door at (2).
5 - Secret Room
A little ways past the door at (2), you'll come across a room with some runes on the wall. Reading them suggests there is something to the left... but what? Take any old torch and slot it into the holder on the wall, and you'll open up a secret room containing an Iron Basinet. This helm requires Heavy Armor Proficiency to use properly, so you might want to hold off on wearing it for now.
6 - Locked Door & Cell
You'll eventually come across another locked door guarded by a Giant Snail. Dispose of the enemy, and then turn your attention to the nearby cell. Don't see a key? Lift up the Sandmole Hide Vest on the floor (some decent low-level armor, provided you have Light Armor Proficiency), and you'll notice the Brass Key needed for the door is underneath. Grab it as well, and use it to open the door down the hall.
7 - Cell Secret
You might have noticed that the cell you saw at (6) contains some gear you can't access. Once you're beyond the door, head down the dead-end hallway to the west and check its north wall. You'll spot a hidden switch that opens the back wall of the cell, allowing you to grab three Poison Arrows.
8 - Locked Door & Floor Switches
To open this door, press both the floor switches by dropping some objects on them - there are plenty of Torches around that you can use.
9 - Hallways, Locked Gates & Crowern
On the other side of the door, you'll be attacked by a new enemy, the Crowern. Crowerns are savage bird-like beasts that move quickly and are able to dive aggressively at you. Try to move as much as possible to avoid taking too much damage.
The locked gates at the end of the hall require two Iron Keys to open. You can get one from the room at (10), and another from the Holding Cells area (13).
10 - "No Weapons" Room, Iron Key & Secret Door
Here, you'll come across a cell full of Giant Snails. The runic text on the wall says "no weapons allowed", so do what it says - put a weapon in the alcove opposite the gate (doesn't have to be one you have equipped currently), and it'll open. Destroy the Giant Snails and claim your reward, a Grim Cap and the Iron Key for the gate at (9).
Before moving on, search the walls carefully for a hidden switch. It opens a secret door to the Pointy Shoes, some Rogue-oriented footwear that improve the wearer's Dexterity.
11 - Holding Cells
Head through this portal to reach the Holding Cells area (13).
12 - Skeleton Warrior Ambush
Save before entering this room. Inside, step on the floor switch and the door will shut behind you. The walls will then open one-by-one, each revealing a Skeleton Warrior to fight. Be sure to kill each as quickly as possible to avoid getting surrounded. Being trapped in a corner here could mean swift death. If you're having trouble here, you can drop an item on the floor switch from outside, and take on the Skeleton Warriors one by one.
When the enemies are all dead, search the new alcoves that have opened for some items - a Tattered Cloak, Bone Amulet (hold on to this for later!) and a Scroll of Ice Shards. Ice Magic is some of the most potent in the game, as it allows you to freeze enemies solid. When you're ready to leave, flip all three switches in the room to unlock the gate.
13 - Holding Cells
The Holding Cells are locked, but you can still get to what's inside them. There are two switches on the walls in the area, which temporarily turn on some portals. The portals "juggle" the contents of each room back and forth. Simply hit a switch until you see the Sack from one of the cells appear at the east end of the hall (although keep on guard, as you'll likely also release the Skeleton Warrior in one of the cells).
Once you have the Sack, open it in your inventory to claim some Pitroot Bread, a Leather Cap, and an Iron Key needed for the gates at (9). The Sack is also useful to hold on to, as it adds to your inventory slots (though it adds some extra weight). To leave the Holding Cells, use the portal at the west end of the hall.
14 - Crystal of Life & Gate
Sweet respite at last! If you lost some party members to the monsters in this area, the Crystal will revive them. From here, you'll notice there are three gates in the room, and two keyholes. You'll need to grab the keys from the west (15) and east (18) areas to open the north gate forward. Once it's open, take the portal at (19).
15 - Switch Room & Brass Key
In this area, after battling through a couple of Crowerns, you'll find yourself at a dead end... or so it seems. Check the south end of the hall to find a switch on the wall, next to a torch. Pressing it will open another alcove just to the north. Check there for another switch, which will open yet another wall. Defeat the Crowern inside, and press the third switch in there to open a final room at the south end of the area. Check the floor in there to find a Brass Key needed at (14), as well as a Throwing Knife.
16 - Portal
This portal will constantly teleport you back to the entrance of the hall. You can disable it temporarily by pressing a hidden switch on the wall behind you. To make it in time, you'll need to run backwards, as turning around will eat up a half-second or so on the timer.
17 - Pit
To cross the pit, throw an item on the floor switch at the other side. At the bottom of the pit, should you fall, you'll find a Grim Cap on the floor and a portal taking you back up to Level 2.
18 - Supply Room & Brass Key
You'll find the second Brass Key needed at (14) in an alcove in this room, along with a Hand Axe and some Cave Nettle on the floor nearby. Keep an eye out for a pesky Crowern lurking in the shadows.
19 - Portal
Once the gate at (14) is open, this portal will take you deeper into the dungeon.
20 - Locked Gate & Scroll of Poison Bolt
This gate can be opened by pressing a hidden switch on the hallway wall. Before exiting, be sure to grab the Scroll of Poison Bolt in the alcove on the wall back near the portal.
21 - Hallways & Herder Ambush
Clear this area of Herders, and then search the north end to find some Pitroot Bread on the floor. Head back to the eastern door, and prepare for a fight. The switch on the wall will open the door in front of you, but also the wall behind you, and two Herders (one small) will sling toxins at you. Your best bet is to press the switch and run back towards the west, then take them out one by one.
Before passing through the now-open door, take a look at the new room that opened up to the west. Inside, search the floor thoroughly to find a Sling (it's a bit hard to spot), which can be used to throw Rocks at enemies for even more damage.
22 - Lever & Brass Key
Check the north end of the Herder-infested tunnels for a Brass Key on the floor, near a torch - it's needed for the keyhole at (24). There's also a lever here, which opens a secret room at (23).
23 - Secret Room
After flipping the switch at (22), the wall here will open up to reveal a secret room. Destroy the Herders inside and claim your reward: a Phalanx Helmet, Leather Pants, a Tar Bead, and a Skull. The Skulls in the game are unique in that there are only a handful of them, and, if you have a Minotaur with the Head Hunter trait, he or she will get a damage bonus for each one carried.
24 - Keyhole Room & Treasure Switch
Search the floor of this room for a Grim Cap, Cave Nettle and Nomad Boots. The keyhole on the wall can be opened with the Brass Key from (22), revealing the way forward.
Before going on, search the wall to the south, behind the central pillar, and look for a hidden switch. Pressing it will open up a secret room containing the first of the game's Treasures, the Golden Chalice (25).
25 - Treasure (Golden Chalice)
By pressing the hidden switch near (24), you'll open a secret room here. Inside, you'll find the Golden Chalice, one of the game's seven
Treasures. Who said there was no fortune in dungeon-delving?
26 - Lever & Hidden Door
The lever on the wall here will grant you access to the previous areas of the Old Tunnels.
27 - Switch Door
Take the door to the west of this hallway to proceed onward - you need to stand on the floor switch to open it, and there's a short delay between activating the switch and the door opening. When it does open, you'll likely attacked by a Skeleton Warrior on the other side.
28 - Crypt & Iron Door
Upon entering this area, you'll be attacked by a semi-new enemy: a Skeleton Warrior group! This is basically a formation of four Skeleton Warriors acting as one unit - they all take damage individually, which means spells and certain melee can hit more than one in the formation.
After defeating the monsters, examine the north end of the room to find another demonic statue, a floor switch, and an Iron Door, the second one in Mount Grimrock. The clue on the wall suggests that patience is the key. To open the Iron Door, you'll simply need to stand on the switch for about 15 seconds. Back away quickly once it opens, however, as another Skeleton Warrior pack will attack as soon as it does. Destroy the beasts, then check inside the room for three Fire Bombs.
29 - Secret Room
Yet another secret awaits you here. Check the wall at this spot for a hidden switch - pressing it will open the wall to your left, revealing a Skeleton Warrior ready for battle. Defeat it, then head inside to find a Wooden Box (another storage container, like a Sack, but heavier and with more space), which comes pre-packed with a Healing Potion, a Leather Brigandine, and a Scroll of Poison Shield. Not bad at all.
30 - Gate
You're at the end of the Old Tunnels! To open the gate forward, remove the Torch from the wall sconce.
Before heading off, be sure to grab the Sack from the nearby cubby-hole - it contains a scroll with a list of alchemy recipes (see our own
Alchemy Recipes page for details), a Mortar and Pestle (used to brew potions), two Flasks (for holding potions), Cave Nettle, and two Tar Beads. Note that this is the
only Mortar and Pestle in the game, so you'll definitely want to take this with you.
A - Stairs Up to Level 1
B - Stairs Down to Level 3


