 Did we miss anything? Is there something we didn't discover? Let us know!
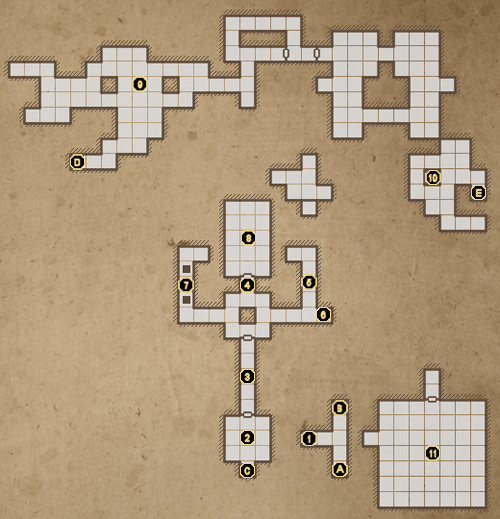
1 - Arrival & Note
Did we miss anything? Is there something we didn't discover? Let us know!
1 - Arrival & Note
When you first arrive at The Tomb, you won't be able to access anything but the stairs down to Level 12: The Prison (B). The sole exception is a note here, reading "this level is sealed." Continue on to
Level 12 for now.
2 - Tomb of Designers
After escaping
Level 12, you'll find yourself back on Level 11, in a place called the Tomb of Designers. What is this place? Head on forward to find out.
3 - Trapped Hallway
This hallway is a real nuisance. Stepping on the floor switch inside will fill the entire place up with poison gas, and it's unavoidable. To survive the ordeal, you'll want to keep your eyes open for three hidden switches, one on the southeast side of the hall and the other two at the north end. Trigger the trap and press them as quickly as possible, then run for the door to the north as it opens.
4 - Locked Door
So close and yet so far! This door is locked, and you'll need to make a brief diversion to find two Ornate Keys that open it up, found at (5) and (7).
5 - Trapped Hallway & Ornate Key
One of the Ornate Keys needed can be found just beyond this spot. That hallway of demon statues and floor switches sure looks suspicious though... probably because it is. Walking across the first time won't trigger anything, allowing you to grab the Ornate Key for (4) unhindered. However, leaving will cause them to unleash some deadly magic. To avoid taking damage, activate the switches on the way back by holding them down with objects.
6 - Goromorg Miniature
Look for a runic symbol on the wall right here and press the hidden button. You'll open a secret room right nearby containing the game's final
Treasure, the Goromorg Miniature! If you ever escape Mount Grimrock alive, you'll no doubt be rich.
7 - Throwing Puzzle & Ornate Key
There's a floor switch at the end of this hall, but how to reach it? The solution should be obvious - use a Throwing- or Missile-type weapon, whether that's a Rock, Quarrel or a Shuriken. Your timing will need to be precise because of the portal flickering on and off, but you shouldn't have much trouble.
Note that if you don't have any weapons that you can fire that far, you can still solve the puzzle. Move forward and fall down the pit in front of you, and toss an item of your choice forward before you go down the pit. If your timing is right, it will reach the switch.
Now, that's one part done. How to close the second gap? Look closely on the west wall for a hidden switch. Quickly run north when the portal is switched off, and hit the button on the wall to close the pit ahead. From there, you can grab the Ornate Key for use at (4).
Falling down the pit here will take you to a basement area on Level 12. There isn't much there other than a Shrakk Torr to kill and a portal taking you back to Level 11.
8 - Tomb & Weapon of Power
A lone Uggardian guards the Tomb of Designers. Destroy it, then turn your attention to the scrolls in the room. They mention a Weapon of Power that was forged to defeat the Undying (the machine on Level 12), and that it was used to dismantle it "piece by piece."
To find this weapon, you will need to look in the "shadows of the tomb" - by removing the Torch from the sconce on the wall, and turning off any light source you might currently have (remember that the Darkness spell cancels out the Light spell). Once you've done so, the Weapon of Power will appear on the altar before you! It's a magical device that fires lightning bolts, and while not terribly powerful or fast itself, it is capable of temporarily disabling the Undying.
When you grab the Weapon of Power, you'll also be fully healed and a portal will appear at the exit. Time to go back to
Level 12 take the fight to that hunk of junk!
9 - Level 10 Basement (Icefall Hammer)
This area is only accessible from Level 10.
10 - Level 10 Basement (Shield of the Elements)
This area is only accessible from Level 10.
11 - Fighter's Challenge
This area is where the Fighter's Challenge is held. See our
Level 6 walkthrough for more details.
A - Stairs Up to Level 10
B - Stairs Down to Level 12
C - Stairs Down to Level 12 (portal room)
D - Stairs Up to Level 10 (Caverns basement)
E - Stairs Up to Level 10 (Shield of the Elements basement)


