 Did we miss anything on this map? Is there something we didn't discover? Let us know!
Overview
Did we miss anything on this map? Is there something we didn't discover? Let us know!
Overview
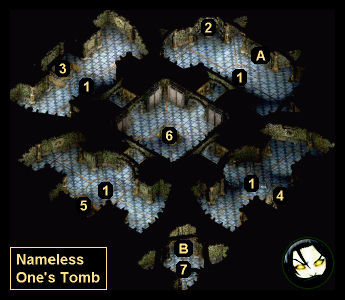
Your companions won't be able to enter this tomb with you, and when you go in, the exit door (Exit A) will close behind you, locking you inside. So you'll have to escape on your own. Luckily, this shouldn't be too difficult because the tomb's defenses were designed to accommodate you while hurting everybody else.
What you'll need to do is collect three tomb keys (#3-5). To get to them, you'll need to enter the central chamber (#6) from the starting chamber (Exit A). Each time you do this, you'll be teleported to the room with the next key that you need. However, re-entering the central chamber from one of the side rooms will just return you to the room you were in. To get back to the starting room, you'll need to stand on one of the major traps (#1). This will kill you -- but also heal you and drop you next to the entrance (Exit A).
After collecting the three tomb keys, entering the central chamber from the starting chamber won't teleport you anywhere. This will allow you to read the eight "diary entries" on the walls. The entries will give you some clues about yourself, including that there's a killer who keeps hunting you down. You'll also see the words "Don't trust the skull."
Each time you read a diary entry in the central chamber, you'll be allowed to press its panel into the wall. Doing this for all eight entries will unlock the sarcophagus in the center of the chamber. When you open it, you'll find
Tomb Key Four, and you'll also earn 2000 xp.
With four keys in hand, you should move from the central chamber (#6) to the third key chamber (#5). This will teleport you to the treasure chamber (#7), where you'll discover a big treasure box containing a
Corpse Fly Charm, an
Enchanted Battle Axe, a
Knot Charm, a
Heart Charm, a
Scroll of Ax of Torment, and a
Tear of Salieru-Dei.
Note: If you loot all of the miscellaneous dead bodies in the tomb, then you can also pick up an
Abyssal Pipe, an
Antler Axe, three
Bandages, a
Charm of Infinite Recall, and more.
Looting the treasure box will cause the exit portal (Exit B) to appear in the treasure chamber. Going through the portal will take you back to the
Drowned Nations, where your companions will rejoin you.
1 - Major Traps
2 - Inscription
This inscription will give you a clue for how to escape: "Seek the keys and embrace death with each that you find."
3 - Sarcophagus
Inside this sarcophagus, you'll find
Tomb Key One.
4 - Sarcophagus
Inside this sarcophagus, you'll find
Tomb Key Two.
5 - Sarcophagus
Inside this sarcophagus, you'll find
Tomb Key Three.
6 - Central Chamber
Inside the sarcophagus here, you'll find
Tomb Key Four.
7 - Treasure Chamber
Exits
- Entrance from the
Drowned Nations.
- Exit portal.


