 Did we miss anything on this map? Is there something we didn't discover? Let us know!
Overview
Did we miss anything on this map? Is there something we didn't discover? Let us know!
Overview
Note: The name of the brothel is a typo. It should be "slaking" (or maybe "sating") instead of "slating." Black Isle Studios noticed the error shortly before the game's release in 1999, but they never corrected it, and since the quirky title has remained a part of the game for so long, Beamdog decided not to correct it in the Enhanced Edition.
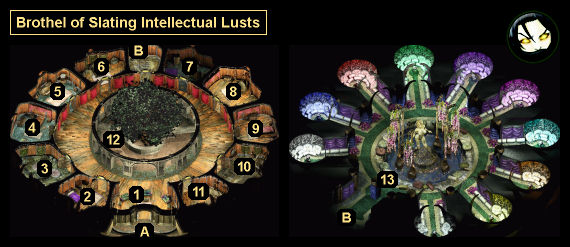
1 - Fall-from-Grace
Around this spot, you'll meet Fall-from-Grace, the owner of the brothel. She'll be intrigued by your plight, and if you ask her to join you, then she'll agree -- provided you talk to her ten students first. You'll find nine of the students on the main floor of the brothel (#3-11).
After talking to all nine students, when you return to Fall-from-Grace, you'll have to guess who the tenth student is. With enough Intelligence or Wisdom, you'll be able to figure out that it's you, which will earn you 3000 xp. Otherwise, you'll have to guess Luis (#2), which won't earn you anything. But either way, Fall-from-Grace will agree to join you, and you'll earn 20,000 xp.
2 - Vacant Room
Inside this room, you'll meet Luis, a creepy mage who has transformed himself into an armoire. He's involved in Vivian's quest (#6).
Also in the room, you'll find
Finam's Book in a nightstand. You might need to return this book to Finam the Linguist in the
Clerk's Ward when trying to decipher the
Dodecahedron from the
Civic Festhall.
3 - Juliette's Room
Inside this room, you'll meet Juliette. She'll tell you that her relationship with her fiance Montague is going too well, and that she'd like to experience some troubles. You'll have two ways to oblige her. You can pose as a rival suitor to Montague, or you can show Montague a fake
Love Letter to Juliette. For the latter, you'll find a
Love Letter in a locked bureau in Yves' room (#11), or you can purchase one for 100 (or 75) coppers from Scofflaw Penn in the Print Shop in the
Lower Ward.
You'll find Montague in the
Civic Festhall in the
Clerk's Ward. When you talk to him there, he'll believe your claim that Juliette is having an affair with you (if you're pretending to be a suitor) or somebody else (if you have a
Love Letter), and he'll decide to break off his engagement with her. You'll then automatically admit that your story is a ruse, and you'll suggest that Montague pretend not to be interested in Juliette any longer. Montague will agree to your plan, and you'll earn 10,000 xp in total.
When you return to Juliette, she'll be shocked to hear that Montague is bored with her, and she'll vow to set things right. This will complete the quest and earn you another 10,000 xp.
4 - Nenny's Room
When you first talk to Nenny Nine-Eyes, she won't have much to say to you. That's because she's too nice and doesn't like to say bad things about her fellow students. But after you've learned that Nenny might have information about Vivian's (#6) and Marissa's (#7) quests, you'll receive new dialogue options to teach her to be mean. You'll start out by encouraging her to insult you, and this will eventually lead to her hitting you. For showing Nenny how to reach her dark side, you'll earn 5000 xp, and she'll become much more accommodating with the information you need (see #6 and #7 for details).
5 - Ecco's Room
Inside this room, you'll meet a silent student named Ecco, who won't make much of an effort to communicate with you. If you ask the other students about Ecco, then they'll direct you to Dolora (#9), but Dolora won't tell you anything before giving you a quest. After completing that quest, Dolora will reveal that Ecco once wooed the paramour of the godling Paramisha, and that Paramisha in a jealous rage destroyed Ecco's voice. When you return to Ecco and ask her about her silence, she'll confirm this information.
So to help Ecco, you'll need to give her a new voice. You can find one for sale at the Curiosity Shoppe in the
Clerk's Ward -- the
Fiend's Tongue -- and it'll only cost you 66 coppers. However, when you give the tongue to Ecco, she'll begin speaking like a fiend, which won't suit her (or anyone) at all. But you'll remember another item of interest at the Curiosity Shoppe --
Deva's Tears -- and Ecco will give you a
Promissory Note so you can purchase it. Conveniently, the note will cover the cost of the item almost exactly, and you'll even get 1 copper back. Then when you hand over the tears to Ecco, she'll begin speaking normally, and you'll earn 30,000 xp for completing her quest.
Note: If you previously purchased the tears with your own funds, then you'll be able to ask Ecco for reimbursement, and she'll give you the
Promissory Note... which in this case you won't be able to do anything with.
With Ecco able to speak again, she'll agree to answer your questions, and when you ask her about Ravel Puzzlewell, she'll reveal that Kesai-Serris (#8) is one of Ravel's daughters. See Kesai-Serris' entry for more information.
6 - Vivian's Room
When you talk to Vivian, she'll tell you that somebody stole her personal perfume, and she'll ask you to find it. When you talk to Marissa (#7), she'll tell you that her
Crimson Veil is missing, too, and she'll task you with tracking it down as well. If you ask the other students about the perfume and the veil, then they'll direct you to Nenny (#4), who apparently is a snoop. After teaching Nenny how to be mean (see #4 for details), she'll reveal that she saw Marissa sneaking out of Vivian's room and Kimasxi sneaking out of Marissa's room.
When you ask Marissa and Kimasxi (#10) about their actions, they'll deny stealing anything, and Kimasxi will mention that somebody recently made off with some of her underwear, making it clear that there's one thief who has stolen multiple items rather than multiple thieves. If you ask Nenny about Kimasxi, then she'll tell you that she saw a man sneaking out of Kimaxsi's room, but that she never saw him leaving the brothel.
If you've talked to everybody in the brothel, then the culprit should be clear: Luis, the mage who is pretending to be an armoire so he can spy on the girls (#2). Of course, when you accuse Luis of the thefts, he'll indignantly deny it -- but he'll also begin rattling his drawers around, and you'll spot a
Scented Veil in one of them. You'll have three ways to retrieve the item:
- With Dexterity 16+, you can simply grab the veil during one of the brief times the drawer is open.
- With Strength 16+, you can muscle the drawer open and take the veil.
- Otherwise, you can repeatedly beg and whine, and then grab the veil when Luis yawns.
To complete the quest(s), you'll just need to return to Vivian and Marissa. The order won't make any difference. You'll receive 25,000 xp and +1 Charisma from Vivian, and 25,000 xp from Marissa.
7 - Marissa's Room
Inside this darkened room, you'll find Marissa hiding behind a partition. When you ask her why she's shut herself away, she'll eventually divulge that she's a medusa -- with snakes for hair and a glance that can transform living creatures to stone. She'll also mention that she's missing her
Crimson Veil, which normally allows her to move around and converse with people safely. Marissa's quest is actually the same as Vivian's quest (#6). See Vivian's entry for more information.
If you have the
Pet Lim-Lim from the merchant in the
Hive Southwest, then after completing Marissa's quest, you'll be able to ask her to turn the lim-lim to stone. This will convert the
Pet Lim-Lim into a
Stone Lim-Lim. The benefit of this transformation is that you'll be able to sell the
Stone Lim-Lim to Giltspur in the
Lower Ward for the password to Conall the Anarchist merchant, who works in the warehouse in the northern part of the
Lower Ward (which means you'll be able to use the merchant without joining the faction). Or you can simply sell the lim-lim to Giltspur for 75 coppers. The lim-lim won't survive the game regardless of what you do with it here.
8 - Kesai-Serris' Room
When you talk to Kesai-Serris, she'll tell you that she trades in dreams. However, if you mention that you've dreamed of Ravel Puzzlewell, then she'll clam up and change the subject. After completing Ecco's quest, you'll learn that Kesai-Serris is actually one of Ravel's daughters. However, if you ask Kesai-Serris about this, then she'll flat-out deny it -- although she'll admit that she doesn't know who her mother is.
To learn more about Kesai-Serris' parentage, you'll need ask the other students. Yves (#11) will encourage you to "dig deeply," but a few of the others will mention that Kesai-Serris and Juliette were once friends -- before Juliette fell in love with Montague. When you ask Juliette (#3) about Kesai-Serris, she'll reveal that Kesai-Serris and Kimasxi Adder-Tongue are half-sisters.
When you ask Kimasxi (#10) about the matter, she won't deny it. In fact, she'll tell you that she and Kesai-Serris share the same father -- a half-fiend called a cambion -- but have different mothers. When you return to Kesai-Serris with this news, she'll contact her father, and she'll learn that she is indeed a daughter of Ravel.
You won't receive a reward for proving that Kesai-Serris is a daughter of Ravel Puzzlewell, but you'll need to complete this step so you can meet Ravel yourself. See
Ravel's Maze for more information.
9 - Dolora's Room
When you talk to Dolora, she'll seem a bit cold, and she'll tell you that she specializes in games and debates. This will give you a chance to compete against her. With Intelligence 18+, you'll be able to beat her in a game and a debate, which will earn you 10,000 xp total. Otherwise, you'll lose in both, and you'll only earn 6000 xp total.
At the end of your conversation with Dolora, she'll ask you for help. She'll tell you that her first love Merriman holds the "keys to my heart," and she'll ask you to get them back. You'll find Merriman on the first level of the
Civic Festhall in the
Clerk's Ward. When you talk to him, you'll discover that Dolora was being literal. Merriman will explain that Dolora is a construct, and that he holds the actual keys for her heart.
When Merriman sees that you're interested in
Dolora's Keys, he'll make you a deal. He'll tell you that he's 150 years old and wants to forget what he knows so he can experience things anew. So he'll ask you to find something that can erase his memory, "like a draught of the River Styx." To help Merriman out, you'll need to use a
Frost-Ale Mug (acquired from the Drunken Mage in the
Clerk's Ward or from the Curiosity Shoppe in the
Clerk's Ward) with the "Dark Birds of Ocanthus" display at the Art and Curio Galleria (also in the
Clerk's Ward). This will give you a
Frost-Ale Mug with Dark Bird.
When you give the mug to Merriman, he'll quaff its contents and forget everything, but luckily he'll have a note with him informing him to give you
Dolora's Keys. When you deliver the keys to Dolora, you'll complete the quest and earn 30,000 xp, and Dolora will agree to answer any questions that you might have. You'll then need to ask her about Ecco to advance Ecco's quest (#5).
10 - Kimasxi Adder-Tongue's Room
Kimasxi is a talented insulter, and you'll be able to trade barbs with her. Kimasxi is also involved in Vivian's (#6) and Kesai-Serris' (#8) quests.
11 - Yves the Tale-Chaser's Room
You'll meet Yves here. She'll tell you that she trades tales with people. This will give you an opportunity to tell her about some of the things you've done, including waking up in the Mortuary, using the Dreambuilder in the Great Foundry, and working with Pharod. You can also have your companions relate stories. Each time you tell Yves a story, she'll tell you one as well, and you'll earn 500 xp.
Note: Morte's story is about you and Ravel Puzzlewell.
If you've met Yvana at the Art and Curio Galleria in the
Clerk's Ward, then you'll be able to ask Yves if they're related. She'll reveal that Yvana is her mother, but that the two of them no longer speak to one another. You won't get anything more out of Yves, but if you return to Yvana and tell her why Yves chases stories, then Yvana will agree to meet with her daughter again. Yvana will also regain her sight. However, you won't earn a reward for helping the reconciliation.
12 - Modron Trio
You'll meet three modrons here. If you have the
Modron Cube from the Curiosity Shoppe in the
Clerk's Ward, then you'll be able to ask the modrons about it, and they'll identify it as a portal cube. They'll also tell you that to use it, you'll need to manipulate its appendages in the right way. However, they won't know the right sequence for this or where the cube might send you.
After talking to the modrons, you'll be able to use the cube in your inventory and try to activate it. From the initial dialogue, you'll learn that you'll need to bend the left knee first. From there, you'll be told if your guess for the next appendage is right or wrong (by the sounds that the cube makes), so figuring out the correct sequence is just a matter of trial and error. Eventually, you'll discover that the full sequence is left knee, left wing, right wing, right arm. When you get it right, the cube will take you to the
Modron Maze.
13 - Brothel Caretaker
Somewhere around here, you'll meet the brothel caretaker. He'll inform you that the basement is where the students keep their sensory stones, or "diaries of a sort." He'll also explain that only the students can access their stones, so they won't be of any use to you.
Exits
- Exit to the
Clerk's Ward.
- Basement stairs. To use these stairs, you'll first have to detect the fake wall blocking their access.


