 Did we miss anything on this map? Is there something we didn't discover? Let us know!
Overview
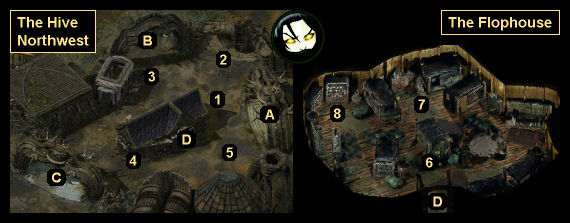
1 - Porphiron
Did we miss anything on this map? Is there something we didn't discover? Let us know!
Overview
1 - Porphiron
Porphiron will tell you that he is a highly trained fighter, but due to his discipline he was unable to defend himself against a group of thugs who stole his necklace of beads. Therefore, he will ask you retrieve the beads for him. You'll find the three thugs -- just regular Hive Thugs wearing red outfits -- loitering west of the Smoldering Corpse Bar in the
Hive Southeast.
When you talk to the leader of the thugs (in a bright red shirt), you'll have three ways to get Porphiron's
Prayer Beads from him:
- You can buy the beads for 15 (or 10) coppers. This will earn you 500 xp.
- You can kill the thugs for 65 xp each and take the beads from the leader's corpse.
- You can lie to the leader and tell him that Porphiron's order is looking for him, which will cause him to hand over the beads as quickly as possible. This will earn you 500 xp. From there, you can lie again and suggest that a donation might appease Porphiron's order, which will earn you an additional 10 coppers and 250 xp. Of course, lying so much will make you more Chaotic.
When you return to Porphiron, he'll ask you how you acquired the
Prayer Beads. What you say won't make any real difference, but if you lie to him about your actions then you'll become more Chaotic. For returning the beads you'll receive 1000 xp, and Porphiron will become a fighter trainer. He'll then be able to switch you to the fighter class, plus train your weapon proficiencies up to level two (out of five).
2 - Fleece
Here you'll encounter a shady fellow named Fleece, who will ask you for directions. He's actually a thief, however, and when you talk to him he'll pickpocket you. If you have Wisdom 13+, Pick Pockets 10+, or Annah in your party, then you'll notice the theft, and you'll be able to bait him into pickpocketing you again so you can watch his technique. This will give you a reward based on your attributes:
- For Wisdom 1-12 but Intelligence 13+, you'll gain 750 xp and +1 to Pick Pockets.
- For Wisdom 13-15, you'll gain 1000 xp and +3 to Pick Pockets.
- For Wisdom 16+, you'll gain 1250 xp and +5 to Pick Pockets.
At the conclusion of your encounter, if you spotted Fleece's thievery and if you have Dexterity 13+, then you'll be able to grab Fleece by the wrist before he can get away. If you also have Charisma 11+, then you'll be able to demand your money back, which will cause Fleece to give you 30 coppers -- which is more than he stole. If you only keep what he took from you, then you'll become more Lawful. If you attack him, then you'll become more Chaotic and Evil.
3 - One-Ear
One-Ear is involved in Nestor's quest (#8). If you insult One-Ear or accuse him of robbery, then he'll attack you, and he'll drop a
High Quality Stiletto and a
Small Steel Fork (which is what Nestor wants) when he dies.
4 - Mar
You'll meet Mar standing here next to some dead Lim-Lims. He'll ask you to deliver a box to Ku'atraa in the
Hive Southeast, and he'll warn you not to open the box or leave the Hive. If you accept this task, then Mar will hand you an
Ornate Box -- and proceed to run away giggling. You'll also feel "dread" coming from the box. Uh oh.
If you open the box, then you'll release a (lesser) Fiend from Moridor's Box. The fiend shouldn't be too tough to kill, and you'll earn 200 xp when it dies. You'll also find a (cursed)
Fiend's Blood Dagger on its corpse, and the ruby decoration from the box will fall into your hands. However, killing the fiend will end the quest, and you'll lose out on much better rewards later (see below), so this method isn't recommended.
When you take the
Ornate Box to Ku'atraa in his warehouse in the
Hive Southeast, you'll earn 250 xp, but Ku'atraa will react with horror when he sees what you have. He'll run away screaming, but not before telling you to take the box to Brasken in the
Hive Southwest.
You'll find Brasken in his kip on the western side of the district. He won't take the box off your hands, either, but at least he'll give you some useful information. He'll tell you that the box is cursed, and that the owner of the box will supposedly die if it's opened. He'll then suggest that you take the box to Shilandra in the
Hive Northeast since she's a previous owner and thus might know more about it. This conversation will earn you 250 xp.
You'll find Shilandra in her kip on the northern side of the district. She'll tell you that the box contains a fiend "of significant standing and power," but that she's not powerful enough to remove the curse from the box or defeat the creature. So like everybody else, she'll send you elsewhere -- to the cathedral in the middle of the
Alley of Dangerous Angles. This conversation will earn you another 250 xp.
At the cathedral, you'll meet Aola, a priest to the forgotten god Aoskar. He'll accept the box from you and banish the fiend inside -- and he'll accept
Moridor's Ruby from the box as your payment. This will earn you 1000 xp, and the fiend will end up in
Curst Gone, where you'll get a chance to fight it much later in the game. Defeating the fiend (if you can do it) will earn you 500,000 xp, and it'll drop the
Aegis of Torment when it dies.
Finally, when you return to Mar in the
Hive Northwest to "thank" him for giving you the box, you'll find him hiding in a small building just to the north of the Flophouse. There'll be some more dead Lim-Lims out front. If you allow Mar to explain his actions, then you'll receive a
Hollow Axe and 1250 xp. But if you're feeling more vengeful than that and decide to kill Mar, then you'll still get the axe, but you'll only earn 35 xp.
5 - Mhult
You'll find Mhult slowly wandering around the district looking for "deaders." If you talk to him, then he'll tell you about the Collectors, including the rivalry between Sharegrave and Pharod.
6 - Arlo
Arlo runs the Flophouse. He'll charge you 5 coppers to rest in it.
7 - Bariaur
Bariaur are centaur-like creatures. This one will sleep through the entire game.
8 - Nestor
When you talk to Nestor, he'll start raving about his stolen fork, and eventually he'll whip out a dismembered ear and demand that it bring his fork back. To track down Nestor's fork, you'll need to talk to One-Ear, who you'll find loitering to the north of the Flophouse (#3). If you insult One-Ear enough, or if you accuse him of stealing the fork, then he'll attack you, and he'll drop a
Small Steel Fork when he dies. When you deliver the fork to Nestor, he'll reward you with an
Obsidian Earring, and then he'll step through a portal (opened by the fork) and disappear.
Exits
- Exit to the
Hive Northeast.
- Exit to
Ragpicker's Square.
- Exit to the
Hive Southwest.
- Entrance to the Flophouse.


