Did we miss anything in this location? Is there something we didn't discover? Let us know!
Underground Ruins |
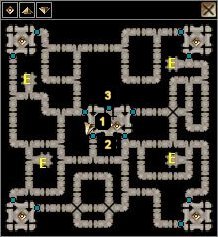
1 - MAZE EXPLANATION
There's a note among the remains of a goblin that tells you how to survive in the maze. Pull the lever in the main hall then follow the lights that correspond to the color glowing around it. Each time you do this, you'll be lead down a hall to a fight with an elemental. Winning the fight teleports you back to the lever, which you'll pull again to get the next color. Any elemental resistance potions or spells you have will be obviously be helpful.
2 - MAGICAL POOL
When you defeat all the elementals, you get a token that you can use in the magical pool to the south of the lever. Throw the token into the pool and the press one of the symbols. Doing so will create a stone that you can use to summon an elemental that corresponds to the symbol you pressed. You can also get two tokens, which allows you to press the four-element symbol and create a robe of elemental resistance, but you have to be able to cast cantrips. In order to do this, you have to cast the correct cantrip on one of the four elements found in niches outside the elemental's halls (marked with an "E" on the map). Cast Flare on the Waters of Wisdom, for instance. You can only get one extra token, so casting cantrips on the other three won't work.
3 - EXIT TO ANCIENT HALL
Once you've killed all the elementals, you can enter the Ancient Hall where J'Nah resides.
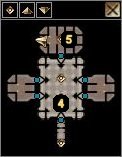
Ancient Hall |
4 - J'NAH AND FOLLOWERS
At the end of the hall, you'll get a cut scene of J'Nah and her followers communicating with a hooded figure. It seems she is upset that J'Nah made an enemy of the dragon and desperately wants an orb that J'Nah was supposed to obtain for her. J'Nah will deal with you if you agree to kill Tymofarrar. I wasn't strong enough to take her on myself at this point, but by using the powder on her and then stepping back and letting the gnolls do the muscle work, I was able to kill her and take her artifact (the dragon's tooth) and her Staff of Power.
5 - EXIT TO HIGH FOREST
J'Nah's familiar, a wisp, will teleport you back to the forest for a potion or a spell. A successful Persuade check will convince him to do this for free.
The phylactery of ice you either accepted or looted from J'Nah helps when you go back to the Nether Mountains to kill Tymofarrar. In fact, I didn't even take a scratch when I fought him because I had the amulet of cold resistance on when I polymorphed into the frost giant. Showing Deekin (the kobold hiding in Blumberg) Tymofarrar's head will get you the last artifact (kind of anti-climactic since you've just beaten down a dragon to get one, but who's complaining?). When you take the artifacts back to Drogan, he and Ayala decide that you should be the one to take the glowing orb from the tower statue to a man named Garrick, who will identify it. As luck would have it, the halfling caravan is headed in the same direction, so the chapter ends when you bum a ride with them.


