Did we miss anything in this location? Is there something we didn't discover? Let us know!
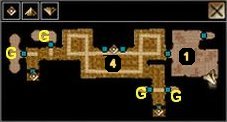
Undrentide North Fragment |
Ashtara fits you with a slave collar and releases you from the stone. Although you are his slave and he's motivated almost solely by greed, he inexplicably lets you keep your stuff and will even trade with you like a regular merchant. He's mainly interested in having you go around the temple killing golems, so that his other minions can loot the place (which you, of course, will do before he has the opportunity). On the maps of the fragments, "G" represents the location of one of the golems you have to destroy.
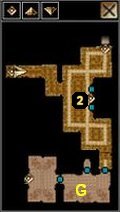
Undrentide East Fragment |
1 - GOLEM BUTLER
Going to the North fragment first is your best option, because there is a room with a golem butler who will tell you what you need to do to remove the magical protection around the room Huerodis is hiding in. He will also tell you where to get a ring that will make fighting all the other golems much easier. When you've killed all ten golems, Ashtara still won't remove the slave collar, but he will let you go look for the three winds you need to remove the protection around Huerodis.
2 - GREAT LIBRARY
Entrance to the Great Library.
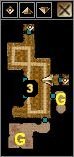
Undrentide West Fragment |
3 - ARCANIST'S TOWER
Entrance to the Arcanist's Tower.
4 - CRYPT TOWER
Entrance to the Crypt Tower.
5 - TEMPLE OF THE WINDS
Entrance to the Temple of the Winds. To actually ascend the levels of the Temple of the Winds, you'll need to get all three of the Winds from the three towers and place them in the ark you find when you use this exit. Note that you can take the winds out again after you remove the "force field" from the stairway and use them to buff up or cast spells in the fight agains Huerodis. The Dead Wind casts Animate Dead, the Dark Wind casts Darkness and Shadow Conjuration, and the Wise Wind casts Legend Lore and Owl's Wisdom.
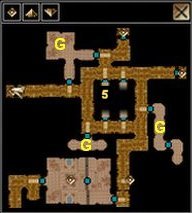
Undrentide Central Fragment |


