 Did we miss anything in this location? Is there something we didn't discover? Let us know!
Area Note
Did we miss anything in this location? Is there something we didn't discover? Let us know!
Area Note
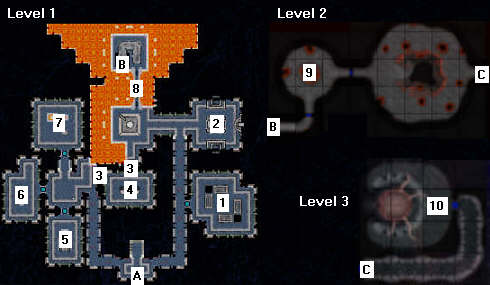
There are bouncing energy balls that make a circuit throughout the first level of the dungeon. It's possible to rotate some of the mirrors in the level to redirect the balls (into your enemies, for example), and, once you've reached the Illithid Control Room (#4), you can also turn the balls off.
Unlike the other dungeons in the module, you can rest here.
If you have Calibast with you, he might give you
Calibast's Ring. If you have Jaboli with you, she might give you
Jaboli's Amulet.
1 - Kobold Room
You'll find lots of kobolds here. A kobold thug will drop the
kobold key.
2 - Duergar Room
You'll find lots of duergar here. The duergar chief will drop the
duergar key.
3 - Secret Door
4 - Illithid Control Room
Here you can find a device to either turn off the bouncing energy balls or make them more powerful.
5 - Drow Room
You'll find several drow in here. A drow priestess will drop the
drow key.
6 - Orc Room
You'll find lots of orcs in here. An orc chieftain will drop the
orc key.
7 - Goblin Room
You'll find a bunch of goblins and hobgoblins here. A hobgoblin chieftain will drop the
goblin key.
8 - Locked Door
You'll need the five keys from the five illithid thralls (#1, 2, 5, 6, 7) to open the door.
9 - Old Friends
Here you'll find whichever two companions you didn't select to be henchmen. They'll attack you, but as soon as you've wounded one enough, they'll both stop. Then you can either kill them or allow them to flee the dungeon.
10 - Final Battle
You'll face an illithid and two intellect devourers here. Depending on how quickly and thoroughly you moved through the module, this battle can either be very easy or very difficult. If you find that you and your companions can't hit the illithid or the devourers, then loot the chests in the room. You'll find some magical weapons inside, including a
longsword +3 and a
dagger +3.
Once you've killed the illithid and exited the room where the final battle took place, the module will end.
Exits:
A. Exit to the Emerald Hills.
B. Stairs between levels 1 and 2.
C. Doorway between levels 2 and 3.


