 Did we miss anything on this map? Is there something we didn't discover? Let us know!
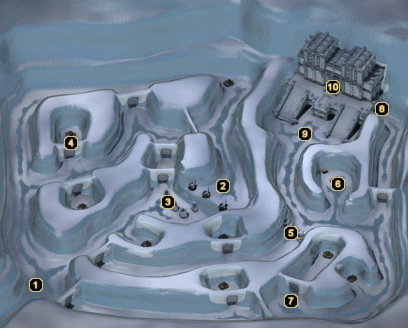
1 - Arrival
Did we miss anything on this map? Is there something we didn't discover? Let us know!
1 - Arrival
Upon entering the area you will watch a scene between some Barbarians and The Master of Locks will say something about "Nathaniel" waiting for your arrival. Then Barbarian Warriors and Aurilite Postulants will attack, who are pretty easy to kill. You will also see some Doom Guards walking around. They will not attack you at this time. Wandering through the passages are big black bugs called Remorhaz. They are pretty easy to defeat. You will also see some small pots that are trapped. All of the doors are locked and you cannot enter them yet. There are two notes on the floor that you need to collect. One from Zack asking to for help and another by Oria about the Queen Remorhaz and Crystal Golems.
2 - Ledge
On the way to the ledge you will have to fight a few more Aurilite Postulants and a Crystal Golem. The Crystal Golem can only be defeated with bludgeoning damage. At the ledge you will find more Aurilites, Frost Touches, and another Remorhaz. Some may be below the ledge and travel around to reach you. Use the levers to release rocks onto the frozen Neverwinter Soldiers.
3 - Frozen Neverwinter Soldiers
If you did not kill the Remorhaz watch for it as you travel back around to the frozen soldiers. Beside the broken ice of the soldier you will find a necklace. This necklace has a symbol of Auril on it. It will now allow you to open all of the locked doors. The Doom Guards will now attack you on sight. The only Doom Guard that can be difficult is Vrassillus. He is immune to bludgeoning damage.
4 - Aocha
Inside this room you will find a spider that is wearing a harness and seems to be tame. You can also loot the rest of the rooms.
5 - Queen Remorhaz
In this passage way is an Aurilite Postulant that is easy to deal with. At the end is the Queen Remorhaz and two Frost Touches. The Queen Remorhaz is immune to fire damage and most others. She will throw some magical balls at you and do a lot of damage. I used Chromatic Orbs and was able to use ranged weapons to cause her damage. The Frost Touches are easily dealt with. Beware that when the Queen dies she explodes into flames and destroys the ice wall behind her. When you enter through the broken ice wall you will be confronted by Lord Rengar. He will resist most spells. Lord Rengar will drop a long sword with 1+ cold damage.
6 - Necromancers
Two Necromancers are inside this room. Talk with them and say "Yes, you wish to serve." This will cause them to attack you. They use a lot of spells. Position your members before talking with them for easy kills. As soon as they attack a Crystal Golem will appear from a locked room. If you do not kill them now they will join in a battle later.
7 - Zack Bossenbury
As you round the corner in the passage to Zack you will encounter Ice Trolls. Leave your party members around the corner sending one to lure the Ice Trolls towards you. You can then use an Entangle or Web spell to stop the onslaught and focus on a few at a time. At the end of the passage you will find a Remorhaz that is sleeping. You can hear Zack yelling from inside. Kill the Remorhaz and Zack will appear. Tell Zack about Aocha, his pet spider and he ask you to share any knowledge you receive about the Ice Temple. You can purchase healing, spells and other items from Zack.
8 - Doorway
If you have any small party members they can squeeze inside the door and open it from the other side. This doorway leads into a room with Abishai inside. You cannot enter any other rooms from here, so you gain nothing by entering.
9 - Sherincal
Make sure your party is completely rested before proceeding down this passage; at the end is Sherincal. She tell you a lot of information that will be useful later. When you are done talking she will attack. She has Aurilite Postulant, Barbarian Shaman, Frost Touches and Soarsman with her. Sherincal will cast Fear upon your members, use a Remove Fear spell if you have one. She can do a lot of damage and resistant to a lot of spells and melee damage; Magic Missiles work well. She will move up the stairs where the Frost Touches are at. When you try to climb the stairs they will throw a switch and change them into ice ramps. You will have to use ranged weapons and spells to kill the Frost Touches and Sherincal. If you need to rest you can move back to Zack and they will not follow you. When you have killed them you will have to use a ranged weapon on the lever to change the ice ramps back to stairs. Sherincal will drop an Everlast Arrow, Winged Blight, and a Chromatic Orb Wand.
10 - Ice Temple Entrance
After collecting all of the loot and resting your party you are now ready to enter the Ice Temple.


