Banshee Network
 
Icewind Dale II
Game Information
Recent News
Walkthrough
Shapechange Tables
Character Information
Races
Classes
Skills
Feats
Ability Scores
Alignments
Equipment
Armor
Weapons
Miscellaneous Items
Spells
Bard
Cleric
Cleric Domain
Druid
Paladin
Ranger
Sorcerer/Wizard
Media
Screenshots
Cinematic Images
Loading Screens
Wallpaper
Other Artwork
Game Resources
Downloads
ID Revisited Interview #1
ID Revisited Interview #2
ID Revisited Interview #3
Icewind Dale II Interview
Icewind II Forum
Icewind II Products
Buy Icewind Dale II!
Site Features
Submit News
News Archives
Join Our Staff
Forums
Community Blogs
Reviews
Previews
Interviews
Editorials
About GB
Advertise With Us!
Advertisement
 

Barrow Wight - Fell Wood


Did we miss anything on this map? Is there something we didn't discover? Let us know!
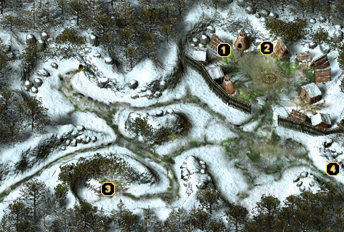

1 - Suoma

When you return to Suoma after completing the Missing Children quest she will ask you to assist Tahvo the Hunter.


2 - Tahvo the Hunter

Tahvo will tell you that a Barrow Wight is haunting the hunting grounds. They keep slaying it but, it keeps returning. He asks that you put the Wight to rest.


3 - Barrow Wight (Sordirskin)

The Barrow Wight will mistakenly think that you stole his horn and try to start a fight. Tell him that you will help him find it. Do not try to loot him; Wights will appear and attack you.

Return to the village and speak with Pairi. She will say that some explorers went into the Fell Woods and never returned. She says that they looked more like bandits.


5 - Exit to Fell Woods

You must once again travel to the Fell Woods. On the next map take the bottom left exit. You now need to travel the paths that lead to Carynara once again. If she did not tell you before how to travel farther into the Fell Woods speak with her again now. Be cautious of respawn.

Go to this section to traverse the Fell Woods to find Sordirskin's Horn.


Fell Wood - Sordirskin's Horn

Once you have found Sordirskin's Horn return to the Wandering Village map. Return the horn to Sordirskin. He will disappear and you can now loot his belongings. You will find chainmail armor, gold and Wight's Blade. When you return to the village Nym will say he is leaving and warns you about the Legion of Chimera. Tell Tahvo that the Barrow Wight is put to rest. Return to Suoma and she will give you the next quest: Kyosti's Ghost.

Walkthrough
Prologue
Targos Docks
Targos Caves
Targos Town
Palisade
Chapter One
Shaengarne River
Logging Village
Vrek's Cave
Shaengarne Ford
Shaengarne Dam
Shaengarne Bridge
Fortress Gate
Goblin Warren Level 1
Goblin Warren Level 2
Goblin Fortress Exterior
Goblin Fortress Interior
Chapter Two
Crash Site
Ice Temple Exterior
Ice Temple Level One
Ice Temple Level Two
Chapter Three
Wandering Village
Missing Children Quest
Fell Wood - Carynara
Barrow Wight Quest
Fell Wood - Wight
Kyosti's Ghost Quest
Fell Wood - Lights 1
Fell Wood - Lights 2
Fell Wood - Treants
Cold Marshes
Rivermouth Cave Exterior
Rivermouth Cave Interior
River Caves
Black Raven Gate
Chapter Four
Outside Monastery
Black Raven Monastery
Eight Chambers
Underdark Passages
Drider Lair
Z'Hinda Citadel
Outside Z'Hinda Citadel
Chapter Five
Kuldahar Pass
Hrothgar's Glen
Kuldahar
Jungles of Chult
Yuan-ti Temple
Jungles of Chult Return
Return to Kuldahar
Dragon's Eye Path
Dragon's Eye Level 1
Dragon's Eye Level 2
Dragon's Eye Level 3
Dragon's Eye Level 4
Holy Avenger
Return to Ice Temple
Fields of Slaughter
Fields of Slaughter Exit
Chapter Six
Severed Hand Entry
Severed Hand Level 1
Severed Hand Level 2
Severed Hand Level 3
Severed Hand Level 4
War Tower
Cleric Tower
Officer Tower
Wizard Tower
Tower Quests
Final Battle
 
 
      Copyright ©2000-2009, GameBanshee.com