 Did we miss anything on this map? Is there something we didn't discover? Let us know!
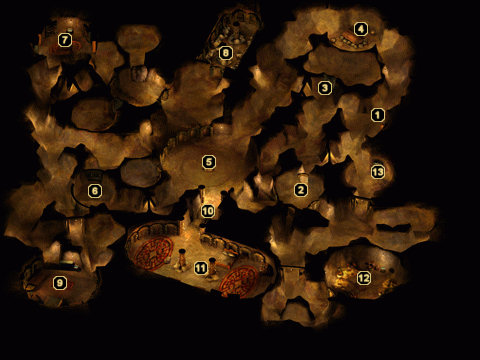
1 - Arrival
Did we miss anything on this map? Is there something we didn't discover? Let us know!
1 - Arrival
You will enter Level Three here. Throughout the area you will encounter various wandering mobs.
2 - Iron Golem
The only door into this room that is not guarded with swinging blades is to the south. This is going to be a very difficult battle even though there is only one Iron Golem to defeat. You must have high magical weapons if you are going to kill the Iron Golem. It has a high damage and spell resistance. Once you have defeated it you will find Mandal's Sword of Myrlock Vales.
Return to Mandal's corpse on Level Two and you will now find his spirit. Give him his sword and he will show you a scene of where he put the Modified Mandrake Root. It is in the Wyvern lair on Level One. Since you have already taken care of the Wyvern you just need to go get the Modified Mandrake Root. Take this to Nheero Fhutma. He will ask you to switch the Mandrake Root with the Modified Mandrake Root in the Alchemy Lab to make the Sabotaged Histachii Brew.
Return to the Alchemy Lab. You will now find D'hey-Jazerroin in the lab. Switch the Mandrake Root with the Modified Mandrake Root. If you have a high alchemy you can use the notes to make the brew yourself. If not, you will have to intimidate D'hey-Jazerroin into making it. To make it yourself you need to pull the southern lever in the Ziggurat Chamber. After the lights stop flashing you will find the brew; you can do this several times as you may need one later. Replace the Modified Mandrake Root with the Mandrake Root. Now that the Alchemy Lab is operational you can also use the Wyvern Stingers to make Wyvern Poison. Place the Wyvern Stingers on the westernmost table and pull the southern lever in the Ziggurat Chamber. You will need four of these later. Return one of the Sabotaged Histachii Brew to Nherro Fhutma.
3 - Wall Trap
As soon as a party member enters the room a wall will close behind trapping them inside the room and an Iron Golem will attack the rest of the party. Have the member inside break down the wall to assist the others with the Iron Golem. As before, this will be a difficult battle.
4 - Body Room
In this room you will find a couple of bodies. If you have the ability to carry these you could use them further along in the game. Use the Wyvern Poison on the Fresh Water Sink that is in the north right corner of the room. The water will turn a greenish color.
5 - Locked Door Room
You will find Yuan-ti Priest and the Yuan-ti Champions around this room. Defeat them before proceeding down the passageway.
6 - Slime Doorway
This area has numerous Mustard Jellies and Olive Slimes. They are immune to most damage except or fire. Use Fireballs, Flame Strike, and Shroud of Flame on these creatures. The faster you kill them the less chance they have of doing harm to your party. After you have dispatched the slimes you can use a member with high search skills to detect the lever to open the metal doors. If you do not have a high enough search skill you will have to wait for a timer that opens the doors every 24 hours.
7 - Library
Searching the Library you will find an Engineering Manual. This will be important later. You will also see another Fresh Water Sink that you need to use the Wyvern Poison on.
Before you can proceed you either need a Sabotaged Histachii Brew that you kept or return to Nheero Fhutma and get one from him. If you return to Nheero you can ask him about the strange creatures that you have seen and he will ask if there is a Library for him to search for information. When you tell him yes he will travel to the Library and you can find him there later to learn what he has discovered.
8 - Sseth's Eye
Before you approach the area you must use one of the Sabotaged Histachii Brew on a party member. This will temporarily turn them into a Histachii. You cannot approach Sseth's Eye unless you are a Histachii or it will cause fear in your members and make them run away out of your control. After you have used the brew you can now enter. You will have to defeat a few Histachii before approaching and activating the lever in the back of the room. This will cause the drawbridge to lower. Rest your party and the effects of the brew will wear off. Return to Nheero Fhutma and ask him about Dragon's Eye and Thorasskus.
9 - Chamber
You will find another Fresh Water Sink in this room that you need to use the Wyvern Poison on.
10 - Drawbridge
Now that you have lowered the drawbridge you can proceed into Thorasskus' chamber. Upon approaching the drawbridge you will find numerous Efreeti. They inflict immense fire damage. Summon as many creatures as possible to help funnel them on the drawbridge. Use Cloudkill, Cone of Cold and Ice Storm to damage them as much as possible before they reach your party. After they are defeated you can proceed into Thorasskus' chamber.
11 - Thorasskus' Chamber
Inside you will find what appears to be a small boy. Speaking with him he mentions that his mother, Izbelah is missing. You may need to speak with him a few times or have a Paladin speak with him to expose his true identity. As soon as you expose him he will transform the sticks in the room into Monstrous Snakes. The snakes will attack and Thorasskus will summon creatures. As soon as you have done some damage to Thorasskus, he will teleport out of the room. The Monstrous Snakes can easily overwhelm your party. Protect your weaker members by forming a circle around them or enclosing around them against a wall. After you have killed them you will find a tunnel in the bottom right corner of the room. You need to exit through the tunnel because the drawbridge has shut.
12 - Treasure Room
You will now be able to enter the Treasure Room. You will find the last Fresh Water Sink to use the Wyvern Poison on. You can also loot the room and find the fourth rope and a Medallion of the Lost Followers.
Return to the locked door room and you will find Thorasskus again. Immediately engage him in battle because he will keep summoning creatures, making the battle more difficult.
13 - Mechanical Door
After defeating Thorasskus and his summoned creatures the mechanical door will open and you can access Level Four.
Now that you have the Medallion of the Lost Followers you may return to Hrothgar's Glen and battle some undead to receive a Holy Avenger sword. This sword can only be used by Paladins. You do not have to complete this part of the game to proceed.


