 Did we miss anything on this map? Is there something we didn't discover? Let us know!
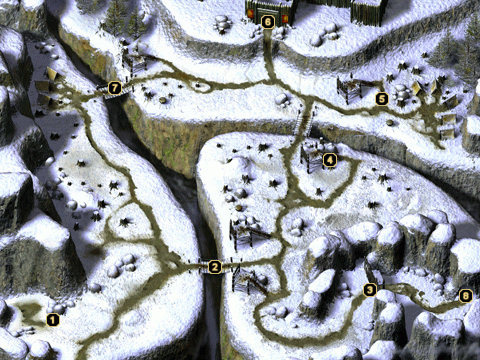
1 - Ennelia
Did we miss anything on this map? Is there something we didn't discover? Let us know!
1 - Ennelia
First you will meet Ennelia; who tells you that Braston is being held prisoner. She is injured, so offer her a Healing Potion and she will tell you about War Drums that are used to alarm the Fortress and about another entrance through a locked gate to the east. Ennelia is the only place that you can rest without enemies appearing.
2 - First Bridge
This bridge is trapped, but doesn't do much damage. Across the bridge are two guard towers with Orc Archers. Just to the left of them is the first War Drum with an Orc Shaman. Quickly break the drum then kill the Shaman and any Archers that were missed. If you do not break the drum first the Shaman will summon Goblin Worg Riders; you have to kill both the Goblin and Worg.
3 - Locked Gate
Follow the path to the south and right. You will find two Goblin Hordlings to kill. Click on the gate and Gark will tell you that Chief Guthma has ordered that no one may enter through this gate. He will also tell you that Trugnuk has a key.
4 - Guard Tower
On top of the guard tower are more Orc Archers. At the bottom are Goblin Warriors, a Goblin Shaman and a few others. Do not cross the bridge to the north. Head to your right along the canyon and you can see the War Drum on the other side. Use your ranged weapons to take out this drum if you can. It will help greatly in the upcoming battle.
5 � Second Bridge and Camp
This bridge is also trapped. As soon as you are spotted you will be attacked by Orc Archers, Orc Shaman, Orc Archer Elites, and an Orc Witch Doctor. Try to pull them towards you, if you cross the bridge completely you will also be attacked by the enemies at the camp. The Orc Shaman and Witch Doctor can do some pretty hefty damage if not taken care of immediately. After these are defeated cross the bridge and an Ogre, Orc Shaman, Hardened Ice Troll, and Trugnuk will attack. Trugnuk will drop the gate key, Potion Bag, Extra Healing potions and Shortbow of the Defender. Be careful approaching the camp, some enemies may be left. Loot the camp for Elven Sewn Gloves, The Merry Shorthorn, shortbow, and potions.
6 - Main Gate
This is the main gate to the Horde Fortress. It will note that only siege equipment will be able to get through.
7 - Third Bridge Camp
To the left of the bridge and guard tower is the War Drum with an Orc Shaman, Orc Archers and Goblins. Remember to destroy the drum first so no Goblin Worg Riders appear. This bridge is also trapped. Across the bridge you will find a Winter Wolf in a small camp. A lot of magical items, scrolls, healing potions, and lamp oil can be found in the camp.
8 - Exit
Head south towards the first bridge. You will encounter Half-Goblins, Orc Warriors, Goblin Archers, Hordlings and some Goblin Worg Riders. These are pretty easy to defeat. Proceed to Ennelia to rest; then head to the locked gate. After opening the gate you will battle with Gark, an Ogre and some Trolls. If you need to rest return to Ennelia. You will not be able to rest in the Goblin Warrens.


