 Did we miss anything? Is there something we didn't discover? Let us know!
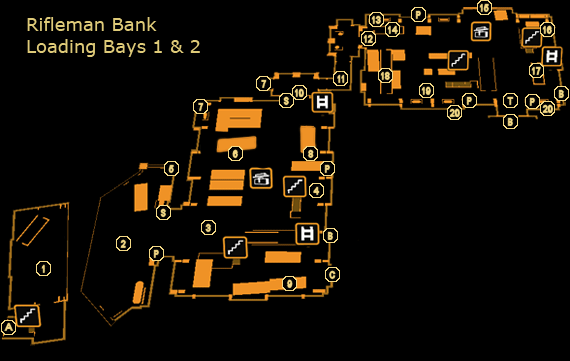
The loading bays of Rifleman Bank are fairly open and non-linear spaces that give you plenty of options in getting from place to place. Your main goal is the maintenance hatch in Loading Bay 1, but feel free to explore around and take out as many enemies as you can, as it will make your life easier later on.
1 - Belltower Ship Loading Bay
You'll begin in the Belltower ship's loading bay. The guards will have been alerted by your passing by the biometric scanner back in the previous area, but it's nothing much to be concerned about. In order to head onto the dock, you'll need to lower the boarding platform using the Cargo Ramp Switch - you'll receive the Out of the Frying Pan
achievement for escaping the ship.
Before flipping it, though, you might want to take a look out the window in the back and even snipe at some of the guards outside, and explore the shipping container nearby to find a Machine Pistol and two boxes of ammo for it.
2 - Docking Platform
Two guards and a Security Camera await you on the dock outside, but otherwise you won't find much opposition. Take them out covertly if you can, but the Security Camera might give you some trouble if you do. If you wait a moment, one of the soldiers will head up to investigate, so take him out when you get the chance to avoid setting the whole base off. If you go in loud, be prepared to fight off the Boxguard as it makes its way out of Loading Bay 2.
Aside from a Credit Chip behind a box on the right-hand side of the Loading Bay 2 entrance, you won't find any other loot here. However, if you don't fancy the main door, consider heading over to the north side. You'll find a couple of boxes which, if you jump on them, will allow you to reach a hidden maintenance room, described at (5), which provides an alternate way in and +300 XP.
3 - Loading Bay 2
Loading Bay 2 is protected by a Boxguard robot - if you have an EMP Grenade by now, it will be no trouble to deal with. Otherwise, you'll need to either sneak around it, use Frag Grenades, or make your way to the office on the upper balcony (4) and shut it down. Loading Bay 2 is defended by a paltry three guards, and has a number of ways to get around, but you'll have to contend with the Security Cameras, and the guards are quick to sound the alarm.
Action-loving players should find no shortage of cover in the loading bay, but those who want to use stealth or the enviornment to their advantage will want to consider the vents at (4) or (7) to sneak on by, or use the Jump Enhancement to climb across the various shipping containers and get the higher ground. There's no real "best" or "ideal" way through, so use your discretion and don't be afraid to improvise if need be.
4 - Balcony
The upper balcony is accessed either via stairs or two ladders, one on the north side and the other on the south side. Aside from the level 5 security door leading to the Admin Offices, you'll also find a small office containing some important odds and ends. For starters, there's a Credit Chip and some
10mm Pistol Ammo on the desks, and the lockers contain a Beer,
Hypostim and
Mine Template. The standard computer has a bunch of background e-mails on it, while the security hub will let you shut off the Security Cameras and the Boxguard in the area.
Last, if you stack up a box and use your Jump Enhancement to get to the top of the office, you'll find a ladder which takes you up high above the loading bay. From here, you'll find a vent taking you to Loading Bay 1 (+300 XP), and, if you cross the crane, another vent taking you to a hidden maintenance room (5) for another +300 XP., which contains some Beer and an
Ammo Capacity Upgrade.
5 - Maintenance Room
This hidden maintenance room can be accessed either by stacking boxes and jumping to the ladder at the north end of the docking platform (2), or from the balcony and crane above Loading Bay 2 (4). You'll get +300 XP for discovering it, and there's an
Ammo Capacity Upgrade and some Beer inside as well. If you're traveling from the docking platform, this is a nicely covert way to get to your objective, as the balconies and vents will take you right to Loading Bay 1.
6 - Storage Container
This container holds a
Stun Gun and
Stun Gun Darts should you want them. Additionally, you can blast or punch your way through a weak wall if you have the capability, which should give you quick and covert (but loud) access to the door at the end of the loading bay, as well as to the vent at (7).
7 - Vent & Rocket Launcher Part
Move the boxes in the corner here to reveal a vent. The vent will take you past the loading bay's exit, allowing you to avoid the laser grid and Security Camera. You'll get +100 XP for taking this route.
Near the vent entrance in the loading bay, you'll notice a shipping container high up just opposite of it. Stack up the nearby boxes or use your Jump Enhancement to reach the top, and you'll find a Credit Chip,
Reload Speed Upgrade and a
Launcher Barrel for Rocket Launcher, which Quinn wants if you've decided to take on his fetch quest. You'll also gain +300 XP for finding the secret stash.
8 - Hidden Stash
Break your way through the weak wall on the backside of this cargo container to find a hidden cache of equipment. There's a
Tranquilizer Rifle,
Tranquilizer Darts two
Hypostims and some
Painkillers for you inside, and you'll get a +200 XP bonus to boot.
9 - Shipping Container
If you've got the Jump Enhancement, you can leap up to the shipping container here to find some
Combat Rifle Ammo and a couple of Beers. There's a weak wall in the container that can be broken down, but it won't come into play until later on when you need to reach Loading Bay 3.
10 - Door & Laser Grid
The way out is well guarded by a laser grid and Security Camera. Either bypass the door entirely using the vents found at (4) and (7), or hack the level 1 panel to get past. Of course, you can also just blast your way through, which works fine too.
11 - Typhoon Turrets
If the alarm's been sounded, you'll notice some posts in the floor emitting spinning lasers. These "Typhoon Turrets" won't sound the alarm - rather, if you cross one, the post will fire off an attack similar to a Typhoon burst, then recede into the floor for a short time. They are impervious to normal weapons fire, though EMP Grenades will disable them, and the Stun Gun might buy you some time. You're best off simply avoiding them, though, either by dodging the lasers or tripping them, then hopping out of the way to avoid the blast.
12 - Loading Bay 1
Much like Loading Bay 2, Loading Bay 1 is fairly large and open, and allows for a variety of approaches. The key difference is instead of a Boxguard, you'll find a mounted Turret inside. Once again, your tactics for getting through are more or less the same - sneak around the edges and use as much cover as you can, hop around the shipping containers, or simply open fire, though again, feel free to mix and match what works. However, there are about ten soldiers to contend with this time, so chances are things are going to be a bit more challenging (one holds a Pocket Secretary with the code to the Admin Offices, "7736"). Either way, your objective, the floor hatch at (16), remains the same.
13 - Heavy Crates
The heavy crates in the corner here block the easier stealth path. You'll need to destroy them or use Move/Throw Heavy Objects to get by.
14 - Storage Container
This storage container provides some cover in sneaking around the loading bay. At the far end of it, you'll find a weak wall to smash through, as well as a
CyberBoost ProEnergy Bar and some
Tranquilizer Darts.
15 - Balcony
This balcony provides a decent spot to hole up against enemy forces, and also houses some explosive barrels you can use as impromptu weaponry.
16 - Maintenance Hatch
The maintenance hatch here is your objective. Note that it's blocked on one side by some heavy crates - you'll need to move, jump over or otherwise get around them to proceed, so keep that in mind if you're sneaking along the outside edges of the loading bay.
Crawl your way through for +2400 XP, and you'll discover Keitner. During the conversation with her, you'll learn that she's been working as a bit of a double agent, trying to expose the corruption she suspects Belltower of, involving some sort of black project. Whether or not she's your mystery alley is another question you'll be left with, but for now, she takes a biometric scan of Jensen and asks that you bring it to the Detention Center and upload it to the database, granting access to the Interrogation Wing. Make sure to ask her about weapons and you'll be given the secondary objective to go meet Quinn for some additional supplies.
With that out of the way, it's time to head into the
Admin Offices (B) to find Quinn and/or visit the
Detention Center. Head through the main door in Loading Bay 1, or use one of the alternate entrances around.
17 - Shipping Container
This shipping container doesn't have much inside, but you will find some
Sniper Rifle Ammo on the stack of boxes.
18 - Shipping Containers & Rocket Launcher Part
This shipping container is mostly empty, but you'll find the
Trigger Module for Rocket Launcher that Quinn wants, one of three pieces. Consequently you'll gain +100 XP for finding the part. If you haven't met Quinn yet, you can still pick up the Trigger Module now and give it to him later. There's also a weak wall in the back, if you want to break your way out.
There's a second container above the first one which you can only access by stacking up crates or using the Jump Enhancement. Smash through the weak wall on its exterior (+300 XP) and you'll find a security hub along with a Turret - by hacking the level 3 security hub, you can reprogram the Turret, carry it out, and decimate the enemies in this room if you so choose. In addition to this, you'll also find a Scholar eBook for +200 XP and some
Typhoon Ammo next to the security hub, and if you move the heavy crates in the back, you can find an ammo case with some
Shotgun Cartridges and
Frag Grenades. All told, quite a haul.
19 - Balcony & Crane
Just like Loading Bay 2, you'll find a balcony with an office up top. The regular computer once more contains some plot-relevant e-mails, and the security hub, requiring a level 3 hack, allows you to reprogram the ceiling-mounted Turret outside. Search the room to find a Credit Chip, an eBook about the "MachineGod" and, inside the weapons locker, two
Shotguns and a
Frag Grenade.
Again, if you've got the Jump Enhancement, you'll be able to hop onto the office and then onto the crane above (if you came in via the air vent from Loading Bay 2, you might already find yourself up here). On the crane's platform, there's an ammo case with
Sniper Rifle Ammo and
Tranquilizer Darts inside. With a little finesse, you'll also be able to fall into the shipping container the crane is holding up - there's +300 XP, two boxes of
Machine Pistol Ammo, a
Laser Targeting System, and some
Heavy Rifle Ammo inside.
20 - Vent
The two vent entrances here allow you to bypass the loading bay outside a little, but otherwise there isn't much of interest. You'll find a Credit Chip inside, and be rewarded with +100 XP.
A - Exit to Aft Cargo Hold
B - Exit to Admin Offices
These doors, either on ground level or on the upper balconies, will take you to the Admin Offices. The balcony exit in Loading Bay 1 requires the code "7736", while the one in Loading Bay 2 needs a level 5 hack to get through.
C - Exit to Loading Bay 3
Loading Bay 3 is inaccessible for now. You'll need to visit it during the final stages of the DLC, so don't be concerned that there's no apparent way in.
P - Alarm Panel
S - Security Camera
T - Turret


