 Did we miss anything? Is there something we didn't discover? Let us know!
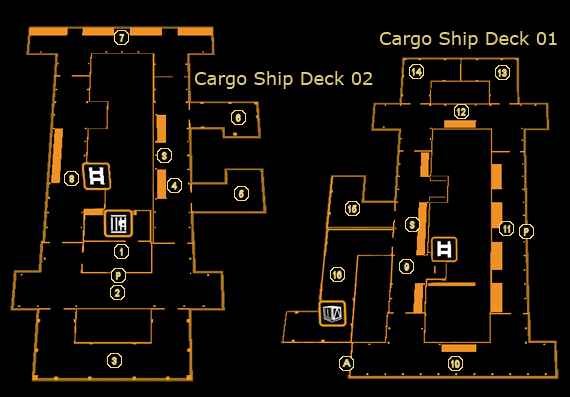
After the introductory cutscene and your interrogation by Commander Burke and Lt. Keitner, you'll find yourself aboard the Belltower cargo ship, recently freed from your restraints thanks to a power fluctuation. Your goal for now is to simply escape and find Adam's Body Armor, found at (16). Note, however, that this is a bit more complicated than it sounds - your augmentations have all been reset to their defaults, and you'll begin unarmed, so you'll need to use cunning to get past the early threats. Search carefully for supplies as well, as you'll need them to survive.
1 - Brig
You'll begin in this makeshift brig - fortunately for you, the door is open, and the guards in the next room are distracted. You have a few choices here. Either move the crate on the floor and sneak out the vent, or hack the level 1 door and take out the guards. The vent will provide +100 XP and take you to the south end of the ship (3). Also take note of the crate and fire extinguisher in this room - normally they'd be just props, but they can be used as impromptu weapons by throwing them at enemies. Considering that you're otherwise unarmed, this might be a good bet.
2 - Guards
The two guards outside the brig are chatting with one another, though they don't have any immediately useful information for you. Once you're outside, subdue them as you wish, and grab their
10mm Pistols. One of them carries a Pocket Secretary with two codes, "7331" and "3713", used for getting to the corridor at (8). Also take note of the nearby Alarm Panel (P) - you may want to disable it, both for the valuable XP and to stave off any alarms.
3 - Storage Room
Despite being a storage room, you won't find anything useful here, though its a good spot to evade the guards and fority yourself if you find yourself in a firefight. You'll come out of the vent in the floor if you took it from (1), and crawling through will yield +100 XP if you haven't already.
4 - Soldiers
You'll run into heavily-armed soldiers here, both with
Shotguns. Note that their helmets will prevent you from killing them with headshots, so you might have trouble taking them out with the basic 10mm Pistol alone. Make sure to keep out yourself and the leftover bodies out of range of the nearby Security Camera (S) to avoid tripping the alarm.
5 - Compartment 02 D-02
Hop over the crates to find an eBook on PMCs and a Beer on the nearby table. You'll need all the help you can get, so even the small health boost the drink provides is welcome here. The vent leads to Compartment 03, located at (6), and can be used to bypass the Security Camera and soldiers near (4).
6 - Compartment 03 D-02
Nothing special in this room, but you'll be able to use the vent on the back wall to avoid the Security Camera and guards outside at (4).
7 - North Corridor
This corridor isn't normally occupied by anyone, though you might run into a patrolling soldier. The two crates in the middle of the room can be moved near the pipes and climbed up to provide a covert path through the corridor - climbing on top of them earns you +100 XP. You'll also find a Pocket Secretary up there, though it's a copy of the one the guard at (2) carries, containing the same codes "7331" and "3713", which will give you entry to the corridor at (8).
8 - West Corridor & Ladder Up
The corridor here is shut on both ends by locked doors. The south door is a level 3 keypad and uses the code "7331", while the north door uses the code "3713" and is only level 1, so you should be able to hack it if you don't want to use the code. The corridor is otherwise unoccupied, so take the ladder up once you've finished exploring the deck.
9 - West Corridor & Ladder Down
Upon climbing the ladder up, you'll want to wait a minute for the guard to your right to walk by - take him down in melee to avoid a firefight. The Security Camera and laser grid (level 2 hack) present a bit of a problem, but search the guard you just took out to find a Pocket Secretary contraining the code "4867", which will let you take those lasers offline without a fuss. The locked room nearby contains Adam's Body Armor (16), but getting in will require you to crawl in through a vent or to find the door's code. If you want to skip all that, though, you can get in using "1923".
10 - South Corridor & Exit to Cargo Holds
The door to the west will be shut until you've found Adam's Body Armor at (16). This corridor is otherwise uninteresting, but at the end of it, you'll find a couple of crates - place one near the pipe at the east end to gain access to the vent, which will allow you to bypass the guards at (11), as well as provide you with +100 XP.
11 - East Corridor
This corridor is guarded by two soldiers, one with a Shotgun. Ouch. Either try to take them out one by one (the stationary guard won't see you take down his friend if you do so at the very end of the hallway), or use the vents accessed from (10) and (12) to bypass them entirely for +100 XP. Note that a frontal assault may not be smart due both to the guards' heavy firepower and the nearby Alarm Panel (P).
12 - North Corridor
This corridor is blocked off by a laser grid, though you can take it down using the same old code "4867". Just like at (10), you can use a crate to reach the vent at (11), allowing you to bypass the guards there for +100 XP.
13 - Compartment 03 D-01 & Weak Wall
Some firepower! Search the room for two
Mine Templates, a
Gas Grenade and a
Frag Grenade, as well as two explosive barrels. One or both of them can be used to take out some enemies if you wish (just throw it), but you might want to destroy the one up against the rear wall, as it will blow a hole through and allow you to surprise the guards in the adjoining room. Be sure to move the second barrel first, though, as the blast could also set it off, leading to an untimely death (we learned that the hard way).
Last, you can also take the vent in the floor for +100 XP, which will bring you to either the room next door (14), the compartment at (15), and the storage room with Adam's Body Armor (16). Be sure to check near the grating at (14) for a Pocket Secretary containing the code to the storage room where Adam's gear is held, "1923".
14 - Compartment 04 D-01
The door to this compartment is unlocked, but there are two guards inside for you to deal with. Either burst in through the front door and ruin their Mahjong, or make a more explosive entrance by shooting/throwing the explosive barrel into the weak wall at (13), which will also kill both of them. Once they're down, grab the Painkillers from the table and loot them for some
Concussion Grenades, some more
Shotgun ammo, and a Pocket Secretary containing the password to the nearby security hub, "9g11vj4m", which will allow you to shut down the Security Cameras in the area. Finally, the vent in the floor takes you to the same system described earlier - see (13) for more details.
15 - Compartment 02 D-01
This room is open to you, though you won't find any equipment inside. Instead, move the crates at the rear wall to reveal a breaker box, which will shut down the electricity hazard in the vent accessed from both the floor nearby, as well as the compartments at (13) and (14), and the storage room with Adam's equipment in it (16).
16 - Compartment 01 D-01 & Adam's Gear
There's two ways to get into the room containing Adam's Body Armor. The first is straightforward - hunt around and find the Pocket Secretary with the code "1923" at (14) to use on the door's panel (of course, you don't actually have to find the code if you know it in advance). The second way requires some crawling around. Get into the nearby room at (15) via either the front door or the vents at (13) and (14), then move the crates at the back of the room and shut down the breaker box, which will let you get through the electricity blocking the vent below, and allow you safe passage into the room.
However you get in, you'll find a Pocket Secretary in plain view straight ahead. Read it to find that apparently, someone is looking out for you... but who could it be? All in good time. For now, head to the back of the room and pick up Jensen's Body Armor for +2500 XP. You'll soon be contacted by a mysterious new ally via InfoLink, and gain some unclear instructions to "find the CIC." Before you head out, be sure to search the crates for a Hypostim and some
Painkillers amongst the medical supplies, as well as the two crates on the floor for 7
Praxis Kits to spend as you see fit, a
Stun Gun, some
Stun Gun Darts, and a
Gas Grenade. Back in business!
Now that you're locked and loaded, more or less, make your way back to the corridor at (10) to find the previously inaccessible door open to you. Head through and move on to the Forward Cargo Hold.
A - Exit to Forward Cargo Hold
P - Alarm Panels
S - Security Cameras


