 Did we miss anything? Is there something we didn't discover? Let us know!
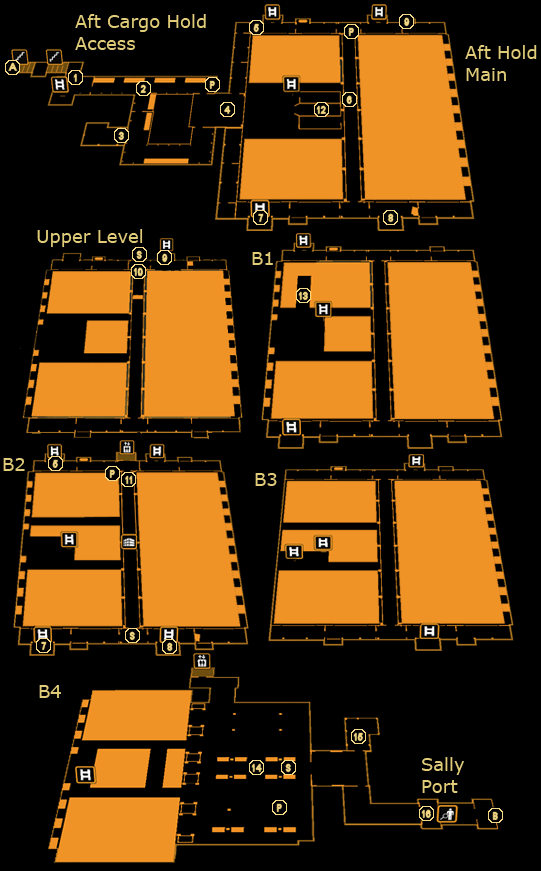
You'll find that the Aft Cargo Hold is similar to the previous one you visited, but you'll spend less time climbing on containers and more time navigating the maze of walkways to reach the bottom. Your goal is the sally port at the end. Your options are a bit more flexible than they may initially seem, and there are many routes to take, though of course you can always fully explore everything to maximize your loot gain and XP if you so desire.
1 - Arrival
The guard at the foot of the stairs you come down is wielding a Shotgun. Dispose of him and then search his body for the code "1094", useful for a couple of the rooms in the area. You might want to drag the body out near the stairs to prevent patrolling guards from finding it. Like in the Lower Decks, there's another vent above the pipe nearby that you can climb through for +100 XP, which allows you to avoid anyone in the corridor ahead.
2 - Corridor
A guard tends to patrol in this area, though you may or may not encounter him here. You can gain +100 XP by crawling through the vents from (1), but aside from the Belltower thug, there isn't much else of interest. Both exits from the corridor lead to the same place.
3 - Storage Room
You'll need to hack the level 2 keypad or use the code "1094" to get in here - keep an eye out for a patrolling guard while you do. Inside, check the very back for an ammo case containing a
Mine Template,
Gas Grenade and
Concussion Grenade, as well as a
Shotgun tucked away behind one of the crates.
4 - Office
You'll find yourself overlooking the cargo hold much like you did back in the previous one, though this time there's no elevator to manipulate. The computer in here will give you yet more background information, and the security hub allows you to shut down the Security Cameras in the area, which will make things easier for you. Before moving on, search the desk for some
Painkillers and an eBook, as well as the lockers in the back for some
Stop! Worm Software.
5 - Ladder & Laser Grid
Keep an eye out for a guard on patrol in the area, and be sure to take him out quietly to avoid setting off the alarms. The ladder down through the hatch will take you to the floor below, but it's protected by a laser grid. Either hack the level 3 panel nearby, use the code "9173" as found at (6), or climb down and time your climb to avoid setting off the lasers.
6 - Corridor
You should be able to sneak right up on the guard in this corridor and take him down quickly. His body contains a Pocket Secretary with the code to the laser grids in the area, "9173". You'll find a heavy crate at the end of the corridor, which, if moved, will give you a way to get through this area more quickly, but you'll need the Move/Throw Heavy Objects augmentation to do so.
7 - Ladder
This ladder will take you two floors down. Be careful, as there's a guard or two waiting for you at the bottom level.
8 - Hatch
The ladder down this hatch is missing, so the only safe way to drop is using the Icarus Landing System upgrade. You'll get +200 XP for doing so, as well as fairly easy access to the bottom floor near the sally port. You can also access this same spot by using the ladder found on the B2 level, but you'll need to bypass the toxic gas at (11) to reach it that way.
9 - Ladder
This ladder will take you between upper and main levels of the cargo hold.
10 - Stash & Gas Valve
The gas valve here will shut down the gas leak at (11), allowing you safe passage. Continue into the corridor to find some Credits, plus a
Nuke Virus and
Stop! Worm Software. You'll get +200 XP for finding the stash.
11 - Gas Leak & Elevator
Toxic gas has leaked into this corridor, and it's deadly for anyone without the Rebreather augmentation. You'll need to find the gas valve on the upper level at (10) to shut off the gas, or find another way around. Once the gas is gone, or you've waded in unscathed, read the Pocket Secretary for... info on the gas leak you just bypassed. You'll gain +200 XP for heading down the corridor, and you'll find a
Machine Pistol next to a dead guard, who has Credits,
Machine Pistol Ammo and a
CyberBoost ProEnergy Bar on him as well.
Additionally, there's an elevator nearby which will give you easy access to the lowest floor. However, taking it will alert the nearby guards, so you might want to reconsider if you want to remain invisible.
12 - Storage Container & Hidden Way Down
You might pass this location by and not know exactly what purpose it serves. If you have the Punch-Through-Walls augmentation and object highlights turned on, though, you'll notice that there's some cracks in the storage container. Punch through or use an explosive, then take the guard out on the other side if need be. You'll gain a +100 XP bonus for your exploration, plus a
Gas Grenade,
Concussion Grenade and two packs of
Tranquilizer Darts in the cardboard box on the floor. Additionally, the guard has a Pocket Secretary on him with the code "8193", used to access a storage room. A second weak wall in the container will give you access to another adjacent one, which has a ladder down in case you don't have the Icarus upgrade.
Aside from being a covert way down to the bottom level, you'll also gain access to a hidden stash at (13). Be sure you have the Jump Enhancement and/or the Icarus Landing System, otherwise you might have trouble navigating the shipping containers to the bottom. If you have the Icarus Landing System, you should be able to bypass most of the platforming and just fall right to the bottom. Keep an eye out for a
Concussion Mine once you get there.
13 - Secret Stash
If you have the Jump Enhancement, you'll be able to access this hidden stash. Hop down from the storage container at (12), then take a look around and you should spot an open container above. Jump up and search the case inside for a
Praxis Kit; you'll also receive +300 XP for your guile.
14 - Stasis Pod Storage Area
You'll come across another bunch of stasis pods here, just like the last area. If you took the elevator down, note that there are three
Concussion Mines outside its door, and that the alerted guards will have taken up defensive positions just outside. If you came another way, the four guards in the area may or may not be alerted to your presence depending on how quiet you were upstairs. Once they've been disposed of, search them to find a Pocket Secretary containing the code to the laser grid outside the sally port, "6834", the control panel for which you'll find just outside its door. Otherwise you won't find much loot around, but the the guards themselves are fairly well-equipped.
15 - Storage Room
You can get in here either by hacking the level 3 keypad or using the code "8193". Move the troublesome crates out of the way to earn a +200 XP bonus. You'll find a weapons locker at the back containing two
Heavy Rifles, and three boxes of
Heavy Rifle Ammo on the maintenance cabinet nearby. Finally, some real guns.
16 - Sally Port
The sally port is protected with a biometric security scanner. Hit the switch and step in. Your biometrics won't be recognized, but your mysterious ally will radio in and hack the system to let you through. He gives you new directions: get to a maintenance hatch in Loading Bay 1, located in Rifleman Bank Station, the offshore platform the cargo ship's now arrived at. You'll receive +1750 XP for your perseverance. Head on through the door (B) to continue.
A - Exit to Cargo Ship Main Decks
B - Exit to Loading Bays 1 & 2
S - Security Camera
P - Alarm Panel


