 Did we miss anything? Is there something we didn't discover? Let us know!
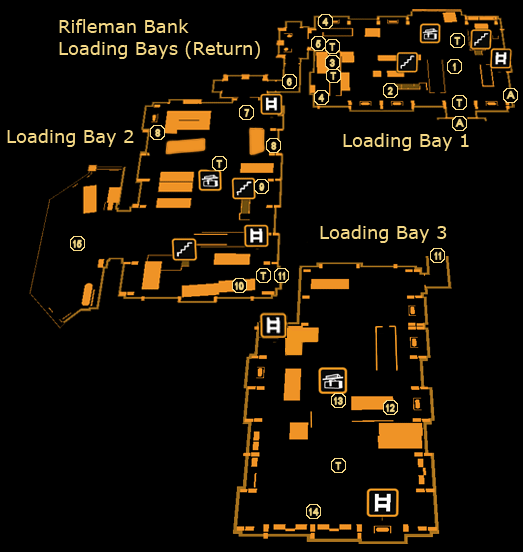
The loading bays have been heavily fortified by Belltower soldiers. Immediately outside the exit from the Admin Offices, they've set up a Turret, which will open fire as you try to leave. If you take one of the upstairs exits from the Admin Offices, however, you'll be able to bypass the fighting outside. If you plan on sneaking through, you might want to consider going up to the second floor, past Burke's office, and hacking the level 5 door to bypass Loading Bay 1 entirely. Either way though, your goal is to reach Loading Bay 3 (11), which you'll find is now open to you. From there, you'll have a showdown with Burke.
1 - Loading Bay 1
Loading Bay 1 can go very quickly or take some time depending on how you handle it. Aside from the new Turret suppressing the front door from the Admin Offices, there's a large contingent of soldiers, but if you hacked the previous Turrets earlier, then you'll find many of the soldiers have already been killed by it, requiring that you simply mop up the stragglers. However, there are two snipers ("shifters" who can cloak as well) up on the crane you need to be aware of, as a couple of stray shots could mean death.
2 - Balcony Office
One of your Turrets may have been disabled by the mercs - if you can reach the office here, you can switch it back on using the security computer.
3 - Shipping Container
If you didn't already find it, the upper shipping container can be smashed open to reveal a security hub and a Turret ready to be reprogrammed, which you can even carry around as your own personal defender if you have the Move/Throw Heavy Objects augmentation.
4 - Mines
The guards have set up mines in these areas to prevent you from sneaking around so easily. Avoid them if you wish, though disabling and collecting them could come in handy shortly. There's
EMP Mines on the south side and
Frag Mines on the north side.
5 - Loading Bay 2 Exit
Another Turret guards the exit to the loading bay. Provided you have the Jump Augmentation you should be able to climb the shipping containers and bypass the Turret entirely. Alternately, you can destroy it, or hack its level 5 security to reprogram it. You'll also find two boxes of
Heavy Rifle Ammo nearby.
6 - Typhoon Turrets
These Typhoon Turrets might be active when you come by, if the alarm was sounded. Avoid or disable them as you will.
7 - Loading Bay 1
Much the same as Loading Bay 2, Loading Bay 1 has been heavily fortified by Belltower forces, complete with a Turret watching the door (which can be bypassed using the nearby vent). You might have ended up coming in via the balcony from the Admin Offices, in which case you can easily sneak by most of the forces in this area. The biggest threat, aside from the Turret, are a couple of Ogre soldiers wielding Heavy Rifles - if you collected a Sniper Rifle earlier, a couple headshots should take down each one. Once more, you can also reprogram their Turret from the office at (9).
8 - Mines
Once again, there are mines set up on the sides of the loading bay. The west side has an
EMP Mine, while the east side has a
Frag Mine.
9 - Balcony & Office
Use, hack or login to (password "crash911") the security computer in here to reprogram the Turret outside, making your life a good deal easier. You'll also find a
CyberBoost ProEnergy Pack, Pocket Secretary with the security computer's password "crash911", and an ammo case containing
Shotgun Cartridges and
Machine Pistol Ammo.
Just south of the office, still on the balcony, you'll find a new security computer set up. As it's patched into the same network as the other security computer, the same password is used; there's no reason to bother touching it if you've already used the other one, since it controls the same Turrets. Check the ammo case nearby for some
Machine Pistol Ammo.
10 - Shipping Container
If you have the Jump Augmentation, you can reach this upper shipping container to find a couple of goodies and bypass the Turret below, though you'll need to break the weak wall to do so. This will provide you easy access to Loading Bay 3 (11).
11 - Loading Bay 3
Arriving at Loading Bay 3, Burke will taunt you, and you'll receive +2400 XP. Chances are you're rolling in Praxis Points by now, so you'll want to use them all, as this is your final opportunity to take advantage of them.
The fight with Burke is basically a gauntlet - your goal is to take him and him alone out, whether that's lethally or non-lethally. To do so, you'll have to reach his office at the end of the loading bay, which is easier said than done. You'll immediately be beset by a Boxguard and two snipers on the balconies above, and there are a large number of spec-ops soldiers of all varieties in the way, along with a Turret at the south end. Note that you can reprogram the Boxguard and Turret from the upper office at (13), making the fight substantially easier.
If you have the cloaking augmentation, you can simply switch it on as needed and eventually make it to Burke without much trouble, although it is possible to reach Burke undetected using cover alone (though quite difficult). Another way is to get on top of the crane and balconies at (14), then climb across the crane on the west side of the ceiling all the way to Burke's office roof, though you'll need the Jump Enhancement and possibly the Icarus Landing System. You can also simply blast your way through, which might actually be the most prudent option for most players. For more hints on handling Burke, check the section at (14).
12 - Shipping Containers
Crawl through this shipping container to find both some cover, as well as
Heavy Rifle and
Machine Pistol Ammo. You should also be able to use the nearby boxes to climb over them, or your Jump Enhancement.
13 - Crane & Upper Balcony
The upper balcony and crane here are most notable for the snipers above, though you'll also find a level 2 security computer in the small office, password "l4stst4nd", which will allow you to reprogram the Boxguard and Turret. Search the room for
Combat Rifle Ammo,
Revolver Ammo, a
Gas Grenade and
Tranquilizer Darts.
14 - Burke's Office
The run-up to Burke's office can be brutal, with an Ogre situated on the rooftop and a Turret providing suppressing fire, plus Belltower soldiers to your flanks. Burke is armed with either a
Machine Pistol or
Burke's Revolver, his custom-made handgun, depending on whether or not you stole the piece from his office earlier. There's three basic of handling Burke:
- Shoot him through the window. This is the easiest option, as Burke is unarmored; you might even be able to assassinate him from a distance using a Sniper Rifle, Rocket Launcher or a well-thrown Frag Grenade.
- Get through Burke's door and take him out. To do this, you can either smash the door down, hack its level 5 panel, or loot the Ogre on top of the office for the password, "5359". Once inside, either knock him out or kill him, which changes the dialogue a little bit.
- Climb in through the roof. There's a small hole on the top of Burke's Office. Reaching it without being seen will be a problem due to the Ogre on top. The best way to do it is to make your way to the crane at (13) and then take it along the west end of the ceiling and drop down. Once inside, kill or knock out Burke, which will change some dialogue.
Note that you'll still need to take out all the Belltower enemies in the area to proceed, again, lethally or non-lethally. Once you do, you'll earn +2400 XP, and the Apex Predator achievement if you managed to perform a takedown on Burke without being detected. Your mysterious ally will contact you and, after some chit-chat, instruct you to head to Loading Bay 2's docking platform for exfiltration. Before leaving, be sure to read Burke's computer for some more background info. If you missed looting it earlier back in the Admin Offices, search his body to find Burke's Revolver, a unique gold-plated gun... unfortunately, you won't have many more chances to use it.
15 - "Quinn"
When you arrive at the docking platform in Loading Bay 2 after taking out Burke, it will quickly be revealed that Quinn was, in fact, your mysterious ally all along... though exactly what cause he serves, or the nature of his true identity (and voice, for that matter), will go mostly unrevealed.
During the conversation his dialogue will change depending on how you handled Burke, as well as the situation with Dr. Kavanagh and the prisoners - most notably, he'll scold you if you didn't kill Burke and let let Dr. Kavanagh die, feeling that it was contrary to his own goals. You can either cut right to the chase, though it's probably best to press him for more information, which will open up several interesting new dialogue options. Despite what he says, there's no downside to chatting with him.
If you continue speaking with Quinn, at one point you'll be able to use your CASIE augmentation (if you have it) to ask him about his true identity, but any option will result in "Quinn" stopping you short - if you persuaded him before back in his shop, he'll explain he was humoring you. He'll ask you a question of a rather philosophical nature (answer whatever way you wish), and you'll receive the That Old Adage achievement, and in exchange he'll indulge your curiosity some more, giving more hints about the Illuminati and the "invisible war" being waged on a global stage.
Once you're done talking, Adam will climb aboard a stasis pod to continue his hut for Megan Reed, destination Omega Ranch, Singapore. You'll receive the Never Stop Looking achievement, as well. Enjoy the final, cryptic ending, and congratulations on completing The Missing Link!
A - Exit to Admin Offices (Return)


