 Encounter any problems with this walkthrough? Have comments? Let us know!
1:
Encounter any problems with this walkthrough? Have comments? Let us know!
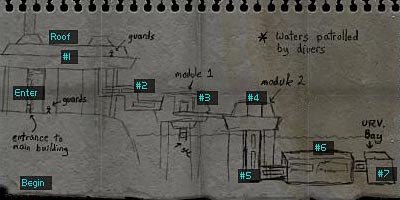
1: You drop down on the coastal base of the ocean lab. Just off coast are the module buildings you're going to be entering and exploring, but for now we have some giant robots and one MJ12 trooper to bypass. Wait in your spot as a giant security bot passes, then sneak around the corner and hug the wall. Continue along the wall all the way past the MJ12 out in the open and the other large security bot on the other side of the base. You'll come around to a shed.
2: To bypass the locked door, turn your speed on and jump on top of the pipes along the wall edge of the shed, and then onto the roof. You can now drop down into the room from the hole. Inside the cabinet in the room are the nanokeys for the command module and shed you're now in. Exit through the door using your key, wait for the bot to pass by and take note of the central pillar with MJ12 nearby (where it says "Enter" on the map) leading up to the command module. You're going to make a run for the pillar and use your newly found nanokey on the door at its base. Enter and ascend the many sets of stairs.
3: At the top will be a t-intersection with a troop you'll have to take down, quietly if you don't want to alert the guards in the room to your left. Take a right and in the room will be a female scientist (roughly at #1 on the map) who will give you the code to the nearby tank with karkian, 1223. Open the tank, and kill the karkian swimming around by using tranq darts or your preferred weapon. Enter the tank, go through an opening at the bottom, and down through another passage on the ground which leads you into a safe darkened room when you emerge.
4: You'll see a glowing green room to your right (from the equipment inside), but first take care of the MJ12 patrolling on the catwalk above. There will likely be an alert but you can hide here until its safe. Head to the greenish hued room and speak with the male scientist, who will offer you a map of a facility. Head back into the darkened room and into the small circular room you passed up on your way to the green room. Take the ladder down but beware a guard on patrol, roughly at #2 on the map. Pass him up and take the next ladder at the end of the hallway down again. Take this long hallway until you see a square room ahead at #3 (also marked module 1 on the map) with guard and turrets above.
5: If the guard sees you he'll sound the alarm and you'll be fired at from the turrets. Sneak by or take him down first, and head through the door on the right of the room to the outside between #3 and #4. Between this building (module 1) and the adjoining one (module 2) is a catwalk of sorts above the water, with another guard. Sneak by or take him down, and open the door to the next ocean module. Beware the sniper on the roof of the building you just left. Inside is another guard and a lift in the center of the room. Sneak into it or take the guard out first, and take it down to #5.
6: Straight ahead will be a corridor with a turret at the end. Above the exit from the lift is a camera you can shoot with your sniper rifle... or, sneak quickly up behind the metal crate and push it forward while crouched until you get to the security terminal, or run behind it. then hack it to turn the turrets on enemies and/or disable the cameras. Continue around the corner and you'll see another guard, possibly dead from the turret you turned against him. Continue until you get to the next room with scientists and a staircase at #6.
7: Behind the staircase is another guard. Sneak up on him and prod him. Speak to the female scientist there to learn the security login: "tech" and "sharkman" and then use the suspended terminal nearby to open the URV bay doors and disable cameras. Upstairs are two more guards so sneak or take 'em out, and then continue on. Ahead of you and down a ladder is the mini-sub bay at #7 (and that's it for a map of the area... there's another more convoluted one with an entire overview of the complex you can get in the game, but I found it completely unhelpful). There's another security computer terminal inside but you've already opened the doors. Hop in and take one of them to the ocean floor.
8: You arrive in another mini-sub bay at with some crates, a stairway, and a foreshadowing of what's to come laying on the ground. Hack the security computer terminal to turn off cameras and open doors. Take the supplies in the crates and head up to the top level of the stairs; the first two don't offer any supplies or encounters of value. Open the left door on the top level but don't go in; the turret in the center of the room will fire on you. Use the security computer terminal by quickly sneaking in and crouching behind the nearby table/monitor. Hack it to disable the camera so the turret will no longer fire on you. Or, simply blow away the turret with your sniper rifle, your choice.
9: Take the left unsealed door in the room and go down a hallway to a branch on the left. Another malfunctioning turret is down the hall. There's a metal crate nearby that you can push forward and avoid the fire, or quickly throw a LAM to the turret and blow up the turret along with opening the nearby door on the right, a double bonus. Head down the hallway and take the greasel lab nanokey next to the dead soldier. Open the locked door to your left using picks and you'll find a very nice cache of supplies, worthy of your picks (if you have a decent lockpicking skill).
10: Head back to the main hallway and open the locked door at the end with your new nanokey, revealing the greasel lab, with a couple greasels inside. Take them out using tranqs or whichever method you prefer, and then descend the ladder at the end. Below is water with another greasel swimming. If you remain on the ladder you can shoot it with a gun, else take it out with tranquilizer darts... approximately three should do if you wait for the toxin to take effect. To your left after you jump in the pool and face forward will be a locked door we need a code to, and ahead and to the right is an unsealed door we'll take now.
11: You get to a long corridor with broken beam leading to another door. Open it, turn on your flashlight and swim in. There are a couple greasels you'll need to deal with here, and then swim the short distance to the bottom of the room and read the datacube on the floor, giving you the code for the door in the other room, 5690. The locked door in the same room as the datacube only holds one medkit so it's not worth your trouble.
12: Swim back to the room with the ladder and enter the 5690 code on the keypad, opening the door. Head upstairs out of the water to a room with some static. Read the datacube to get the security login: "oceanguard" and "krakan". Carefully from the right side open the door and slip through, then head down the stairway to another door. Beyond this door is the carved-from-earth rectangular excavation area. There are two sets of animals in here and one biggie. To the right, just past the only corridor branch is a set of greasels. Head past the right side corridor and defeat them first. To the far left, on the other side of the mining truck are two karkians.
13: Take the corridor off the right side of the room, and hold up before you get to the room at the end. Inside is a giant karkian feasting on a corpse. It packs and can take quite a punch but a LAM will do nicely, or any other high-powered weapon. You can also Cloak and head in. Take the crew module access nanokey and weapon mod on the table inside and head back out to the door at the end of the excavation area. Use the key on the door, and descend a dark ramp down to another door. Open it to reveal another corridor with ladder on the right and two rooms at the end. The right has a greasel and two lockers, one with a reload weapon mod, and the left has two lockers with biocell and tranq darts.
14: Take the ladder on the right of the corridor down to the next level. To the left is a camera and to the right is a gun turret down the hall. There are a few rooms here with supplies if you want, including thermo camo on the room to the left, and weapon mod (laser) on the right room next to the turret. Disable it as you can (sniper at the camera or turret, LAM at the camera or turret, etc.) or run into the room on the left or right then sneak by. Head through to the lift at the end and take it down for an accomplishment bonus. Flip on your flashlight and spot the gas grenade on the wall around the corner. Disable and move through the door at the end of the corridor to a small room with laser grid, grate and electronic security panel.
15: Either the grate or bypassing the laser grid can get you to your destination but the easier path is by using multitools on the panel. Do that and head left, then straight to a door ahead. There are no enemies in this first room, but through the door is a giant spider. Fortunately, it's slow moving. Bring an EMP grenade or two, or a LAM and move into the large room at the end. Sneak up on the spider and toss the EMP or LAM to disable or destroy it, and proceed straight ahead to the lift. I'd ignore the two small lifts on the left and right side of the room, because there are no great supplies but a few spiders you'd have to deal with.
16: Before activating the lift so that it comes down to you, put your hazmat suit on (optional of course) and take a short dive into the water beyond the lift. Search the MIB body to the left for an augmentation upgrade canister, then swim down to the submerged datacube for the login: "mj12" and "skywalker". Climb back onto the lift and send it down with the button. Ride it to the top and get your sniper rifle ready. There's a malfunctioning turret to the right (and left that we can ignore). Step off, locate the turret and destroy it with the rifle... or run to the shelf nearby and disable it with multitools. Along the back wall is a security computer terminal. Use the "mj12" and "skywalker" login to extend the bridge and shut off the camera, then take the bridge below to the next room with repair bot.
17: Use the computer on the left side of the room with the "mj12" and "skywalker" login and access the UC (universal constructor) schematics. Gary Savage will leave an image copy in your datavault and instruct you to meet him atop the command module just onshore... basically where we began. Now it's backtrack time. Yes, all the way. First, in the big room with giant spider, the Page hologram will talk to you. Continue on.
18: There are only two new encounters of note. The first is the biggie. Remember the rectangular excavation area? Backtrack all the way back to the door before the area... even opening it if you wish to make sure it's the right door. Now Walton Simons is waiting off to the right of the door as you enter into the area from your side. There will be a confrontation and two alternatives: fight or run. If you run, you see him again in Area 51, but if you fight (and he's not too tough), it can be over here. Before you enter into the area, prepare your weapon of choice and augs of choice. I like to turn on power recirculator so that when I use regen, I don't need to flip on two augs. You may also wish to turn on ballistic protection, speed etc. Anything for combat.
After the conversation, I used my sniper rifle (maxed skill of course with 10 clip capacity), and it only took about 6 imperfect shots to take him down. I backed up and strafed left and right, ignoring his (plasma I think) shots until he went down. When it's over, or if you decide instead to run, continue your backtracking toward the mini-sub bay through the door at the other end of the area. Go up the stairs, into the electrical shortage room, into the left door, down the stairs into the water, and back into the room with the keypad and ladder up. Second encounter of note: there's an MJ12 in scuba here with a tranq gun. Use your own or just head up the ladder. Finally, go back to the mini-sub bay and take it back to the other modules.
19: Continue backtracking to the lift back up, out of the module 2 back to module 1, through the hallway, up a ladder through another hallway, and this time, take the ladder at the end all the way to the top to a small room with another ladder. Take that up, open the hatch and climb up into a small rooftop building with a door. Open it and you'll see the chopper and Gary Savage, who will run over when he notices you, giving you an augmentation upgrade canister for rescuing Tiffany. It's time to stop a nuclear missile Page has sent headed straight for the UC, which means off to the missile silo.


