 Encounter any problems with this walkthrough? Have comments? Let us know!
1:
Encounter any problems with this walkthrough? Have comments? Let us know!
1: You've made it to the helibase double-door entrance, and see an ambrosia container right in front of you near some crates and a likely NSF guard patrolling the area. As soon as you enter the giant room, there's a security camera right above scanning left and right. Straight ahead is no good for the stealth player. Instead you'll want to go both to the left and right branches of this room, which both lead to hallways and stairs up. We'll go to the right branch first, since it has a key we need. If Alex doesn't transmit to you that you've found one ambrosia canister and need to find the rest, get closer to the one in view, avoiding the camera above, until he transmits.
2: Wait until the camera moves away and make a break for the right offshoot of this large room. In the long hallway to the left just before the big staircase, there will be two bathroom doors. Go in the first. There's an NSF guard standing on the opposite end... so take him down and then his nanokey, which unlocks doors on the left branch. We'll go there now.
3: Avoiding the camera in the next room, break for the left side of the large room. Again there will be a hallway to the right with two doors, this time offices with supplies. A guard can come patrolling this area so be careful. Once you're finished with the offices, head upstairs and around the bend to where a guard is walking the upper overlook to the large room. Wait around a corner and take him out when he comes by.
4: The nanokey ring you have now unlocks the door in the hallway you just passed, which has a ladder we're not using, and if you turn left where the guard was patrolling, the door at the end, both which take a lot of tools to bypass. It's a good thing we have the key. Enter the door to the left where the guard was walking. You'll enter a control room with another NSF guard standing at the counter. Sneak and take him down, and then hack the nearby security terminal to shut off all three cameras... including one on the right side.
5: Check behind the plant on the same counter where the guard was. There's a switch that opens a very nice armory, so stock up.
6: Your keyring also unlocks the door in this room which leads out to the helipad... but we're going to take the entrance from the right branch upstairs. Head back down and take the right branch, this time going upstairs. Wait for the guard to come just shy of the bend, and take him down.
7: It's a recreation room with supplies, ATM, etc. The camera should now be turned off so don't worry. Be sure to check the small crate cache along the bookshelf wall for bonus points. When you're through, head out the door at the far end to the helipad.
8: Your goal is to descend via a grate in the northwest corner. Rather than stepping out onto the helipad itself, drop down from the plank you step out on into the shadows below and stay there unseen. You need to make it to the north side where the crates are and the best way is to stay in the shadows. Thankfully you can get fairly close to the NSF guards while hiding in shadows so do that to cross the gap, and beware of the couple NSF patrolling through the crates on the other side. Make your way left to the corner and open it to reveal a tunnel. Drop down with a splash, we're going swimming.
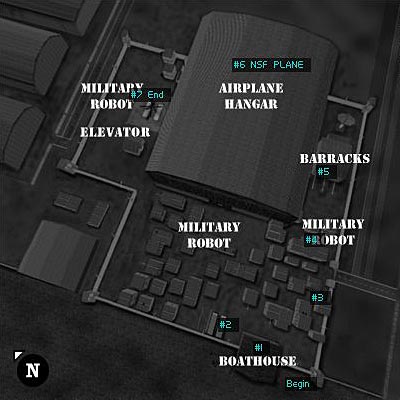
9: Swim to a large room with floating crates and a ladder. Take the ladder up, and jump across to the platform next to a large pipe. Move the crate in your way and jump across into the pipe. Upgrade any speed augs you may have, turn on your speed and aqualung, and swim through the underwater tunnel until you get spit out in a harbor near a boathouse where it says "Begin" on the map. There's an NSF walking the length of the dock and back ashore at #1. Surprise him with the prod, take his nanokey to the East Gate and search the area for supplies. There's an Ambrosia container along the left side and Alex tells you that the last one could be on Lebedev's jet. You're also ordered to find and kill Lebedev.
10: Tranq darts are in the first trailer on the left side of the boathouse at #2. You can move a small crate next to the window, break it and sneak to the trailer if you want. Sabot shells are in the other trailer next door. Beware of a guard who creeps near the front of the boathouse to the beginning of the trailers.
11: Should you be interested in some secrets and supplies, make your immediate goal a ladder near the south gate at #3 on the map. Beware patrolling robots here. Climb the ladder to the top of the shipping crates, and make a jump across to the obvious room on top of nearby crates for a secret inside of two small crates.
12: Continue jumping (activate your speed if you feel unsure) from the secret room in an obvious pattern across the crates toward the south gate where you'll see a crate just poking out in another similar room ahead, near #4. Some of the jumps can be large but you can make them without speed. Grab the weapon mod and take the ladder down at #4 to espy the east gate with guard near the red control box.
13: When the guard walks out of view, sneak up on him and take him down, then use the nanokey you got from the boathouse guard at #1 on the lockbox, then hit the switch to open the gate.
14: Proceed to the barracks at #5 and enter through the unlocked door on the left side of the building. Alternately you can stack crates next to the back window and enter through it. There's a guard patrolling the stairway and walkway above, so take him out first and grab his nanokey that unlocks the door along the walkway ahead.
15: Silently walk back downstairs and around the back of the staircase. There's a hidden brick on the wall you can push to reveal another large armory. Grab the goods and get back upstairs to the door along the walkway, which will open with your nanokey ring.
16: This is the same room you'd enter if you stacked crates. Inside is four foot lockers. The one on the immediate left has a datacube with the hangar door code, 5914. The one to the right just inside has a LAM. The back left locker has a biocell and multitool. The one on the right just plain darts. Head back out to the door at the end of the walkway.
17: Enter the code 5914 on the hangar door and enter the hangar. Descend the stairs and Paul will run to you with a secret. He's joined the NSF and wants you to join. You seek proof of his claim that the Gray Death is manufactured by UNATCO. He tells you Lebedev in the 747 can convince you and to see him. The NSF in the area are non-hostile, so feel free to explore and search the trailers for crates.
18: Enter the 747 at #6 (just a tad obvious), and head upstairs to grab the nanokey to the private quarters near the back of the plane on the main level. Use your key ring on the door and grab the assault rifle off the table in the first room and head back to see Lebedev.
19: Start a conversation and he'll start trying to convince you to join. Anna Navarre then shows up and tells you to get on with it. Talk to Lebedev again to learn more. Anna will again interrupt telling you to leave now... which is your last warning. I'd recommend taking this chance now, and if you want to join the NSF (which the walkthrough will follow), use the assault gun on Anna in the head before talking to Lebedev again. You'll be partly damage by Anna's weapon and subsequent explosion but will be okay, and importantly, Lebedev will remain alive to explain more about the NSF and your "parents." So keep talking to him to learn more.
20: Read the datacube under the bed, giving you the code 9905, and head downstairs to the cargo hold. You'll find the last Ambrosia container and an
AUGMENTATION CANISTER locked away. Use the code above on the security panel and take the aug. Alex will have told you by now he'll erase the logs for you, and that you should head on over to the helicopter on the other side of the base, at #7.
21: Head on out of the hanger, through the barracks, and around the hangar to the helipad at #7. You may want to loot the corner towers with security cameras and turrets now that they no longer function. Above #7 is a locked area with electrical fields gone awry and crates inside. It's worth taking the supplies from the crates and then going back to the helicopter. Gunther will be walking around, so talk to him if you want to learn that he's been assigned your brother's assassination. Nice. Now board and fly off to UNATCO HQ for a debriefing.


