 Encounter any problems with this walkthrough? Have comments? Let us know!
Welcome to Liberty Island, JC. As I mentioned in the introduction, this walkthrough will be primarily stealth-based. Your primary goal -- as you'll find out from your brother Paul when he briefs you on the docks (just run a few steps forward)-- is to find the NSF threat within the Statue of Liberty. For a bonus, you'll now have two secondary goals. One is to locate your informant Harley on the North Docks at some point (who will give you the code to the front door to the statue), and the other is to break out a UNATCO agent (Gunther) who's being held captive inside.
I'm now going to re-paste this trimmed paragraph from the intro because it should be stressed:
Be sure to search everywhere for datacubes (that usually contain helpful information and/or codes), ammunition, weapons and supplies: this includes under tables, on top of shelves and high places, in wooden crates, behind crates, in dark corners, under secret floor panels and within secret wall panels, underwater... virtually anywhere that is not immediately obvious. Deus Ex is stuffed with extras.
1: When speaking with Paul, he'll give you the option to take another weapon. I'd suggest the sniper rifle, as you'll find a crossbow if you're thorough and we're not taking the direct brute force approach. Now take some time to familiarize yourself with the interface (if you haven't yet done the tutorial) and take the stairs nearby underwater for a couple crates with useful supplies. (Break them open using the crowbar you find on the docks.)
2: Look at your primary and secondary goals, and then follow the docks around to the small stairs that go up to the statue grounds. Once you go up these stairs, you'll find several NSF guards on patrol all around the huge grounds. For now, avoid the one coming straight at you by waiting until his back is turned and he's walking the opposite direction, head up the stairs and to the left behind some crates. It often helps to crouch walk.
3: On top of the crates you'll find a breakable supply crate, so wait until the gaurd is away, pick up the small metal crate nearby and drop it so that you can climb up. Jump up and break open the crate, taking what's inside. Wait for the guard to walk away and pay close attention to the guard you can see in the distance... which would be to the right of the entrance stairway. That's the direction we'll be using in this walkthrough.
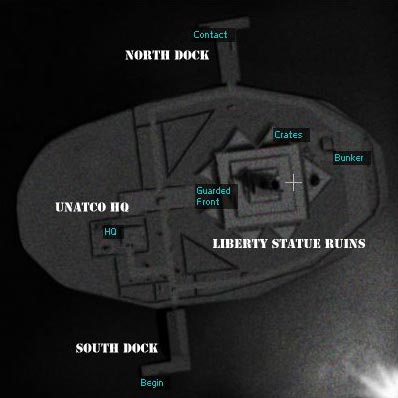
4: After this, I won't be telling you about every crate opportunity as it would become cumbersome to read and they virtually all use the same or similar technique. Anyway, we'll be moving along the right side of the huge base, up to where the map says "bunker". Once we clear out the bunker, we'll head north and around to the north docks, where we'll find our informant Harley. From there, it's back to the bunker where it says "crates". We'll climb them up to the statue base, and eventually make our way up to the top of the statue, before taking an inner set of stairs back down to rescue Gunther. Then we'll take those inner stairs back up all the way to the very top to finish the mission. Once finished, we'll head out the front doors (because it will be all clear) to the UNATCO HQ. That's it in a nutshell... now let's continue.
5: These guards are all pretty easy. They won't see you if you're crouched and slightly off their path, even if they would in real life. They will hear you if you run and are nearby, and they do occasionally spot you if you're leaning out in their direct path. But don't be too worried. Watch their patterns and follow along the right side perimeter of the statue base walls (formed in a rough star), keeping away from guards until you reach the bunker. At one point before the bunker, you will have to crouch and sort of walk outside in the "lighted" area around two guards who are close by the walls talking... but you won't get caught if you remain far enough. There will be a few other guards talking way off in the distance and they will not see you either if you stay crouched and between the two sets of guards. Simply walk around the first guards and then head back inward toward the star walls.
6: There's a lone guard walking a circular route around the bunker. When he's away, head down the sloped driveway into the bunker and stay against the left wall. There's another guard inside, so wait just outside the entrance in the corner, and when the guard is walking away from you, crouch, sneak up on him, and use the prod charger on his legs or lower back to drop him.
7: Search the area and notice an electric field gone haywire further in. Either take the hazmat suit off its hanger near the entrance of the bunker, and use it to cross the field, or break into the electronic panel on the other side of the forklift, or try this for free. Hop onto the forklift, press the forklift button, turn around and crouch/walk through the opening to step onto the actual lift that's now raising. When it stops, simply jump over to the other side safely. You'll get an exploration bonus and find some very useful items.
8: Make your way back out of the bunker, past the crates to the north side of the star, staying close. You'll see a patrol robot near the exit to the north docks. When the robot is walking to its right (east), make a dash for the north docks entrance, and head down the stairs, then wait.
9: Ahead of you, you'll see a stack of crates with a stationary guard on the right and a patrolling guard walking around them. Simply crouch and walk forward to your end of the crates when its clear, and then sneak around to the side with the stationary guard, who's facing east. Stay hunched around the corner until the patrol guard comes walking around, and prod him in the legs. He'll fall, and the stationary guard won't notice. Go back around to the left side of the crates and make your way north to the shack on the left.
10: Talk to Harley in the doorway, and he'll give you a key to the front entrance if you use the "trust me" line. Speak to the drifter girl in the shack for some ammo, and then go outside to the north part of the dock where you'll see an opening. Down below in the water is an underwater barge with a locked trap door on its top. Jump in, unlock the door, and by swimming up for air and back down, grab the weapon mods and supplies out of the crates inside the barge, and head all the way back to the crates near the bunker, avoiding all guards and robots.
11: Make your way to the top of the crate piles by using the ladders and jumping, and you'll find yourself on top of the statue base itself, with guards patrolling.
12: On the west side of the statue base, you'll find a couple sets of stairways leading up to the top. Use whichever way you prefer to get around to the west side, and up both sets of stairs.
13: Once at the top, you'll find a pyramid-like structure with entrances at each of the four sides. Also, there will be active LAM's against a couple walls of the entrances, so sneak up, disarm and take them for your own. When the LAM's are gone, sneak inside but watch for the two guards talking. You'll find both a stairway up fairly close to the guards along the wall (but accessible with sneaking) and a stairway down within the central chamber. The stairs up lead to your primary goal, and the stairs down lead to the inner base where you'll find Gunther being held captive.
14: Take the stairs down and you'll see a long corridor with a guard patrolling it. There's an obvious niche to stay hidden from the guard a ways down the corridor by the crate. Do so, wait until he passes and then continue down some stairs to a small alcove with a security camera and mounted ceiling turret. You'll see the big statue lobby in front of you with a guard patrolling around the giant fountain. Scoot along the camera wall when it isn't looking until you're under it and when the camera is facing left it's facing left, head out to the top of the stairs and hug the right side, waiting for the guard below to pass. When he does, proceed down the stairs down and head to the right side of the stairs to the table there with items and datacube.
For a few more items, instead of going right in the lobby, there's an ATM on the left side along with a stairway up on both the left and right. You'll have to watch for the guards, but a few useful items spread around.
15: Pick up the items off the table and read the datacube, which gives you the login name and password for the computer where Gunther is being held. You may already have it, but just in case....
16: Head to the right side of the main stairs. Against the wall between the stairs and the wall with the laser alarm there's a ventilation shaft. Crawl through it, and you'll be in a room with a locked door. Don't go through it at the moment, but continue through another shaft ahead of you into another room. Take what's there, read the cube for some ATM access codes, and now go back to the previous locked door.
17: Unlock the door in the first room you found through the shaft, and be prepared for two guards roaming around the areas. I would suggest tranquilizing them with darts to get by but do whatever suits your style. In the second and last room down the hallway (you will pass the laser alarm into the lobby), there will be a guard sitting down in a chair. It's possible to crouch/sneak past him if you hug the wall to the right, making sure to also avoid the security camera above. Otherwise, prod or stun him from behind.
18: At the back of the room is a computer access panel. Open it, and use the NSF001: smashthestate access codes you've already got to log in. Open the door to Gunther's cell and release him. Talk to him but refuse to give him a gun (as he's quite able and ready to use it on NSF). He'll stay put but you'll have completed your only other secondary objective. Don't forget to take the weapon mod on the desk, and maybe the soy from the counter. Now to go back upstairs.
19: Whichever way seems easiest to you, head back out the way you came, into the lobby, up the stairs with the security camera, and up the flights of stairs to the top of the tower statue. Now we're going to take the stairway that leads up. Remember the two guards there? Sneak past them to the stairway and head up. At the top, after a few stairways, you'll find another two guards. It's possible to sneak behind them so try that if you like. I snuck up on the first, prodded his legs, and then stunned the other one as well before he could react so as not to kill anyone. Continue behind them up a ladder and another staircase, and you'll be at the very top with the NSF terrorist leader. Talk to him, and learn as much as you can. Continue talking with him after you've completed your primary mission, and you might deduce that maybe it's not the NSF who's the cause of all these problems.
20: After talking with the NSF leader, grab the
AUGMENTATION CANISTER behind him and scoot back down the building in whichever way you prefer, as you won't have to deal with anymore NSF throughout the entire level. The front doors work well... and once you're out, head to UNATCO HQ, on the west side of Liberty Island to talk to Paul who's standing outside.


