Encounter any problems with this walkthrough? Have comments? Let us know!
1: UNATCO wants you dead. Badly and obviously. Welcome to the Naval Shipyards, where, once you reach the ship, you'll toss five LAM's near five strategic weak points in the ship's hull, reverse the bilge pump, and get the heck out. But first, to make it to the ship.
2: It's actually very easy to do, but of course we'll want to explore some, get some more equipment, etc. Basically, prepare. This is not the "quickest path" walkthrough, but a complete method of completing the game in a stealthy/snipish way. If it were the quickest path walkthrough, I'd tell you to open the main gate, make a b-line to the crane in the northeast using Cloak when spotted, run through the passage under the crane, take the lift to the top, flip the switch, crawl over the crane to the roof, enter the air conditioning shafts, take out the giant fan with a LAM, follow the shafts to the end (dealing with spiders ahead using a nice gun, Spy Drone aug or EMP), open the grate, jump to the ship, climb the first ramp you see up to the door, take the ambrosia sample in the chem lab on the first floor, make your way to the upper deck by taking the ventilation shaft on the second level and climbing the ladder, drop down into the captains quarters, grab the below decks key, head back down below decks, use the map to place explosives where each X is on the map, first by placing two in the huge engine room you enter into, then one in the bilge room, reversing the bilge using the computer, head back to electrical, bypass one panel in the room, head down the grate and bypass both panels down there, head back up, toss another LAM in the same room, climb the ladder, cross the bridge, take the grate down to the helipad area, throw a LAM against the back wall, head back up and out of the ship the way you came, jump to the dock, take the lift on the right back up to the air conditioning vents, and proceed out to the helicopter to end the level. But it's not.
3: You remembered to talk to Vinny the sailor in the Underworld Tavern last mission? You'll have some help getting through the main gate in that case. Head through the grate in the drop off area. Follow the path to a guard outpost with friendly marines; the ones inside will not be so agreeable. The marine just ahead of the guard post will stop you and give you a key to the main gate if you spoke to Vinny. If not, there's a grate you can enter between the guard houses. Your goal is to make it to the door at the base of the large crane way off to the north east. The large building though the main gate to the north is where we want to go first, for some supplies and useful codes.
4: Alternately, if you have a high speed augmentation, you can drop a garbage can ~5ft. in front of the gate and use your speed to hop on that and hop right over if you didn't get the key. Open the gate and to the right you'll see some trailers. Each locked door is at 35% so if you have a powerful weapon such as the Dragon Sword, you can just cut through the doors for some useful supplies.
5: Take the door through the north when the guard is away, crouch to avoid the camera through the room on your left, and walk just past the vending machines. There's a security computer terminal on the stair wall, so hack into it to open the door within the nearby room, and turn off all cameras. Head back into the room.
6: In the desk is the key to the trailers outside (in case you skipped it and/or want to go back), and a security code "usfema" and "security". Use your Dragon Sword to hack through all the weak locked drawers and desk doors. Head through the now open door to the right. Hack through the locked cabinet and take the commander's office key, the supply closet key and the ammo warehouse key under the desk. Use the security terminal and "usfema" and "security" code, and you'll have access to cameras, security and perimeter robots. Put them into stand-by mode.
7: Walk into the unlocked bathroom, open the cabinet and stall and read the datacube, which holds the code to the door near the base of the crane, 0909. We won't go that way, however. There's another supply room here and you can hack or shoot through the door with whatever works for you. Head back out and up the stairs that the security terminal was on.
8: Watch for the guards, stay low and take out the guard on the walkway beyond, leading to the ammo warehouse. There will be a guard below this bridge doing a patrol and he may spot you so either take him out, act quick or act only when he's not looking. Use your key on the door, and you'll find two robots inside, hopefully in stand-by mode. If not, peek through and toss a scramble grenade (or LAM) below. With the scramble, they'll start attacking one another, and likely the victor will likely walk outside start killing the troops that open the main door when finished. If they're near the barrels below you can also shoot the barrels to blow the robots up.
9: Enter the warehouse, and proceed to the corner office. Use "usfema" and "security" on the terminal in the room to put robots in stand-by, disable cameras and open the storage doors. Alarms will sound but it's okay. Enter the storage areas and grab all the supplies, as well as the LAM's if you don't have them. Climb the platforms above the storage areas to the highest one to receive a small skill bonus.
10: Likely the large main door is open due to the robot fighting. Across the way to the left is the commander's office. You can break and enter through a window by stacking a barrel in front of it, or use lockpicks on the door. Inside is a camera. Flip the light switch or use your light to find the security terminal against one of the walls, use it with the "usfema" and "security" access codes, and turn off the cameras. There is not much of note in the drawers and cabinets in here but some, so use your sword to break them all. Use your commander's office key on the door by the security terminal to enter his office. Inside his desk you'll find a weapon mod, storage key for the room next door, and the safe has an aqualung/environmental
AUGMENTATION CANISTER. The datacube on the desk has the code for the east warehouse, 2249.
11: Use the storage key on the room next door for some supplies and head to the next building to the west. Inside is a repair bot and some supplies. Exit and open the nearby gate for a skill bonus, and head north toward another building. Just a ballistic armor inside if you want to spend the lockpicks. Step through the small alley on the right side and hold up before you emerge. Across the way you'll see the crane and a small tunnel at its base. Beyond is a door. Time for a decision. I'd advise going through the tunnel and up the crane but you can also try the door, while being more exposed to the robots who can tear you apart unless you have some Thermoptic camo handy. The reason for the crane is that there are spiders through the air vents above that are much easier to destroy going this way then when you inevitably head through the same vents at the end of the mission on your way to the roof. Either way gets you to the same place eventually, the ship.
12: The walkthrough uses the crane, so dash across to the tunnel and take the lift up. Enter the small room, take the nice 30.06 ammo and sniper rifle, and hit the switch to drop the crane over the roof. Walk across and jump onto the roof, getting a bonus. This is where you need to be at the end of the level, so we'll make it easier to get back here when you need to.
13: Head through the grate shaft to emerge in a room with giant fan and three nasty spiders below. Use your Spy Drone aug's EMP blast if you have it, or else your assault gun or other heavy weapon works adequately (though burns through ammo of course). If you have an EMP grenade you can simply use that to disable them, or a LAM. Toss a LAM onto the giant fan to blow it up, eliminating that death machine, head down the ladder, grab the supplies and proceed through the grate, not the door. The door has another spider and we can avoid it now and on the way back. Take the shaft to the elevator room, enter a nearby room as a bonus and note the giant grate near the elevator. You can use it to jump to the ship but we'll instead take the nearby ladder down to the dock and use the code to raise the gang plank.
14: Use the ladder, head out of the room and onto the dock, and there will be a few guards patroling its length. Up and to the right is a door to the offices, just across from the gang plank keypad, so when its clear head through the door. There are a number of ways to get the code to the gang plank. Talk to the mechanics in the break room if you previously spoke with Vinny last mission, open the lockers in another room for the code, or read the datacube further in, inside the guard office on top of the desk. The code is 6655.
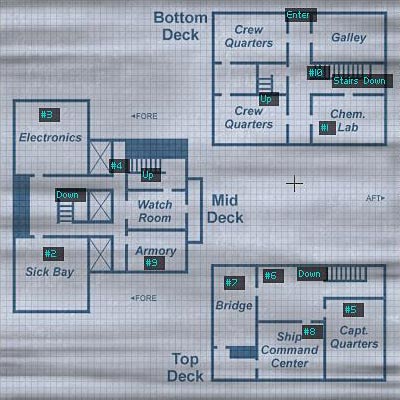
15: Use it just outside the doors on the dock to raise the plank. Walk up it and take a right. Go all the way back and left, and inside a crate you'll find some nice ammo. You can take either ladder down the other side of the ship, each for a small bonus, and climb back up. When you're through exploring the main deck of the ship, head up either of the main ramps to a door on both port or starboard sides. The doors both face each other and are on either end of the same hallway once inside so it really doesn't matter where you enter. The map shows you entering from the dock side, or starboard side door.
16: Watch for sailor patrols on each level, though only a couple per. The main room on the first floor is the chem lab, indicated on the map at #1. Grab the ambrosia vial near the microscope on a counter, and lockpick the safe for an AUGMENTATION UPGRADE. Head up the stairs to level 2. Our goal is level 3 and the captains quarters.
17: Watch for the single sailor walking in circles around the area, and at the top of the stairs hang a right into the sick bay at #2. There's a medbot here and a desk with a cube containing a useful engineering bridge code we'll use in the near future, 9753. Open the cabinet door for the below decks key. We could head below decks now but there's some good stuff upstairs, including the armory code. Exit through the vent shaft and head up to the Electronics Lab at #3.
18: Read the datacubes for an ops code 83353 and access code "root" and "reindeerflotilla". Pick up all the supplies in cabinets and on desks including weapon mods, and head back through the grate. Exit through the grate in the middle, watch for the guard, take a left (clockwise) around the circular level to a grate along the left wall at #4. Enter, take it to the ladder near the end, climb the ladder, and take the first branch left to find a grate right above the captains quarters on level 3.
19: Drop down, and through no one will be there, the sailors outside might hear you but will do nothing. Use the holo projector by flipping the switch, take the credits, read the datacube on the desk for the armory code 71234, and another under the bed for the access code "kzhao" and "captain". The key in the nightstand is another below decks key.
20: Head out through the door, avoiding or taking out the sailors, and use the "kzhao" and "captain" name and pass to access the security terminal at #6. You can open the armory door here (unneeded really since you have the code but easier) as well as the command center door, and turn off the cameras. Enter the bridge room at #7 and exit through the door outside to get a small skill bonus. Go through the bridge to the command center at #8 to get a weapon mod, security code 65678 from a datacube, and nanokey for security access.
21: Head back down to level 2 via the stairs and into the armory at #9. Some nice stuff in here. When you're done, head downstairs to level one, and then below decks at #10, using your nanokey ring to unlock the door. Proceed down to the engine room and the crux of the mission, placing the explosives.


