 Encounter any problems with this walkthrough? Have comments? Let us know!
1:
Encounter any problems with this walkthrough? Have comments? Let us know!
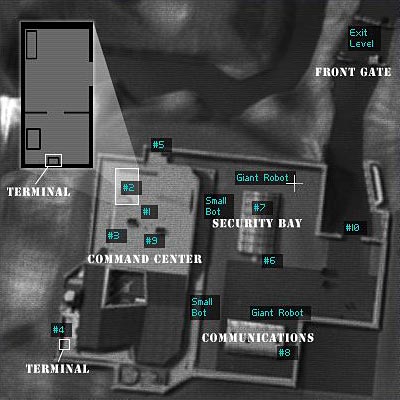
1: You land on the roof of the command building and have a chat with Carla, a scientist, who gives you the code 5868. It's a secondary goal that helps achieve your primary goal and one that we'll do first, since it's fairly easy. With that code, you're supposed to access the two terminals found on your newly acquired map (and that I've labeled #2 and #4), and input the code on each to activate security bot defense. Around the base there are four enemy bots, two large and two small (also added by me). By activating the security bots in the security bay at #7, and letting 'em loose, they'll help take out the enemy bots and you'll have essentially free reign to walk around, at least outside.
2: Head through the rooftop door at #1 and down a couple flights of stairs. You'll come to a security camera that can be sniped off, snuck by or bypassed via a nearby security computer terminal. Your choice. Head through the door nearby and up the ladder in the next room, breaking open crates as you feel necessary. To the right of the ladder is a large shaft with a body at the bottom. We're going to jump down. If you have the speed enhancement it helps to take no damage but it's doable even without. With speed turned on simply jump down safely. Without, jump toward the right wall and you'll be stopped by a small ledge one floor down. Then jump all the way down, sustaining less damage.
3: After the small skill bonus, grab the nanokey next to the body, climb through the grate and you'll be right next to terminal 1, where you enter the code 5868. Simple eh? Yes, there are more difficult ways to do this. It's more or less below #2 on the map. Later in this level you'll probably want to go swimming and there's a rebreather in the locked cabinet in the next room if you should not happen to have good swimming or aqualung. Go up the stairs in the next room to the door. Quietly open it and you'll be faced with two reclined guards on the sofa. Take them out as you wish and walk along the catwalk up here until you get to the elevator. The guard across the way with his back turned (on your same level) will pay you no heed. Take the elevator to floor 3.
4: When the doors open you'll have another two guards to take out, easily if you want with the prod charger. Run ahead into the room with the ladder and shaft you entered at the beginning. Nice little circle. Now head up the stairs back to the roof where Carla is. Walk around the rooftop door to the west side of the building, at #3. Look over the ledge and you'll see a door and platform about a story down, and probably a little to your left. Jump down and enter the door. Climb the ladders all the way to the bottom and pick or blow up the locked door below, which leads outside.
5: Exit and to your left you'll see a guard tower with two guards patrolling on its upper levels. You can safely sneak by without alerting them if you prefer, yet there's a small skill bonus for going to the top and crossing a pipe to a secret area. Walk past them to a set of large pipes along the ground. On the other side of these pipes is a set of box housings, and on the last one is the other terminal at #4. Sneak to the end and enter the code 5868, and you'll have put the security bots back online. Now to have a little fun.
6: Head back past the guard tower and then turn right, east around the far corner of the building. A lone guard patrols this side. Take him out using a prod if you wish, walk down the small set of stairs at #5 to the ground, and follow against the wall until you reach the end, which opens up to the outside bunker area. The first bunker you see on your left is the one we're looking to enter, the security bay, and its entrance is on the right, near #6. There's a giant robot patrolling in a clockwise circle around this one and the one to the far right. When the nearby robot is not in view, head straight up behind the nearby bunker, and take a right, following its walls. When you get to the end, take another right and you'll see the door you need to enter. As long as the nearby robot doesn't see you, you're okay so hit the switch and enter.
7: Here's the scoop. There are two friendly giant robots inside, which when you turn them on, head outside to destroy any enemies they encounter. Yet they're not invincible. My advice is to wait for the big enemy robot to come around near the entrance door, with you inside, pass it up, and for you to toss a LAM at it to either blow it up or weaken it substantially. Or, an EMP to disable it first. Then your security robots should have no trouble with the either large robot, the two small ones patrolling near the large building you just walk out from, the MJ12 commandos near the front door, or the MJ12 troops further east, which will all be killed.
8: When that's taken care of, head inside (#7) for the decent supplies, hit the two switches for each security robot and just watch them work. It's easily one of my favorite parts of the game. When the dust settles and you complete your primary objective, to get rid of the lockdown, rest a little easier, because though there are still a few guards inside the building, you have free reign of the outside. Inside, there are places to explore but you can easily do that after our next mini-mission, going underground.
9: Enter the other bunker, the comm bunker, through the east door at #8. Talk to Dr. Mares, who tells you that Dr. Savage can be found via the trap door in the back of the building. Head back, and for an augmentation upgrade, open the second locker from the left. The far right locker has a datacube with the login: "tunnel01" and "omega2a". Head through the trap door in the back, descend the ladder, and be prepared for two spiders. You can use your spy drone, EMP grenades (which are fairly scarce in the game but don't save them all), or powerful gun to take them out but there is a better way. Just ahead of the first set of crates is the first spider. Near it are two gas barrels. Take out your rifle, sneak up to where you can see the spider and barrels, and blow the barrels up when the spider is near. That's the first. The second is further ahead again near a couple barrels. Blow them up to take care of the spider.
10: Ahead down the corridor is a security terminal. Use the "tunnel01" and "omega2a" login to disable the camera. Pass up the generator room door because we'll be coming back through it in the near future. Use your tools to bypass the lasers, else you may encounter a bug where the door up ahead remains shut if you blow up the nearby barrels to kill the alarm spiders. Head through the open hazard door ahead and you'll be in a small room. Open the door straight ahead to see the radioactive area beyond. We'll bypass that. To your left is a locked maintenance door which we'll get the key to. Instead, head right through a grate on the ground, enter the shaft and drop down into the water from the first grate on the floor you come to.
11: A body in orange suit is floating nearby and below him is a nanokey to the maintenance door we just saw. Equip your aqualung and/or rebreather because we'll need to use multitools below if we're to get an augmentation upgrade. Swim through the lower level opening, and take the stairs down rather than up. Use your multitools underwater to open the door, and search a nearby body for the augmentation upgrade canister. Take the stairs back up to the door, hit the switch, and you'll notice that it was the generator door you passed awhile ago. Head right and back through the hazard door to the maintenance door. Open it using your nanokey, climb up a ladder and head over the radioactive area for a decent skill bonus.
12: You'll come to a ledge and door just below you, a large room with crates ahead and below the ledge, and another ledge beyond. A spider is in the crate room, and another one is on the ledge beyond. A safe thing to do is to crawl forward as far as you can while still up on the pipes, and toss an EMP to the spider on the far ledge. Then crawl back and jump down onto the first ledge before the crate room. Take out the spider below however you wish. Enter the door, descent the stairs, and eithe bypass the panel with laser grid nearby or get out your sniper rifle. Stand behind the laser grid that you can bypass, and keep an eye on the far end of the hallway, at the ceiling, for that's where the turret will come out. Break through the lasers and zoom up to the turret being dropped. Hit it with your sniper rifle where the bullets are coming out and it should disintegrate. Head around the corner and up the stairs to the control room. Bring the bridge to level three, which allows you to cross over the room with the crates.
13: Search the crates in the room for some items if you want but be careful of radiation from the barrels. Head back out, down the hallway, up the stairs and cross the bridge. You'll have another spider here to deal with if you didn't take it out when you were on top of the pipes above. Ahead is a body with a nearby nanokey to the control room. Climb the ladder nearby, open the hatch and climb into a storage room. Open the door and you'll be outside, near where terminal one was. Beware of MIB and MJ12 troops down here.
14: Use your cloak if you want or take them out, your choice, take a right after you exit through the door and you'll come to an elevator on your right. You can, if you want, take this opportunity to explore through the door ahead of the elevator. Beyond the door is the large lobby area of the building, a few cameras that can be bypassed, and further in, a hazard lab with Cloak/Radar
AUGMENTATION CANISTER. If you wish to explore, take the stairs to the second level once inside, head across to the next room with holographic globe and table, lean over the edge and take out the two guards below, drop down and enter the hazard lab. You can jump across the floating crates and submerged tables to find some decent items including the aforementioned aug canister. Outside the hazard lab is a locked room with a trapped scientist. The nanokey you got from the beginning when you jumped down the large shaft will work here. Unlock the door and receive a small exploration bonus, a code that you've already used "tunnel01" and "omega21" and EMP grenade from the scientist, and items from the crates.
15: When you're ready, head up the elevator near where you exited from the tunnels to level 2. Take down the guard (if he isn't already) standing next to the control room door (roughly below #9 on the map), pass over to the other side and enter the door. Take the stairs down to the lab. You'll see Sam Carter on the top of the stairs to the lab so have a chat with him. Then head down to the lab area to meet with Gary Savage, who agrees to manufacture an antidote to the virus once his computers are functioning again. Unfortunately, in the room beyond, there's a lot of electric static and broken down equipment, yet that's where we'll need to go. He gives you the logon "gsavage" and "tiffany".
16: Back upstairs near Sam Carter is a door that leads into the room gone haywire. Enter through the door and grab the nanokey from the nearby cart. Head back all the way upstairs and use your nanokey on the door. At the back of this glass room is a giant fan. Throw a LAM at it and you'll have an alternate entrance into the hazardous area below. Climb through the new opening into the room beyond, where just below is a bunch of static. Drop down near the broken electric terminal in the center of the room, throw on a hazmat suit if you need to and bypass the terminal with multitools.
17: You can safely now walk to the computer and login using "gsavage" and "tiffany". Choose to upload the milnet and you'll get a nice skill bonus and a cutscene where Daedalus and Icarus merge. Head back to the lab using the lift on the floor you're currently on, and notice the Page hologram, who will remark that not all is going according to plan; he's got Savage's daughter Tiffany and gives him an ultimatum. You agree to help rescue his daughter and receive a picture of her from Savage. Take the stairs back up and you'll be told to meet Jock at the northeast entrance to the base.
18: Remember the bunkers outside? You can now exit through the front doors since the outside is clear. Head out of the control room area, across the bridge to the elevator, down to level one, take a right and go through the door into the giant lobby area, head out the front doors, and exit through the northeast gate at #10. Head down the path to find Tong (who's going to see Savage about a cure), and beyond him, Jock's chopper, which will now take you to the Gas station/junkyard area to rescue Savage's daughter.


