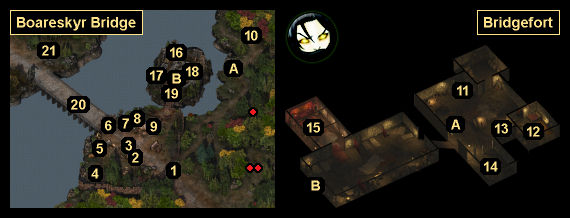
 Did we miss anything in this location? Is there something we didn't discover? Let us know!
Overview
1 - Crusader Sergeant
Did we miss anything in this location? Is there something we didn't discover? Let us know!
Overview
1 - Crusader Sergeant
When you approach the crusader camp, the sergeant here will stop you and demand to know who you are. You'll have three ways to get past her:
- You can rescue (or kill) Kharm's nephew Keherrem from the
Temple of Bhaal in the
Forest of Wyrms. You'll then be able to explore the camp without restrictions. Each character in your party will earn 3000 xp if you choose this method.
- You can attack the sergeant and the other guards -- plus the rest of the camp when they realize what's going on. Eventually the Bridgefortians and Flaming Fists will join in, but it's probably best to do some attacking and retreating so you don't get overwhelmed. You should also head into Bridgefort first (via Exit A) so you don't miss out on any quests.
- You can claim to have a message for the Barghest. If you the guards believe you (you might need a high Reputation for this to work), then they'll put you in jail (#4) until they have time for you. To break out of your cell, you'll just need to pick the lock. The jail guard will recognize you from the
Nashkel Mines and let you escape. You'll then be able to explore the camp without any restrictions, and nobody will notice that you're supposed to be behind bars.
2 - Delgar Munsch
Delgar won't have much to say to you. If you kill him, then you'll earn 975 xp, and you'll find a
Potion of Hill Giant Strength on his corpse.
The first time you enter the camp, you might notice a chicken right next to Munsch. If you click on it, then it'll jump into your inventory, and you'll end up with a Dusty Chicken that "could use a bath." The chicken is one of the things you can drop into the old well (#21). The chicken will disappear from the camp if you wait too long to collect it.
3 - Kharm and Keherrem
You'll meet Kharm here when you first arrive in the crusader camp, but Keherrem will only show up if you rescue him from the
Temple of Bhaal. If you tell Kharm about your rescue of Keherrem, then he'll give you 250 gp -- unless Keherrem is dead, and then you won't get anything. If you ask Kharm about an assignment, then he'll order you to find the Wardstone in the
Temple of Bhaal and use it to infiltrate Bridgefort. However, you won't really be able to do these things -- for the crusade at least -- and so Kharm's orders won't amount to anything.
If you kill Kharm, then you'll earn 1400 xp, and you'll find a
Halberd +2, a
Helmet of Charm Protection, a
Potion of Fire Giant Strength, and a
Potion of Heroism on his corpse.
4 - Jail Cells
This is where you'll get sent if you pretend to have a message for the Barghest when you talk to the sergeant at the front gate (#1). You'll just need to pick the lock of your cell to escape. In another cell you'll meet Dorn. He's a Neutral Evil Blackguard, and he'll join you if you invite him. You'll earn 6000 xp for releasing him. Finally, you might notice two trolls locked in cells as well, but there isn't any way to release them.
5 - Vichand
If you kill Vichand, then you'll earn 1400 xp, and you'll find a
Potion of Extra Healing and a
Wand of Paralyzation on his corpse. You should be able to kill Vichand without the rest of the camp noticing. But note: Vichand is a part of Hess's quest (#12), so you shouldn't kill him until you've received that quest.
There are also three containers next to Vichand. In a chest, you'll find Dorn's gear, which by default includes
Full Plate Armor, a
Girdle of Piercing,
Rancor +1, and a
Ring of Protection +1. In a bedroll, you'll find The Troll-Tender's Journal, which will give you some background information about the camp. And in the cart right next to Vichand, you'll find an Arcane Scroll of Impactful Doom and a Planetar Feather, but he'll notice if you try to take them. So you'll have to threaten him for the items or kill him and then take them. You'll need the scroll for Hess's quest (#12) and the feather for
Neera's companion quest.
6 - Locked Gate
This gate will only open after you've dealt with the siege of Bridgefort.
7 - Hormorn
If you kill Hormorn, then you'll earn 3000 xp, and you'll find 20
Bullets of Ice +1, a
Knave's Robe, a
Potion of Extra Healing, a
Sling +1, a
Wand of Fire, and a
Wand of the Heavens on his corpse.
In the crate next to Hormorn you'll find a
Potion of Healing and a
Potion of Heroism.
8 - Oloneiros
If you kill Oloneiros, then you'll earn 5000 xp, and you'll find 40
Asp's Nests +1,
Bracers of Defense AC 6, a
Cloak of Protection +1, a
Potion of Clarity, two
Potions of Extra Healing, a
Staff Spear +2, a
Traveler's Robe, and a
Wand of Frost on her corpse.
9 - The Barghest
If you kill the Barghest, then you'll earn 3000 xp, and you'll find a
Chill Axe +2,
Full Plate Armor, a
Large Shield +1, two
Potions of Extra Healing, and a
Potion of Power on his corpse.
In a crate next to the Barghest you'll find a Tepid Mug of Ale, which you might need for Lieutenant Otilda's quest in the
Troll Claw Woods.
10 - Goblin Cave
Inside this cave, you'll get attacked by over a dozen goblins, including a Goblin Witch Doctor and a Goblin Chieftain. However, the goblins are pretty wimpy, and you might be able to kill most of them with a single Fireball. Afterwards, you'll find a
Potion of Clarity on the corpse of an adventurer and a
Circlet of Lost Souls in a rock.
11 - Jegg Hillcarver
Jegg is Bridgefort's quartermaster / smith. She'll sell you a variety of +1 and +2 items, including
Full Plate Armor +1,
Rhyte's Last Arrow +2,
Stalwart Scales +2, and
Steadfast +2. She'll also craft items for you:
12 - Wynan Hess
When you talk to Hess and tell him that Khalid sent you, he'll suddenly come under attack from an enemy mage, and Bridgefort's wards will fall. Your party will get energy drained, and a glowing blue spellstone will suddenly appear in the next room, killing three people -- Herdrin, Kendra, and Lexa. You'll then learn that the spellstone will continuously weaken the people in Bridgefort, and that the only way to stop it is to bring Hess the spell scroll used by the enemy mage who cast the spell.
You'll find the enemy mage Vichand in the crusader camp (#5). The spell scroll will be right next to him in a cart. You'll have two ways to deal with Vichand: you can kill him or threaten him. The former is pretty easy because nobody in the camp will notice if you attack him, and he won't last long with six against one. You'll also earn 1400 xp for the deed. But if you choose the latter, then just be sure to threaten Vichand again when you depart, or else he might raise the alarm as you're leaving the camp, and force you to fight everybody.
When you deliver the Arcane Scroll of Impactful Doom to Hess, he (or one of your own mages) will use it to dispel the spellstone, but a Wraith will appear once it's been dispatched. This shouldn't be a tough battle, especially since most of the NPCs in the room will start casting buffs on you. When the wraith dies, you'll earn 2000 xp. With the threat neutralized, Bridgefort will be safe again, and your party will no longer be energy drained.
Note: After completing Hess's quest, you'll be able to complete a quest for Junia (#15). You'll also be able to grab some Voidstone Shards from the remains of the spellstone. The shards are crafting materials you'll be able to use with Jegg (#11).
13 - Hoach Randymonk
If you have the Boot and a Half of Speed from Tsolak's coffin in the
Coast Way Forest, then Hoach will attempt to improve it for you, and it'll only cost you 1000 gp (if you offer that amount) or 1500 gp (if you ask him what the price is). You'll have to wait a day for him to finish. But note that the result is random. You'll either receive a real pair of
Boots of Speed, or else you'll receive a broken pair that will damage you and cause you to run around randomly. If you get the latter, then you'll be able to ask Hoach for a refund and get 100 gp back.
Hoach is also involved in
Glint's companion quest.
14 - Neera
Inside this cell you'll meet Neera, a Chaotic Neutral Wild Mage. She'll join you if you invite her.
15 - Temple
In this room you'll meet Junia and Frair Tajik, two priests of Lathander:
- After you've completed Hess's quest (#12), when you talk to Junia, she'll ask you to move the bodies of Herdrin, Kendra, and Lexa -- the three people killed by the spellstone -- to the temple's altar. The bodies are heavy, but you should have multiple characters in your party who can deal with the extra load. Once you've completed the task, Junia will have another favor to ask of you. She'll tell you that Kendra was the sister of the guard Tharantis (#18), and she'll ask you to inform him.
Tharantis will be devastated by the news, and he'll ask you to give him the gold chain that Kendra always wore. When you ask Junia about the chain, she'll suddenly start getting details about Lathander wrong, which Glint will notice (if he's in your party). If you ignore or don't detect the mistakes, then Junia will blame a priest named Ymori for the recent robberies of the dead, and she'll tell you that he's probably out wandering in the forest. If you accuse Junia of the robberies, and if you use her mistakes as evidence, then she'll attack you (see below).
You'll find Ymori's corpse in the northern part of the map, west of the spider cave (#10). However, when you try to loot it, you'll get attacked by a few Zombies and a Wight. After the battle, when you loot the Wight, you'll find
Herdrin's Short Sword +2 and
Kendra's Chain on it -- not to mention Ymori's Head. If you have Edwin in your party then he'll recognize that Ymori couldn't have raised the undead creatures that attacked you, and so the necromancer must be someone else.
When you return to Junia, most of your dialogue options will result in you accusing her of the robberies and her attacking you. Junia will summon three Wights to help her out (one for each of the bodies you put on the altar), but the battle still shouldn't be too bad. You'll earn 2500 xp for defeating the enemies, and you'll find a
Club +1 and Lexa's Ring on Junia's corpse.
When you return to Tharantis, you'll have two options for how to complete the quest. If you hand over
Kendra's Chain, then you'll earn 3000 xp and +1 Reputation. But if you force Tharantis to pay for the chain, then you'll receive a scroll of
Protection from Petrification, 50 gp, 3000 xp, and -1 Reputation. If you demand more payment than what Tharantis offers, then Tharantis will attack you -- along with all of the other Bridgefortians.
- Tajik will provide temple services for you.
16 - Elandro and Thirrim
When you talk to Elandro, you'll learn that he's deeply fearful of the crusade. If you tell him to "acknowledge it, accept it, and learn to live with it," then you'll make him feel better and you'll earn 6000 xp. However, if it's nighttime and if you say anything else to him, then a creature called Greater Feyr will appear and attack you. You'll earn 13,000 xp for defeating it, and afterwards Tharantis (#18) will walk over and ask you if you need anything. If you say potions, then he'll give you two
Potions of Healing.
Thirrim is an alchemist. He'll have a wide variety of potions for sale.
17 - Khalid
Khalid is the current leader of Bridgefort. If you enter the fort while it is still under siege, then Khalid will ask you to do two things: talk to Jegg (#11) and talk to Hess (#12). After doing these things, when you return to Khalid you'll have two options:
- You can surrender the fort to the crusade. Jegg will destroy most of the fort's supplies, so the crusade won't get much from the exchange, but you'll miss out on a big fight.
- You can fight the crusade. Regardless of how you attack them, the Bridgefortians and the Flaming Fists will eventually show up to assist you. But if you want the Flaming Fists to be there from the start, then you'll need to return to their camp in the
Troll Claw Woods and tell Lieutenant Otilda that "it's time to bring this battle to the crusade." You'll then automatically return to this map with the Flaming Fists in tow.
With the Bridgefortians and Flaming Fists assisting you, the battle should be pretty easy -- even if you hide in the back and don't do much to help out. Just throw out a Fireball or two when the crusaders are bunched together, and target the enemy spellcasters whenever you spot them.
The challenge for the fight might be in trying to keep Khalid alive. Depending on the save you imported into the game, it's possible that Khalid will be extremely low level and have no useful equipment -- but he'll still charge right at the crusaders and die in one or two hits. The only way to prevent this is to head over to Bridgefort when the fighting starts (if you're not there already), and talk to Khalid when he approaches the drawbridge. You'll be able to recruit him at this point, so you can quickly take charge of him and send him to the back of the fort where he'll be safe. The downside, of course, is that you'll have to fight the siege with a party of five, but with the Bridgefortians and Flaming Fists helping you out, this shouldn't be a problem. Or you can just surrender, and then nobody will die, including Khalid.
You'll earn somewhere around 20,000 xp for winning the fight, and you'll find all of the equipment listed for the individual crusaders (#2, #3, #5, #7-9), making the battle profitable if you can win it.
At the conclusion of the siege, Khalid will become available as a companion. He's a Neutral Good Fighter.
In a crate near Khalid, you'll find Worn-Out Boots. You might think that you can use them with Hoach (#13), but that's not possible. The boots don't seem to have any purpose.
18 - Tharantis
Tharantis is involved in Junia's quest (#15).
19 - Locked Drawbridge
Next to the drawbridge here, you'll meet the guards Estebarre and Mari. You might be able to threaten Mari into giveing you the Drawbridge Key, or you might be able to steal it from her. This will allow you to lower the drawbridge and surrender Bridgefort to the crusade. You can also surrender by recommending that option to Khalid (#17). Otherwise, the drawbridge will automatically lower when you attack the crusader camp.
20 - Bridge
Right after dealing with the Siege of Bridgefort, you'll learn that the crusaders are trying to blow up this bridge. You'll be told that you should hurry to stop them, but you can take your time. So if you just fought the crusaders in their camp, feel free to loot the corpses and rest first. You can even return to the Flaming Fist encampment in the
Troll Claw Woods to do some shopping.
When you reach this spot on the bridge, you'll encounter a handful of crusaders guarding a mage and numerous explosive barrels. The mage will summon two Greater Fire Elementals, and you'll need to defeat everything before the elementals can ignite the barrels and blow up the bridge. The timer for this isn't short. As long as you stay and fight the crusaders and elementals, you should be able to defeat them in plenty of time to save the bridge. However, if the bridge does blow up, then your entire party will die and you'll have to load your game.
To move past the barrels, you'll have to return to the crusader camp. There you'll run into Bence Duncan and Skie, and after your conversation with them, some of the barrels will disappear from the bridge, allowing you to pass. However, as you're making your way across the bridge, you'll have a vision of Bhaal's death, and you'll have another cryptic meeting with the Hooded Man.
21 - Old Well
If you donate 1 gp to this well, then nothing will happen. If you donate 25 gp, then your party will receive the Bless spell. If you donate 100 gp, then your party will receive the Heal spell. If you drop a weapon into the well, then you'll summon the Well Spirit, who will consider your action to be an aggressive challenge and attack you. You'll then earn 3000 xp for defeating it. If you drop the Dusty Chicken (#2) into the well, then you'll generate some amusing dialogue, and you'll earn 3000 xp.
Exits
- Teleportation circle. You'll only be able to use this circle if you have the Wardstone from the
Temple of Bhaal. The first time you use the circle, everyone in your party will earn 5000 xp.
- Main Bridgefort entrance.


