 Did we miss anything in this location? Is there something we didn't discover? Let us know!
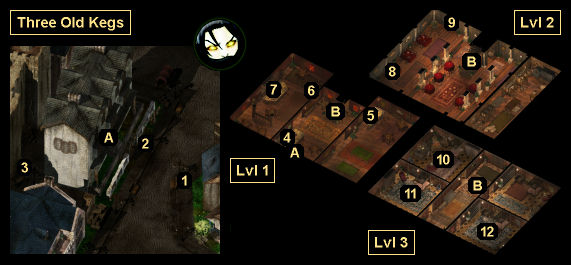
Overview
1 - Asery, Dirla, Gott and Lluis
Did we miss anything in this location? Is there something we didn't discover? Let us know!
Overview
1 - Asery, Dirla, Gott and Lluis
This quartet is a band of robbers. If you talk to them, then they'll decide that you'd make a good victim and they'll attack you, but if you mention that you're a "skilled warrior," then you'll scare Asery away. You'll earn 1450 xp for defeating the robbers (assuming you get the kills rather than Corwin), and they'll drop six
Potions of Healing and a
Potion of Heroism when they die.
2 - Robel
When you talk to Robel, he'll ask you for a favor. He'll tell you that he's been shouting about the Three Old Kegs for hours now, and that his throat is getting raw. So he'll ask you to go inside and ask Katheera (#4) to send him out a drink. To convince Katheera, you'll just need to select the dialogue option that starts with "I'm a hearty individual" or "Robel's working so hard." If you're successful, then you'll earn 30 gp and 300 xp when you return to Robel. If you fail, then you'll only earn 300 xp.
3 - Aileen
At this spot you'll find a woman named Aileen standing next to a dead man in a cart. She'll start off by telling you that the man was her cousin, that he died of some sickness, and that she needs 15 more gp to have him buried. But if you press her, then you'll learn that the body belongs to her drunken husband, that he "accidentally" hit his head and died while he was attacking her, and that she needs 15 more gp to make his body disappear without any questions being asked.
You'll have several ways that you can respond:
- If you pay Aileen 15 gp without learning the whole story, then you'll earn 200 xp.
- If you pay Aileen 15 gp after learning the whole story, then you'll earn 300 xp.
- If you promise Aileen that you won't say anything to the Flaming Fist, then you'll earn 100 xp.
- If you blackmail Aileen, then you'll earn 85 gp and 100 xp.
If you inform Officer Fritz in the
Flaming Fist Castle about Aileen, then you'll earn 50 gp and 300 xp.
4 - Charra
Charra will sell you drinks.
5 - Katheera
Katheera will sell you drinks. She's also involved in Robel's quest (#2).
6 - Autinn
When you get close to Autinn, you'll witness him disparaging the Amnian Delight and its crew. Lucille and some other sailors will take offense to this, setting up a potential brawl. You'll have four ways to respond:
- You can threaten the sailors and force them to stand down (by saying "Ten seconds").
- You can be diplomatic and convince the sailors to stand down (by saying "What about another drink?" and then "Everyone, calm down"). You'll earn 500 xp for this.
- You can help Lucilla fight Autinn (by saying "And you might have the ugliest face," "And you" and then "Aye, all right"). Autinn will surrender once you've done enough damage to him, but if you manage to kill him then you'll receive 750 xp and find
Eadro's Blade on his corpse. After the fight, Lucilla will give you the
Cudgel of Montgomer.
- You can help Autinn fight Lucilla (by saying "I ended Sarevok's threat" and then "I'm with you"). Lucilla will surrender once you've done enough damage to her, but if you manage to kill her then you'll receive 750 xp and find the
Cudgel of Montgomer on her corpse. After the fight, Autinn will give you
Eadro's Blade.
After dealing with the sailors, you'll get a reward from Nantrin Bellowglyn (#7). If you handled the situation peacefully, then he'll offer you 200 gp, which you can turn down for +1 Reputation instead. If there was fighting, then Nantrin will only give you a free drink.
7 - Nantrin Bellowglyn
Nantrin will sell you drinks. He's also involved in Autinn's quest (#6).
8 - Berahli, Hastus, and Ozil
At this table you'll meet the three men who beat up and robbed Ophyllis, the treasurer at the
Ducal Palace. When you question them, you'll learn that they've already given away and spent the money. This will give you three options:
- You can forgive them their crime. You'll receive a
Battle Axe +1.
- You can have them arrested. You'll earn 750 xp.
- You can kill them. You'll earn over 600 xp for winning the battle, and you'll find a
Battle Axe +1 and 132 gp on their corpses.
9 - Painting
Behind this painting you'll find a pair of random gems.
10 - Lady Araya, Lord Maxwell, and Lord Therton
As you approach this room, you'll overhear the three people inside plotting to overthrow the Council of Four. This will give you three ways to respond:
- You can blackmail them. You'll receive a
Cloak of Protection +1, a
Dagger +1,
Ostentatious Boots, 600 gp, and 600 xp.
- You can attack them or try to arrest them. Either way you'll have to kill them. You'll earn 45 xp for the battle, and you'll find a
Cloak of Protection +1, a
Dagger +1,
Ostentatious Boots, and 800 gp on their corpses.
- You can offer to help them. They'll send you downstairs to look for a fourth conspirator named Eldric, but you won't find him. In fact, you won't be allowed to help the trio at all. Instead, you'll only be able to tell Corwin what they're up to. She'll then send you back upstairs so you can get the conspirators to incriminate themselves. This should prove easy, and once they've said enough, Corwin will step in and arrest them. You'll earn 750 xp, and you'll receive an Emerald for your efforts.
11 - Minsc and Dynaheir
If you tell Minsc and Dynaheir that you're planning to go up against Caelar Argent, then they'll join you as companions. You'll only be able to take both or neither.
12 - Delenda's Room
Inside this room, you'll meet Delenda. She won't be happy to see you, and if you refuse to leave, or if you keep talking to her, then she'll call for her bodyguard Bartleby. If you threaten Bartleby at all, then he and Delenda will leave, and you'll earn 200 xp. If you kill Bartleby, then you'll earn 650 xp. and you'll find
Bartleby's Wakizashi on his corpse.
Exits
- Entrance to the Three Old Kegs.
- Central staircase. This staircase will allow you to move between the three levels of the Three Old Kegs.


