 Did we miss anything in this location? Is there something we didn't discover? Let us know!
Overview
Did we miss anything in this location? Is there something we didn't discover? Let us know!
Overview
Note: Every character in your party will receive 15,000 xp when you first arrive at the Coalition Camp.
Another Note: The first time you leave the camp, you'll trigger an encounter where you'll get ambushed by four Mercenaries and a Shadowy Figure. You won't be allowed to use spells, but potions, scrolls and wands will work. The Mercenaries shouldn't pose much of a problem, but the Shadowy Figure will be troublesome because he'll keep turning invisible and backstabbing your weakest characters. This encounter can be extremely difficult depending on how magic-oriented your party is, and how many potions, scrolls and wands you happen to have.
When we killed the Shadowy Figure, we had a scroll of
Stinking Cloud, which we used on the enemy party before they spotted us. Then we waited for the Shadowy Figure to fall unconscious, and we hit the party with two
Potions of Explosions, a
Wand of Fire, and a
Wand of the Heavens. That chewed them up pretty good, and it was easy to mop up the rest.
If you can kill the entire party, then you'll earn 8500 xp, and when you loot the corpses you'll find 80
Arrows +1, 20
Arrows of Biting, 20
Arrows of Piercing, a
Battle Axe +1, 80
Bolts +1, 20
Bolts of Biting, 20
Bolts of Lightning, a
Potion of Extra Healing, three
Potions of Healing,
Shadow Armor +3,
Vexation +2, and a Letter. The Letter will indicate that the mercenaries were hired by the Hooded Man as a test for you.
If you have all sorts of trouble with the Shadowy Figure, then you'll have some options. He'll leave once he's done enough damage to you -- or you to him -- and you can also just skip the encounter entirely by immediately leaving the map.
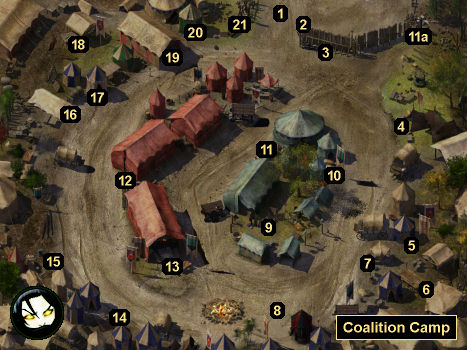
1 - Bence Duncan
After receiving your orders at the command tent (#13), you'll meet Bence Duncan here. He'll tell you that Skie has left the camp, and that she was last seen heading towards
Dragonspear Castle.
You'll find Skie outside the
Dragonspear Castle Courtyard cornered by four mercenaries. No matter what you say to the mercenaries, they'll attack you -- and probably die pretty quickly. You'll earn 2100 xp for the battle, and you'll find
Chain Mail +1 and two
Potions of Healing on the corpses. Then when you talk to Skie, she'll agree to return to the Coalition Camp.
Back at the Coalition Camp, you'll need to report in to Marshall Nederlok (#8). He'll reward you with 800 gp, and he'll tell you that he's tasked Skie with filling sandbags for a while to keep her out of trouble. If by the time you get back to camp Nederlok is gone, then you'll be able to complete the quest inside Dragonspear Castle in Chapter 11. However, you won't receive a reward for taking this route.
2 - Sergeant Wilch
After receiving your orders at the command tent (#13), you'll see Sergeant Wilch here preventing a merchant named Wilhelmina from entering the camp. When you intervene, Wilhelmina will start regaling you with the benefits of her turnip juice. If Neera is in your party, then she'll buy a sample automatically. Otherwise, Wilhelmina will give you a sample for free. You'll need Wilhelmina's Miracle Turnip Juice for
Neera's companion quest.
After talking to Wilhelmina, you'll be able to decide if she should be allowed into the camp or not. Either way, she'll simply disappear from the game, so it won't make any difference.
3 - Helvdar
If you ask Helvdar what's ailing him, then he'll tell you that he lost his lucky pebble during the trip to the camp, and that the only way he can make up for it is to acquire a new set of boots. He'll then tell you that a Cave Bear was spotted in
Dead Man's Pass, and he'll ask you to kill it and deliver its pelt to Belegarm so Belegarm can make him a lucky pair of boots.
You'll run into the Cave Bear in the northern part of
Dead Man's Pass. It'll just be a regular bear, so you shouldn't have any trouble killing it. You'll earn 900 xp when it dies, and you'll find a Fine Bearskin on its corpse.
When you deliver the bearskin to Belegarm (#19), you'll learn that he has boots already made for soldiers who need them. This will give you two ways to proceed:
- You can accept the
Ordinary Boots from Belegarm and give them to Helvdar. Then a day later you can pick up the
Lucky Boots from Belegarm and keep them for yourself.
- You can ignore the
Ordinary Boots and just have Belegarm make the
Lucky Boots. Then you can give the
Lucky Boots to Helvdar or keep them for yourself.
If you give boots to Helvdar (and, if necessary, convince him that they're lucky), then you'll receive a
Potion of Defense, a
Potion of Fire Giant Strength, and 6000 xp. If you show the
Lucky Boots to Helvdar and tell him that you're keep them for yourself, or if he doesn't believe you that the
Ordinary Boots are lucky, then you won't receive a reward from him, and you'll lose a point of Reputation.
4 - Waizahb
Waizahb will have a variety of weapons, armor and potions for sale, including a
Backwhacker +2, a
Belt of the Skillful Blade, a
Headband of Focus,
The Night's Embrace +3,
Raconteur's Regalia +2, a
Ring of Danger Sense,
Screaming Bagpipes, and
Soft Feet.
Waizahb will also mention that she sometimes sells "special wares" -- that is, mementos stolen from the crusaders -- but that she's currently lacking in that department. So she'll then ask you to find her five things:
- Annotated Map. You'll find the map on a table at the
Dragonspear Castle Courtyard. A crusader will be watching the table, so you'll either need stealth or a
Potion of Invisibility to take the map without anybody noticing. If the crusader spots you, then all of the crusaders in the courtyard will turn hostile.
- Battle Standard. You'll find this in a chest next to Commander Dreon at the
Dragonspear Castle Courtyard.
- Dreon's Signet Ring. You can get this from Commander Dreon at the
Dragonspear Castle Courtyard if you tell him that you have a number of reports requiring his seal. You'll need to be wearing a Crusader Uniform (which you can find in two places in the courtyard) for him to deal with you. If you give the commander your word that you'll get the ring back to him, then you'll lose a point of Reputation. Otherwise, if you say anything else to him, then you won't.
- Token of Faith. You can pickpocket these from crusader recruits at the
Dragonspear Castle Courtyard. A couple of targets include the blonde girl by the entrance and the orange-haired dwarf by Deneld.
- Tristian's Holy Symbol. You can get the holy symbol from Tristian at the
Dragonspear Castle Courtyard -- but only by playing Coroniir with him. You can get a Coroniir board from Mizhema (#7). To win the game, you'll need to have a character with a high enough intelligence (like Edwin or Neera).
Waizahb will give you a reward for each item that you bring in. If you give him all five items, then in total you'll receive a
Pearly White Ioun Stone, a
Potion of Magic Shielding, a
Potion of Power, a
Potion of Storm Giant Strength, a
Shadowed Spear +2, 1750 gp, and 10,000 xp.
5 - Nazramu
Nazramu is a part of
Zaviak's Vision Quest. You'll only be able to see and interact with him if you're wearing the
Spectacles of Spectacle.
6 - Crate
Inside this crate you'll find two
Elixirs of Health, a
Potion of Defense, and two
Potions of Healing.
7 - Mizhema
She'll provide you with temple services. She's also involved in Waizahb's quest (#4) and Kjarvan's quest from the
Dragonspear Castle Courtyard.
8 - Flaming Fist Encampment / Supplies Chest
This is where most of your companions will hang out when they're not in your party (Corwin and Glint will wait for you near the entrance). You'll also find your supplies chest here. Once you've received your orders at the command tent (#13), Marshal Nederlok will move over here as well (on the eastern side near Mizhema, #7).
9 - Containers
If you loot the containers around here, then you'll find a
Potion of Extra Healing and a
War Hammer +1.
10 - Damius and Sempack
After receiving your orders at the command tent (#13), you'll meet Damius and Sempack here. If you share a drink with them, then they ask you to kill Pritchard Gardnerson, Glint's cousin. You'll find Pritchard with General Stonehand to the west (#11). You'll have two ways to complete the task:
- You can kill Pritchard, as requested. Nobody in the camp will care what you do to him, so you can attack him in full view of witnesses if you want (the dialogue option about Belegarm, which you can use to lure Pritchard away, isn't necessary). Halfway through the battle, Pritchard will beg you for his life and offer you
Pritchard's Family Stiletto +2, but you can just loot it off his corpse if you want it. For killing Pritchard, you'll earn 650 xp but lose 3 Reputation points, and when you return to Damius and Sempack, they'll give you a
Potion of Fire Giant Strength and a
Potion of Fortitude.
- You can spare Pritchard. For this case, you can simply decline the Damius' and Sempack's offer, or you can head over to Pritchard and tell him about the plot. General Stonehand will overhear what you say, and while she'll chastise you for "making mischief," she'll also give you a
Potion of Magic Protection.
Note: Completing this quest will cause Pritchard to disappear from the game and might prevent you from completing part of
Glint's companion quest.
11 - General Stonehand and Pritchard
After you've received your orders at the command tent (#13), you'll meet General Stonehand and Pritchard here (#11):
- General Stonehand will inform you that there's some sort of thieves' guild operating in the camp, and she'll send you to Waizahb (#4) to learn more about it. When you ask Waizahb to set up a meeting between you and the guild, she'll oblige, and when you head over to the northeastern corner of the camp (#11a), you'll encounter Rhynwis. You'll have a few options for how to deal with her:
- If you force-attack Rhynwis, then you'll earn 500 xp for her death, and you'll find a
Short Sword +1 and
Studded Leather Armor +1 on her corpse. However, when you return to Stonehand, you'll discover that the quest has reset, and that you'll have to start it over. This was true for version 2.3.67.2.
- If you talk to Rhynwis and say that you're going to attack her, then she'll disappear and get away.
- If you talk to Rhynwis and try to join the guild, then she'll decline, but she'll tell you that the guild will "rein in" their activities.
- If you talk to Rhynwis and try to shut down the guild, then she'll agree to your terms, and she'll offer to have the guild join you when you attack Dragonspear Castle. If you demand more than that, then she'll offer you some of the guild's loot (including the unique heavy crossbow
Harold +2), which you'll find in a hidden cache at the
Underground River.
When you return to Stonehand to report your findings, she'll reward you with 6000 xp and 500 gp. If you only take 300 gp, then you'll receive +1 Reputation. If you got the best result (with the guild agreeing to help you out), then Stonehand will throw in a
Potion of Mind Focusing.
- Pritchard is involved in
Glint's companion quest and an assassination plot (#5).
12 - Simonetta Twoedged
Simonetta will tell you that it's good to learn about the people you're fighting with, and she'll ask you to interview people around the camp to find why out they're here. You'll only be able to talk to two people -- Belegarm (#19) and Vigilant Halasan (#16). Afterwards, when you return to Simonetta, she'll give you her
Medal of Valor, and you'll earn 6000 xp.
Note: While talking to Halasan for the quest, you might learn that she knows a soldier named Tristian in the crusade. You'll meet Tristian in the
Dragonspear Castle Courtyard, but mentioning Halasan to him won't lead to anything.
Simonetta is also involved in
Safana's companion quest.
In the locked chest next to Simonetta, you'll find a
Potion of Healing and two
Potions of Heroism.
13 - Command Tent
When you first arrive in the camp, you'll meet the three leaders of the coalition -- General Stonehand (Daggerford), Marshal Nederlok (Baldur's Gate / Flaming Fists), and Torsin de Lancie (Waterdeep) -- in front of this tent. Torsin will be in charge. He'll tell you that Caelar is bypassing the coalition's troops by using the tunnels beneath
Draonspear Castle, and he'll ask you to infiltrate the tunnels and figure out what she's up to -- and, oh, maybe kill Hephernaan if you happen to run into him. Torsin will also tell you that a dwarf named Phossey Dugdeep has something for you.
When you head over to Phossey's tent (#20), you'll meet Phossey and Torsin there. Phossey will give you a Barrel of Bwoosh! -- distilled from the explosive barrels that didn't destroy
Boareskyr Bridge -- which will give you a way to collapse
Dragonspear Castle's tunnels, and Torsin will give you a Stone Dowser so you'll know where to cause the explosion.
After telling you about the Barrel of Bwoosh!, Torsin will dismiss Phossey (who will then disappear from the game), and he'll give you a Poison of Terror. He'll explain that the poison will incapacitate rather than kill the crusaders in the castle, and so if you're able to use it on their food and water stockpiles, then the coalition forces will have a much easier time when they eventually begin their assault. Torsin will then head back to the command tent.
For the main quest in the chapter, you'll need to complete one or both of Torsin's tasks:
- You'll find the right spot for the Barrel of Bwoosh! at the
Underground River. The dowser will lead you to the general area (near an ettin ghost), and then you'll need to move the cursor around until it changes into a question mark. Clicking at that point will cause you to drop the barrel, and everyone in your party will earn 4000 xp.
- You'll find the food and water stockpiles in the
Dragonspear Castle Basement, which you can reach via the Underground River. However, when you use the poison, a bunch of crusaders will show up, including Hephernaan and two of his mage friends, and they'll attack you. After the battle, you'll be able to head over to the other stockpile and poison it, too. Each character in your party will earn 4000 xp for each stockpile you poison.
When you return to the Coalition Camp after completing at least one of the tasks, you'll learn that Caelar Argent has requested a parley with the coalition, and you'll be ordered to go to
Dead Man's Pass. When you get there, Caelar will offer to surrender her troops and leave
Dragonspear Castle -- if the coalition hands you over. No matter what you say, the coalition will decline, and every character in your party will earn 5000 xp. Then when you return to the Coalition Camp, Caelar will attack. See the
Coalition Camp Battle page for more information.
14 - Triage Camp
Inside this camp, you'll meet two people who will give you quests:
- Dosia. She'll tell you that dozens of soldiers in the coalition's forces have started getting ill, and she'll ask you to examine three of her patients to see if you (or one of your companions) can figure out what is afflicting them. The three patients are:
- Xerra. He'll be feverish. If you ask Glint, Jaheira, M'Khiin or Viconia for help, then they'll mention making a poultice for him, but they won't actually do anything.
- Yestimell. He'll be in so much pain that he'll attack you, and you'll have to kill him. If you have Corwin, Jaheira or Minsc with you, then they'll recognize that Yestimell is acting like forest rats do when they're in too much pain.
- Zidrand. She'll be sicker than the others because she's in the center of the camp. You'll see this yourself, but you can also ask one of your healers, and they'll see it, too.
When you return to Dosia, she'll ask you what you recommend:
- If you ask Glint, Jaheira, M'Khiin, or Viconia, then they'll suggest that you look for a blackthorn tree and use its bark for a cure.
- If you saw a comment about rats, then you can volunteer to catch a rat and ask it about the disease. You'll find several rats running around the camp. When you talk to one (using Jaheira or Minsc), a wererat will pop up, and no matter what you say to it, it will attack you. But when you try talking to another rat, it will suggest using the mold from the bark of the blackthorn tree.
- If you ask Dosia, then she'll suggest that you meet with the druid Onoroth who lives in
Bloodbark Grove.
- If you say that the sick should be killed to protect the healthy, then you'll lose 2 Reputation points and fail the quest.
If your lead is Onoroth, then you'll have to talk to him in
Bloodbark Grove. He'll agree to help you, provided that you kill the Greater Basilisk to the north and give him its Basilisk Claw. The basilisk shouldn't be difficult to defeat. You'll just need to have some form of
Protection from Petrification before you face it. Then when you give the claw to Onoroth, he'll give you a Blackthorn Bark Cure.
If your lead is the blackthorn tree, then you'll need to visit it in
Bloodbark Grove. It'll be labeled as a "Strange Tree." The first time you click on it, you'll get attacked by wolves and dire wolves. The dire wolves will act like trolls, meaning you'll only be able to finish them off by using fire or acid, but otherwise the battle should be straightforward. Then when you click on the tree a second time, you'll receive the Blackthorn Bark Cure.
When you return to Dosia, you'll have three options. If you just hand over the cure, then you'll receive the
Martyr's Morningstar +2, +1 Reputation, and 6000 gp. If you demand payment for the cure, then you'll receive three
Potions of Extra Healing, -1 Reputation, and 6000 xp. If you tell Dosia that her payment isn't good enough, then you'll receive -2 Reputation.
- Hyreth. He'll be coughing, and he might look like he's a part of Dosia's quest, but he's not. Hyreth won't want to you heal him because he's a follower of Ilmater. If you have Glint or Viconia with you, then they'll be able to get him to change his mind. After completing Dosia's quest, she'll be able to help you as well. When you convince Hyreth to accept healing, you'll receive two random gems, a random wand, 50 gp, and 6000 xp.
15 - Jegg
Jegg will still have +1 and +2 weapons and armor for sale.
16 - Vigilant Halasan
You'll find Vigilant Halasan here trying to train some new recruits from Daggerford. She won't sound very optimistic about them, but she'll allow you to try training them yourself. For this, you'll need to work with each of the six recruits: Clovista, Danine, Garrold, Hester, Morlis and Taied. What you can teach them will depend on your class and which companions you have in your party. For example, Glint can teach tactics to Clovista, and Edwin can convince Garrold to become a mage. After helping the recruits, when you return to Halasan, she'll give you
Commander's Chain Mail +3, and you'll also earn 6000 xp.
17 - Thaird
Thaird will perform innkeeper duties.
18 - Malden Col
Col can be pickpocketed for a Seal of Caelar, which you can use to gain entrance into certain crusader locations, like the
Dragonspear Castle Courtyard.
Col is also involved in
Safana's companion quest.
19 - Belegarm
Belegarm will have a little bit of everything for sale.
20 - Phossey's Tent
You'll need to visit Phossey Dugdeep at her tent for the main quest of the chapter (#13).
21 - Crate
Inside this crate you'll find 40
Arrows +1 and 40
Bolts +1.


