 Did we miss anything in this location? Is there something we didn't discover? Let us know!
Overview
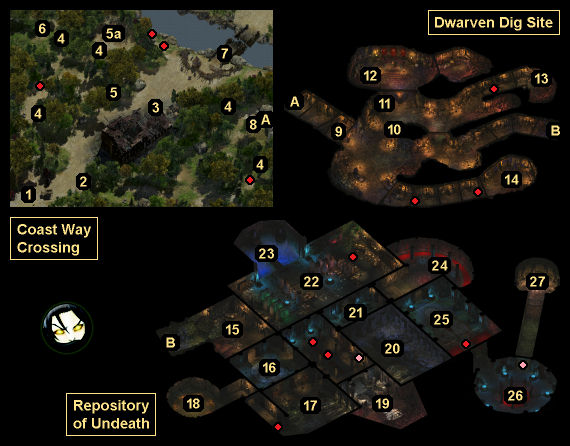
1 - Flaming Fist Encampment
Did we miss anything in this location? Is there something we didn't discover? Let us know!
Overview
1 - Flaming Fist Encampment
- This is where you'll start out in the region. You'll meet several people here, many of whom were also at the
Ducal Palace:
- Belegarm. He'll have a wide selection of wares for sale.
- Brielle. She can be a part of Herod's quest from the refugee camp (#3).
- Corwin. She's a Lawful Good Archer. She'll join you if you invite her.
- Edwin. He'll wander into the encampment shortly after your arrival. He's a Lawful Evil Conjurer, and he'll join you if you invite him. However, Edwin doesn't get along with Minsc and Dynaheir, and you won't be able to add him if the other two are in your party.
- Glint. He's a Neutral Good Cleric / Thief. He'll join you if you invite him.
- Mizhena. She'll provide temple services. The chest next to Mizhena is the same as your inventory chest from the Ducal Palace. All of your supplies will still be in it.
- Thaird. He'll rent you rooms (peasant or merchant), and he'll sell you drinks.
- Viconia. She's a Neutral Evil Cleric. She'll join you if you invite her. Viconia came to the camp with Patrescus and Pfaug, who won't have anything very interesting to say.
In the crates around the camp you'll find a
Potion of Healing, a
Potion of Heroism, and a scroll of
Cure Serious Wounds.
2 - Prin
At this spot (#2) you'll meet a bard named Prin singing to a menhir. If you ask him what he's doing, then he'll tell you that the menhirs in the area seem to respond to music. If you try to sing (or hum) at the menhir yourself, then one of two things will happen. If your charisma is at least 16, then you'll activate the menhir the easy way. But if your charisma is too low, then something bad will happen -- like an enemy appearing, or getting hit with magic damage, or having to answer a riddle ("the wind blowing...") -- and you'll activate the menhir the hard way. It's much more profitable to go the hard way.
There are five other menhirs in the area (#4). After activating them all, the ghost of a bard named Crommus will appear, and he'll tell you how the mage Artipheon killed him and trapped his voice in the menhirs, all so he could steal away Crommus' love Carline to be his bride. But with his voice restored, Crommus will call to Carline, and they'll get their happy ending together. As a show of thanks, Crommus will give you permission to loot his grave (#13), and you'll also earn 6000 xp.
When you return to Prin and let him know about the menhirs, he'll reward you with a
Reed of Echoes. If you decide to withhold the story from Prin, then we won't give you anything, but you can kill him for 900 xp plus a
Potion of Invulnerability, a
Quarterstaff +1, the
Reed of Echoes, and 400 gp.
3 - Refugee Camp
You'll meet a few people of interest at this camp:
- Herod and Teleria. Herod will tell you that five refugees have gone missing from the camp, and that the mage Teleria showed up right before it started happening. If you ask Teleria about the disappearances, then she'll invite you to meet with her in the clearing to the northwest (#6). Once there, you'll discover that the missing refugees have been turned to stone, and that Teleria is responsible. You'll have two ways to respond:
- You can attack Teleria and her Lesser Stone Golem ally. Since they'll ignore you until you talk to them, you can set up your party first with your melee characters surrounding Teleria, making the battle pretty easy. You'll earn 2800 xp for defeating the pair, and you'll find a
Knave's Robe, a scroll of
Protection from Normal Missiles, a
Stone Ally, and five
Stone to Flesh Scrolls on Teleria's corpse.
To cure the refugees, you'll just need to use the
Stone to Flesh Scrolls on them. They'll give you some minor rewards, including a
Potion of Healing, a
Potion of Invisibility, a scroll of
Knock, and a
Wand of Fire. Then when you return to Herod, he'll offer you 1000 gp as a reward. If you refuse it, then you'll receive +1 Reputation instead.
Note: If you cure the refugees before talking to Herod and Teleria, then Teleria will disappear, and you'll get the same reward from Herod.
- You can offer to help Teleria complete her collection. Just don't admit to having completed Prin's quest (#2), or else she'll attack you. Teleria will tell you that she needs an "armored soldier" and a "handsome nobleman."
- You'll find the soldier in the Flaming Fist encampment (#1). Just send Brielle on a mission to collect flowers from Teleria's clearing, and tell her, "It has to be you." But note: if Corwin is in your party then she won't allow you to do this, so you'll have to remove her for your conversation with Brielle.
- You'll find the nobleman in the refugee camp. Just tell Vessanal that you found a chest with his family insignia on it in Teleria's clearing.
When you return to Teleria, she'll be happy with your work, and she'll reward you with a
Stone Ally. However, when you go back to the refugee camp, Herod will be gone, so you'll lose a shopkeeper.
While he's in the camp, Herod will also act as a shopkeeper. He'll sell you some basic and +1 items, plus
Mosela's Cudgel +2, a
Ring of Lock Picks, and a
Savage Shortbow +2.
- Takos. He'll tell you that when crusaders burned down his inn, three of his most treasured heirlooms -- a cloak, a mirror, and a shield -- disappeared, and he'll ask you to find them. Two of the heirlooms are located nearby. You'll find
Gentrus's Hand Mirror hidden under a loose floorboard inside the husk of the inn, and you'll find a
Cloak of the Beluir Watch inside a battered chest outside of the inn. For the shield, you'll have to go to the
Coast Way Forest and help or kill the two vampire hunters there. Either way, you'll end up with
The Suncatcher +2.
When you return to Takos with the three heirlooms, you'll have some options for how to complete the quest. If you tell Takos that you're keeping his stuff, then he'll attack you and die easily, and you'll earn 50 xp plus lose some Reputation. If you hand in the heirlooms, then Takos will reward you with the unique dart
Biter +2 and you'll also earn 3000 xp. If you complain about this reward, then Takos will allow you to keep one of the heirlooms in additional to the dart.
Note: To use
Gentrus's Hand Mirror, you'll just need to right click on an unidentified item and then choose the "scroll" option to identify it.
- Vessanal. He can be a part of Herod's quest.
4 - Menhirs
These five menhirs are a part of Prin's quest (#2).
5 - Announcer / Baeloth's Black Pits
At this spot (#5), you'll meet an announcer who will regale you with the wonders of Baeloth's Black Pits to the north, and he'll give you a Black Pits Flyer. After triggering the cut scene at the Black Pits, the announcer will disappear.
At the Black Pits (#5a), you'll see Baeloth trying to entertain a crowd of onlookers. However, his fearsome beasts will really be chickens, rats and squirrels. The crowd won't exactly be mesmerized by the display, so Baeloth will try to spice things up by sending in a goblin named M'Khiin. M'khiin won't be happy about this, and she'll use her special ability Summon Ghostly Defender to attack Baeloth. At the end, the crowd will run away, and you'll be able to recruit Baeloth and M'Khiin to your party. Baeloth is a Chaotic Evil Sorcerer. M'Khiin is a True Neutral Shaman. You'll earn 3000 xp for adding M'Khiin to your party, although you'll lose 2 Reputation while she's with you.
Also at the pits, you'll see a wild dog in a cage. If you click on the cage to free the dog, then it will lead you to the remains of a forgotten adventurer, and you'll find some gems and gp.
6 - Clearing
You'll find two things of interest in this clearing:
- Five stone statues. They're a part of Herod's quest from the refugee camp (#3).
- Gauth the beholder. He's one of the extra-planar creatures from Zaviak's Vision Quest, so you'll need to be wearing the Spectacles of Spectacle to see him. If you use the spectacles to interact with Gauth, then he'll attack you. You'll earn 6000 xp when he dies, and you'll find a
Ring of Fire Resistance on his corpse.
7 - Bridge
When you approach the bridge here, one of the crusaders defending it will panic and blow it up. This will trigger a battle between you and a few of the crusaders who didn't make it to the other side: Barachus (berserker), Elwood Dowser (mage), Ivann (fighter), Kerra Tinbasher (fighter / cleric), Seed (druid), and Twelve-Fingers (ranger). As always, you should focus on the enemy casters first while your melee fighters distract the enemy melee fighters.
You won't have to win the battle. After about a minute, Caelar Argent will show up and order her forces to stop fighting. Then she'll talk to you and you'll learn her plan -- that she wants to free all of the people captured by demons and sent to the Nine Hells during the Dragonspear Wars. No matter what you say, you'll leave the encounter as adversaries.
After your conversation with Caelar, any enemies still alive will huddle together and wait to get arrested. If you want, you can attack them at this point, and any nearby Flaming Fists will help you out. In total, you can earn over 8000 xp for the battle, and you can find a bunch of gear on the corpses: several
Arrows of Fire, several
Bullets +1, a
Composite Longbow +1, a
Dagger +1, several
Darts of Stunning, a
Festering Spear, a
Knave's Robe, two
Large Shields +1, a
Long Sword +2, an
Oil of Speed, a
Potion of Absorption, two
Potions of Explosions, two
Potions of Extra Healing, a
Potion of Frost Giant Strength, a
Potion of Healing, a
Potion of Invulnerability, a
Ring of Protection +1, a
Sling +1,
Studded Leather Armor +1, a
Two-Handed Sword +1, a
Wand of Frost, a
Wand of the Heavens, and a
War Hammer +1.
Completing the bridge encounter will unlock two new locations on the world map:
Troll Claw Woods and
Boareskyr Bridge.
8 - Daran Highhammer
When you approach this spot, you'll see Daran being attacked by zombies. After helping him to dispatch the threat, you'll learn that Daran was hired by the dwarven clerics inside the nearby dig site (Exit A) to deal with vermin, but that the undead were a little too much for him. He might also mention that one of the dwarves had a chest, and he'll be way more interested in the contents of that chest than if any of the dwarves survived.
9 - Brother Deepvein
When you reach this spot, you'll find Brother Deepvein and three dwarven clerics fighting a large group of wights and zombies, one of which will drop an Amulet of the Keeper of Secrets Under the Mountain. After the battle, Deepvein will tell you that he and the other dwarves were mining for ore when they broke into a large chamber containing books and undead creatures -- and that they've been fighting for their lives ever since. He'll then tell you that his colleague Gurn Coldhearth died during the initial attack, and that they weren't able to recover his corpse. So he'll ask you to bring it back for him. You'll find Coldhearth's remains deeper in the dungeon (#26).
Note: If any of the dwarves die while fighting the wights and zombies, then they might drop more Amulets of the Keeper of Secrets Under the Mountain. You should pick them up, or else they might disappear from the game and cost you a way to complete a quest (see #26).
If you decide to kill Deepvein, then you'll find some
Bullets +2, a
Helmet of Dumathoin, a
Medium Shield +1, a
Sling +1,
Splint Mail +1, a
Wand of the Heavens, and a
War Hammer +2 on his corpse.
10 - Table
On this table you'll find some random potions / gems / gp.
11 - Barrel
Inside this barrel you'll find two
Antidotes and an
Elixir of Health.
12 - Semahl / Abandoned Camp
When you reach the dwarves' abandoned camp, you'll find a giant named Semahl there fighting some undead. After helping him to win the battle, he'll mourn the loss of his "little friends." If you tell Semahl that some of the dwarves are still alive, then you'll earn 3000 xp, and Semahl will head over to the entrance (#9). If instead you kill Semahl, then you'll earn 6000 xp.
Also in the camp you'll find a locked chest. This is Coldhearth's chest, and you'll only be able to open it with the Chest Key (#22). Inside the chest you'll find the Journal of Gurn Coldhearth and a Parchment. The journal will reveal that Coldhearth made a deal with a lich to become a lich himself. The Parchment will show how Coldhearth learned about the lich.
In some barrels near the camp, you'll find three
Potions of Healing, a
Potion of Infravision, and a random potion.
13 - Crommus' Grave
You'll only detect this grave if you spoke to Crommus during Prin's quest (#2). Inside the grave you'll find a
Bard Hat,
Crommus's Capelet,
Star-Strewn Boots, and
Tangled Strings. Near the grave on the ground you'll find a
War Hammer +1.
14 - Umber Hulks
In this chamber you'll encounter two Umber Hulks and two Mutated Crawlers. You'll earn 9300 xp for defeating them. After the battle, you'll find an
Oil of Speed, two
Potions of Extra Healing, and a random potion in a barrel, plus another Amulet of the Keeper of Secrets Under the Mountain on a corpse.
15 - Library
If you examine the shelves in this library, then you'll find two random scrolls and four books about liches.
16 - Raised Pool
When you click on this pool, you'll see that it has four slots for scepters, and that one of the slots is already filled. You'll find the other three scepters nearby (#17, #20, #22). When you place them into their slots (by clicking on the pool three more times), you'll earn 3000 xp, and the pool will clear.
With the pool clear, you'll be able to gaze into it and spy on one of three people -- Imoen, the Hooded Man, or Caelar Argent. Doing so will show you a short cut scene about the person and reward you with 500 xp for each character in your party. But the viewing will also cause the pool to fog back up. To clear it again for further viewings, you'll need Essences of Clarity (#20, #22).
17 - Room
You'll get attacked by ghasts, ghouls and zombies in this room. Their part of the battle should be easy, but you'll also have to deal with several skeleton archers in an adjacent room (#19), who will shoot at you through the windows. So draw the melee enemies to you so you can fight them without the archers becoming involved, and then make sure you have some spells available for when you face the archers.
In this room on a table you'll find a Silver Scepter. You'll need it for the raised pool (#16).
18 - Broken Portal to Other Planes
Every so often, fire-based creatures -- Fire Mephits (420 xp), Fire Salamanders (2000 xp), or Lesser Fire Elementals (400 xp) -- will appear at the portal here and attack you. If your tanks have decent fire resistance, then this is a place where you can easily grind some xp. The portal is also involved in Coldhearth's quest (#26).
19 - Locked Room
The door to this room will start out locked. To open it, you'll need to activate the throne to the north (#23). Inside the room, you'll encounter a handful of skeleton archers. After defeating them, you'll find five
Arrows of Antimagic, a
Mage Robe of Electrical Resistance, a
Quarterstaff +1, and scrolls of
Glitterdust,
Greater Restoration, and
Protection from Evil, 10' Radius on the floor.
20 - Room
When you enter this room, you'll be greeted by a wide variety of undead creatures -- bonebats, ghasts, a mummy, a shadowed soul, zombies, and more. This is a good battle to get buffed up for, and you'll probably have an easier time if you lure the enemies to you rather than charging in at them. Afterwards, when you loot the bodies, you'll find an Essence of Clarity.
Also in the room you might notice a trio of sarcophagi. Inside them you'll find some magic scrolls, a
Wand of Fear, and
The Uncursed Staff. You'll also find a Silver Scepter. You'll need the scepter and the Essence of Clarity at the raised pool (#16).
21 - Bronze Sentry
You'll encounter a Bronze Sentry here. It's worth 5000 xp, and it'll drop a
Sword of Troll Decapitation when it dies.
22 - Laboratory
When you enter the laboratory, you'll be greeted by another mass of undead creatures -- bladed skeletons, shadows, skeleton archers, tattered skeletons, wights, zombies, and more. Some of the creatures will be in the front of the room, and some will be in the back, so if you draw them to you, then you should be able to split the battle into two parts.
Afterwards, when you search the room, you'll find Cleric's Vestments and a Chest Key on the floor; you'll find a Silver Scepter plus scrolls of
Vampiric Touch and
Protection from Poison on a table; and you'll find an Essence of Clarity, a Failed Phylactery, and Notes on a Failed Experiment in a shelf.
You'll need the Chest Key to unlock the chest at the abandoned camp (#12). You'll need the Essence of Clarity and the Silver Scepter for the raised pool (#16). The Cleric's Vestments and Failed Phylactery don't have any purpose.
23 - Throne
If you pull the lever concealed in the throne (by clicking on the throne twice), then you'll open a door to the south (#19).
24 - Pillars
The four pillars here are a puzzle. You'll need to activate them in the right order to open the door to the south (#25). The first time you click on a pillar, you'll get a description of it. From left to right, you'll see that the pillars represent autumn, spring, winter, and summer. If you press a pillar in the right order, then you'll hear a click. If you press one in the wrong order, then you'll get attacked by five elemental mephits, with the element representing the season of the pillar you mistakenly activated (that is, autumn will produce lightning mephits, spring will produce earth mephits, winter will produce ice mephits, and summer will produce fire mephits).
There are two clues for this puzzle, both located in the library (#15). If you read the Tome of Ancient Knowledge, then you'll see that "sometimes it is wise to think backwards." But if you read A Philosophical Treatise on the Nature of Lichdom, then you'll see a more specific answer. Either way, you should activate the pillars in this order (numbered from left to right): winter (3), autumn (1), summer (4), and then spring (2).
25 - Locked Room
The door to this room will start out locked. To open it, you'll need to solve the nearby pillar puzzle (#24). Inside the room you'll get attacked by some undead -- bonebats, drowned in blood, and a shadowed soul.
26 - Ritual Room
When you open the door to this room, you'll witness an unnamed lich converting Gurn Coldhearth into a lich, and you'll learn that that the two of them were working together. Apparently, Coldhearth tricked the dwarves into coming to the repository so he could free the unnamed lich and became a lich himself. You'll have two ways to proceed:
- You can work with Coldhearth. He'll ask you to bring him five Amulets of the Keeper of Secrets Under the Mountain. You'll find one amulet on the ground by Deepvein (#9), you'll find one in the Umber Hulk room (#14), and you'll have to kill Deepvein and his clerics for the other three. If you've checked all of these places and you're still missing an amulet, then it's probably because one of the dwarves died when you first entered the Dig Site, and the amulet he dropped has since disappeared. If that's the case then you'll only have one choice, to attack Coldhearth.
When you return to Coldhearth, he'll be thrilled with your work, and he'll reward you with a
Dread Hammer +2. He'll also agree to help you against Caelar Argent.
- You can attack Coldhearth. For this case, you shouldn't attack him right away. Instead, you should head back to Deepvein (#9) and tell him what you've learned. He won't believe you at first, so you'll have to convince him by showing him Coldhearth's journal (#12) or by having rescued Semahl (also at #12). This will cause Deepvein to give you a gemstone called
The Secret Revealed, which can cause major damage to liches. The gem only has three charges, but if you run out then you can return to Deepvein and he'll recharge it.
When you attack Coldhearth, he'll immediately become invulnerable to spells and weapon damage. Plus, he'll put up Red and Blue Fireshields, so hitting him with melee attacks will just damage your attackers. To defeat Coldhearth, you'll have to use
The Secret Revealed on him. The gemstone will dispel most of his protections and also deal some minor damage to him. You should then be able to cut him down quickly, which will cause him to disappear and drop an Ancient Key.
To kill Coldhearth, you'll have to do more than just kill his physical presence. You'll also have to destroy his phylactery, which you'll find in the Phylactery Cache to the north (#27). The Ancient Key will unlock the secret door to the cache. You'll discover six phylacteries there. The Coldhearth Phylactery is the second one from the left.
To destroy the phylactery, you'll need to take it to the Broken Portal to Other Planes (#18) and throw it inside. Coldhearth is almost guaranteed to reappear while you're making the trip, so you might want to wait outside the portal room so you don't have to fight Coldhearth and annoying fire creatures at the same time. When you fight Coldhearth again, you'll just need to use the same strategy as before. As long as you don't need to defeat Coldhearth more than three times,
The Secret Revealed should see you through.
Once you've thrown the phylactery into the portal and killed Coldhearth's physical form, you'll earn 22,000 xp, plus 3000 xp for each party member, plus 3000 gp. Then when you return to Deepvein (#9), he'll reward you with a
Helmet of Dumathoin and a scroll of
Greater Restoration. You'll also be able to recruit the dwarves to help you against Caelar Argent.
27 - Phylactery Cache
This chamber will start out locked. To open its (secret) door, you'll either need to pick the lock or defeat Coldhearth (#26) so he drops his Ancient Key. Inside the cache you'll discover six phylacteries. The second from the left is Coldhearth's, which you'll need to pick up if you want to destroy him (see #26). If you destroy the other five phylacteries, then you'll receive a few gems.
Note: Opening the door to this chamber will cause Coldhearth (#26) to turn hostile.
Exits
- Entrance to the Dwarven Dig Site.
- Passage between the Dwarven Dig Site and the Repository of Undeath.


