 Did we miss anything in this location? Is there something we didn't discover? Let us know!
Background
As the U-Bahn hums toward the Frankfurter Tor, you tug idly at the fabric of your maintenance uniform. You found it in a duffel bag on your seat when you boarded, along with a note from Duerr to put it on before your arrival.
Did we miss anything in this location? Is there something we didn't discover? Let us know!
Background
As the U-Bahn hums toward the Frankfurter Tor, you tug idly at the fabric of your maintenance uniform. You found it in a duffel bag on your seat when you boarded, along with a note from Duerr to put it on before your arrival.
"The moment you step off this train," the note said, "your trial run begins. You are to rendezvous with the rest of your team, reconnoiter the building, and plant the specified devices in Aleshire's suite. Beyond that, your approach will be left to you.
"Do not disappoint us. You are being watched."
--- Mission Success ---
Your return trip to the Kreuzbasar is a quiet one -- the train from the Frankfurter Tor is empty, save for you. There's nothing to distract you from your thoughts.
You're finished with the first part of your "audition." Luca Duerr is waiting at Cafe Cezve to administer the second.
--- Mission Failure ---
Your return trip to the Kreuzbasar is a lonely one.
You spend the ride in quiet contemplation. The bugs that you were meant to plant in Aleshire's penthouse rattle in your pocket; a cheerful sound, and an intangible reminder of your decision to scrub the run.
Your audition is over. The Lodge -- whoever they are -- are going to have to find themselves another shadowrunner.
Karma Points
- [2] Complete the mission (failure or success).
Walkthrough
This mission will be available right from the start of Act 2. You'll learn about it from Luca Duerr inside Cafe Cezve in the Kreuzbasar. Duerr will invite you to perform an "audition" for his organization. If you're amenable, then he'll describe the job. He'll tell you that a man named Aleshire might be working with "pro-corporate extremists," and he'll ask you to plant bugs in the man's apartment so you can find proof. If you're successful, then he'll promise you some money and future work.
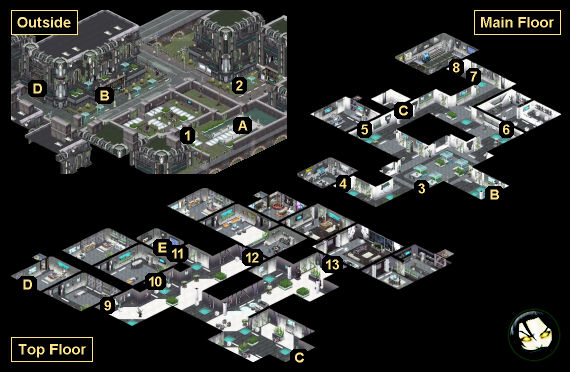
To start this mission, you'll need to take a U-Bahn train to Frankfurter Tor, where you'll start right outside the U-Bahn platform (Exit A). A Knight Errant Grenadier will stop you, but no matter what you say to him, he'll allow you to pass. Then a short ways down the street, you'll run into Jana, one of your team members (#1). She'll give you two pieces of bad news: that she's just a regular electrician rather than a shadowrunner (her combat skills are fine, though), and that the rest of your team decided to enter Aleshire's building without you.
You'll find the building nearby (Exit B). Inside, you'll meet the rest of your team: James, a security mage, and a "Foreign Elf," the muscle. James will insult everybody, and the elf won't be able to understand anybody. So you'll be in charge. Your four main objectives are detailed below.
Activate the elevator.
To do this, you'll have to get into the utility room (#8), which is being blocked by a Knight Errant Guard (#7). There isn't any way to talk your way past the guard, although if you have Charisma 3 and the Security etiquette, you can learn that the current Emergency Assistance Code is "indigo."
To get past the guard, you'll have to kill him. There are two ways to do this:
- You can simply attack the guard (by choosing the attack option when you talk to him). This will cause the Knight Errant Enforcer in the security hub (#4) to attack you as well, plus trigger the building's alarms. The alarms will put all of the security forces in the building on high alert, which will force you to fight an extra battle on the Top Floor.
- You can electrocute the guard. To do this, you'll just need to interact with the electrical junction box in the clothing store (#6). Jana will tell you that she can use it to overload the junction box by the guard. If you draw the Knight Errant Enforcer (#4) over to the guard by telling him the "indigo" code word, then you'll be able to use the junction box to take out both guards at once.
Electrocuting the guard(s) will keep the alarms from going off, which will prevent the first battle on the Top Floor from taking place. Luring away the Enforcer and using his terminal in the security hub (#4) will allow you to move guards out of position, which will prevent the second battle on the Top Floor from taking place.
Regardless of your method, when the guard dies he'll drop a Theta Key Card, which will allow you to enter the utility room (#8). Inside, you'll find a terminal. When you interact with it, Jana will quickly take control of the elevator (Exit C), allowing you to use it.
Reach the Top Floor and disable the penthouse security.
When you take the elevator (Exit C) to the Top Floor, you'll automatically start a conversation with your team. Jana will summarize what you'll need to do next. She'll tell you that you'll need to enter Apartment 303 (#12), where you'll find an access panel that will allow her to set the penthouse's door (#13) to maintenance mode, which will allow you to open it. She'll then give you the Apartment 303 Code (14291) and the Penthouse Maintenance Code (11111) to make sure that you don't forget them.
If you attacked the guards on the Main Floor, then at this point you'll get ambushed by a security team, including a Knight Errant Grenadier and a Knight Errant Mage. The grenadier is the toughest to kill, so you should save him for last. Otherwise, if you electrocuted the guards on the Main Floor, then you'll get to skip this fight.
Before continuing with the mission, it's a good idea to explore the Top Floor. In particular, if you have a deck and Decking 4, then you'll be able to enter the security station (#11), where you'll find a terminal and a hatch. Jacking into the terminal will put you into the matrix, where you'll encounter some White -- and possibly Black -- IC. You should be thorough in the matrix, re-entering as necessary if you die, as nodes there will allow you to unlock Apartment 301 (#9), Apartment 302 (#10), and the hatch (Exit E). You'll find some useful stuff in the apartments, and the hatch will allow you to skip some battles.
Inside Apartment 303 (#12), you'll find the access panel in the living room. Jana won't have any trouble doing her job, but afterwards while you're chatting -- and, among other things, learning that you're working for "The Lodge" -- the owner of the apartment will come home. James will want to kill him, and the Foreign Elf will take exception. No matter what you say, the homeowner will press his panic button and flee, and James and the Foreign Elf will square off. You'll then have to pick a side:
- If you pick the elf's side, then you'll fail the mission, and you won't get any more work from the Lodge. But James will die, so it might be worth it. For this case, you won't need to worry about putting the security cameras in the penthouse; you'll just need to escape (see below).
- If you take James' side, then you'll have to kill the elf, but you'll be able to continue on with the mission as planned. This is by far the best option as far as rewards go, provided you don't mind working for the Lodge.
During the fight against James or the Foreign Elf, if you didn't redirect the building's security forces while you were on the Main Floor (#4), then a response team will show up now, and they'll attack you. This team will only have three Knight Errant Guards plus a Knight Errant Captain, so it shouldn't be too difficult to defeat. Plus, they might target whichever former teammate you're fighting, so they might even help you a bit.
Hide the cameras in the penthouse.
With Jana's job complete, you'll be able to enter the penthouse (#13) using the code 11111. Inside, you'll find the three spots where you're supposed to hide cameras, and James will do his job without incident -- except for more insults and threats, of course. You'll also find an
Advanced Medkit, which you should take.
Escape to the U-Bahn Platform (Exit A).
When James hides the last camera, the building's alarms will go off no matter what you did earlier. This can make escaping the building more difficult. You'll have three ways to get out:
- If you exit the way you came -- by the elevator (Exit C) and the main entrance (Exit B) -- then you'll have to fight two groups of security forces, one on the Main Floor and one Outside. The Main Floor team will have two Knight Errant Guards, a Knight Errant Conjurer, and a Knight Errant Captain. The Outside team will have a Knight Errant Guard, a Knight Errant Enforcer, a Knight Errant Captain, and our old friend the Knight Errant Grenadier by the U-Bahn platform exit (Exit A).
- If you leave via the fire escape (Exit D), then you'll skip the Main Floor battle and only have to fight the team Outside.
- If you leave via the hatch (Exit E), then you won't have to fight anybody.
The conclusion for the mission will depend on if you were successful or not:
- If you completed the mission, then when you reach the U-Bahn platform (Exit A), you'll contact Luca Duerr. He'll show you a live feed from one of the cameras you installed, and you'll see, hear, and feel Aleshire -- plus probably a lot of other people on the Top Floor -- getting killed by a bomb (aka the canister Jana connected to the access port).
When you return to the Kreuzbasar, you'll earn 2 karma points. Then when you talk to Duerr in the cafe, you'll have to make a choice. If you get mad and refuse to work for him, then you'll fail the trial, and you won't get any more work from the Lodge. If you're more philosophical about the mission, then Duerr will pay you 1500 nuyen as agreed, and he'll contact you up to three more times during the remainder of the campaign. If you complete at least two of these future tasks, then you'll receive several rewards, including a
Prototype Combat Suit, the best outfit in the game.
- If you failed the mission, then when you reach the U-Bahn platform, Jana and the Foreign Elf will decide to make themselves scarce so the Lodge can't find them. You'll return to the Kreuzbasar, where you'll earn 2 karma points. The Lodge will send you a message on the Mission Computer letting you know that you failed, but they won't take any action against you. Luca Duerr will disappear from the cafe.
1 - Jana
2 - Waitress
The waitress here will sell you soykaf for 2 nuyen, and, if you have Charisma 3 or the Street etiquette, then she'll also sell you
Jolt for 150 nuyen. The soykaf is a waste of money (you'll immediately drink it and not like it), but the Jolt might pay for itself inside the building (see #3).
3 - Stressed Suit
Pacing around here, you'll meet a Stressed Suit. If you have Charisma 3 or the Corporate etiquette, then you'll learn that the man is worried about an upcoming presentation. If you give him Jolt (available at #2), then he'll thank you and give you the Suit's Door Code (53786), which will get you into his apartment (#9). You can also enter his apartment by using Decking 4 (at #11). Inside the apartment, you'll find 200 nuyen.
4 - Security Hub
5 - Cyberware Boutique
Inside this shop, you'll meet a Tech Vendor, who will give you an Encephalon NEXT Purchase Order for 250 nuyen. When you take the purchase order to Dr. Ezkibel in the Triage Cyberclinic in the Kreuzbasar, he'll add the
Encephalon NEXT to his wares -- for the low, low price of 5000 nuyen. Also in the shop, you'll meet some parents pondering some equipment for their son. Talking to them won't lead to anything.
6 - Dunkley's Fine Clothiers / Electrical Junction Box
The Tailor in this shop will sell you a
Ballistic Cloth Suit for 1500 nuyen.
7 - Knight Errant Guard / Electrical Junction Box
8 - Utility Room
9 - Apartment 301
This apartment will start out locked. To open it, you'll need to use the code 53786, which you can learn from the Stressed Suit (#3), or you'll need to bypass the apartment's security in the matrix (#11). Inside, you'll find a credstick worth 200 nuyen plus a fire escape that you can use to leave the building (Exit D).
10 - Apartment 302
This apartment will start out locked. To open it, you'll need to use the code 38297, which there aren't any clues for, or you'll need to bypass the apartment's security in the matrix (#11). Inside, you'll find a terminal with Paydata: Romantic Recording on it. With Decking 4, you'll be able to download this video (and later sell it for 378 nuyen) or delete it (and earn no reward whatsoever).
11 - Security Station
12 - Apartment 303
13 - Penthouse
Exits
- U-Bahn platform.
- Building entrance.
- Elevator.
- Fire escape / ladder.
- Hatch.


