 Did we miss anything in this location? Is there something we didn't discover? Let us know!
Background
Drogenkippe. It'd be high up on anyone's list of places to avoid, but that's where you're headed... and you're going there alone this time. The last time that you saw Blitz, he was carting his portable terminal over to Cafe Cezve, presumably so that he could do his decking in the most comfortable environment possible.
Did we miss anything in this location? Is there something we didn't discover? Let us know!
Background
Drogenkippe. It'd be high up on anyone's list of places to avoid, but that's where you're headed... and you're going there alone this time. The last time that you saw Blitz, he was carting his portable terminal over to Cafe Cezve, presumably so that he could do his decking in the most comfortable environment possible.
Like everything else related to Drogenkippe, the U-bahn train that services it is in poor repair. The car that you're riding in stinks like a chemical toilet on a hot day. On the floor near the doorway, you catch sight of a trampled lump of tattered fur: the longer you stare at it, the more convinced you become that you're looking at the remains of a long-dead squirrel.
The train rumbles to a stop, and the doors slide open. Time to get this over with.
--- Mission Complete ---
The ride back to the Kreuzbasar is a lonely one. This train car smells a little better than the one you rode in on; it isn't great, but at least it doesn't leave you gagging. Still, things are looking up. You've helped Blitz pull himself out of hot water, and with any luck at all, you'll never have to set foot in Drogenkippe again.
After a long, boring trip, the car rattles to a stop. The doors slide open. You're home.
Karma Points
[2] Complete the mission.
Walkthrough
Once you've gained enough trust with Blitz, he'll tell you that he owes a debt to a moneylender named Meat Grinder -- and that his account is so far past due that he just received a pair of thumbs in the mail. But Blitz will have a plan. He'll tell you that he's worked out how to rob a crime organization -- and a rival of Meat Grinder's -- called the Landenberg Ring, and that the money you liberate from them should be enough to clear his debt. If you refuse to work with Blitz, then he'll leave your team, so agree to help.
When you arrive in Drogenkippe, you'll start out near the Landenberg Ring's bank. But when you reach the alley door entrance, you'll discover that Blitz told Meat Grinder all about his plan, and that Meat Grinder sent his accountant to watch over things. The accountant, Hasenkamp, will then start following you.
Blitz
To get the alley door open, Blitz will need to do his thing in the matrix. You'll take control of Blitz, and you'll need to guide him from his starting position (#14) to the Alley Door Node (#16). You won't have to deal with any hostile IC along the way, but you will have to talk to a Gatekeeper IC and a Watcher IC to get them to move aside. When you click on the Alley Door Node, you'll automatically hack it and open the door, but you won't be able to do anything further while the first firewall (#17) is up.
Main Character
At this point, you'll switch back to your main character and Hasenkamp. When you enter the bank (via Exit A), you won't see anybody around. So you'll get a chance to explore at your leisure. Hasenkamp will complain if you poke your nose into anything, but you can ignore him. As you look around the bank, you'll find references to Jurgen Plotz, the leader of the Landenberg, and to Albert Tripps, whose last name is apparently appropriate. You'll also find some minor loot (at #4 and #6).
But eventually, you'll need to enter the server room (#7). It'll start out locked. There are two ways to get the door open:
- Comm panel. When you use the comm panel, you'll learn that Jon Bergfalk is in the server room. If you saw the name Albert Tripps in the bank (at #4) or if you have Charisma 5, then you'll be able to convince Bergfalk that you're Albert. Then with knowledge of the "juice" (at #6), you'll be able to convince Bergfalk that you have some for him. This will cause Bergfalk to unlock the door.
Alternatively, if you buzz the comm panel four times without saying anything, then Bergfalk will open the door to investigate.
- Keycode. If you have Decking 5, or if you enter the keycode "8814," then you'll be able to open the door yourself.
When the door opens, Bergfalk (aka a Server Decker) will realize that you're intruders, and he'll attack you. But he'll be close to you without any cover, and you'll get to go first, so you should be able to kill him quickly. After the battle, when you search the room, you'll find a Server Terminal and a Keycard. The terminal will allow you to lower the first firewall (#17) for Blitz. The Keycard will open the locked office across the hall (#5).
Blitz
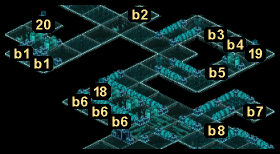
With the firewall lowered, you'll return to Blitz. This time, you'll need to interact with the Secure Area Node (#20) so you can once again open the way for your main character and Hasenkamp. But to do this, you'll need to solve a bit puzzle. To reach the Secure Area Node, you'll need to acquire two bits. To reach the optional Teller Area Node (#18), you'll need three bits. The solution for this is listed below:
|
| Bit Puzzle
|
- Pick up the bit at b2.
- Pick up the bit at b3 and place it in b4.
- Take the bit at b5. While you're there, you should hack the Data Node (#19). Rather than receiving paydata, you'll learn that you were expected in the bank tonight, and that Plotz wants you eliminated.
- Take the bit from b4 and place it in b3.
- Place a bit in b8.
- Take the bit in b7 and then take the bit you just placed in b8.
- Place all three bits in b6. This will open the way to the Teller Area Node (#18). Hacking the node will open the Teller Area door (#8).
- Take back two of the bits in b6 and place them in b1. This will open the way to the Secure Area Node (#20). Hacking the node will open the Secure Area door (#9).
Main Character
When the Secure Area door opens, you'll switch back to your main character and Hasenkamp. If you opened the way to the Teller Area (#8), then you should head there now and pick up an
ArmTech MGL-6 grenade launcher. It'll go into your weapon slots, creating a new slot if necessary. That means you'll get to use it when combat starts up (soon).
As you make your way to the vault, you'll pass by two locked rooms with guards inside (#10, #11). The guards won't spot you, so you'll be able to walk right past them. Then inside the vault antechamber (#12), you'll find a Firewall Terminal. When you activate it, you'll lower the second firewall in the matrix (#21), and you'll switch to Blitz.
Blitz
The way will now be clear for you to reach the Vault Door Node (#24). When you hack it, you'll open the vault door (#13), and you'll switch back to your main character and Hasenkamp.
Main Character
When you enter the vault (#13), Hasenkamp will automatically make a money transfer to Meat Grinder's account, clearing Blitz's debt, and then he'll steal a mysterious plastic box. Nothing you say will change any of the above.
When you try to leave the vault, you'll discover that the door is locked. This will surprise Blitz, and you'll be given two ways to proceed. If you let Blitz open the door, then the alarms will go off right away, and you'll get attacked inside the vault antechamber (#12). If you use Decking 5 to open the vault door, then the alarms won't go off until you get past the antechamber, and so you'll get to skip a fight. But either way, the alarms will go off.
To escape the bank, you'll have to fight two major battles. The first one will take place in the room just past the antechamber. When you enter it, the exit door will lock, and Blitz will tell you that the only way for you to get out is to activate the Door Control Terminals in the guard rooms to the north (#10) and south (#11). The only problem is, Blitz will have to hold open the doors to those rooms for you by hacking nodes in the matrix (at #22 and #23), so he'll only be able to open one at a time. And just to make matters worse, reinforcements will keep coming at you until you succeed, and Blitz will also have to fight White IC in the matrix.
Note: With Decking 5, you'll be able to open the northern door (#10) by yourself, and Blitz will only need to open the southern door (#11).
Another Note: Along with the Door Control Terminals, you'll also find an
Advanced Medkit in each guard room. You should grab them since you might need them.
The basic strategy for this battle is to have your weaker character run to the Door Control Terminals while your stronger character fends off the reinforcements. New reinforcements will only show up once you've killed the current reinforcements, so another strategy is to leave one enemy alive, and then let that enemy chase you around in circles, avoiding combat as much as possible.
Activating both Door Control Terminals will open the exit door. When your main character and Hasenkamp go through it, Blitz will close it and lock it behind you, separating you from the reinforcements. But then Blitz will throw another curveball at you. He'll tell you that to make it out of the bank, you'll have to use the front entrance, and that to even reach that exit, you'll have to use another terminal to open another door.
You'll find the terminal in the lobby -- along with four auto turrets (#2). However, when you activate the terminal, Blitz will inform you that Hasenkamp is an assassin as well as an accountant, and that he was sent here to kill you. Blitz will then ask you to press a button on the terminal, which will give him control of the turrets so he can kill Hasenkamp. You'll have three ways to respond:
- If you side with Hasenkamp and let him go, then he'll reveal that Blitz was telling the truth. But when he exits the lobby, he'll run into Meat Grinder, and Meat Grinder will kill him. Then Blitz will use the auto turrets to kill Meat Grinder -- and also accidentally destroy the mystery box. After these events play out, you'll have to survive two waves of enemy reinforcements (each with three enemies). At the end, Blitz will gain the IC Scrambler program (see below).
- If you side with Blitz, then Hasenkamp will turn against you. However, when you kill Hasenkamp, you'll also destroy the mystery box. You won't have to face any enemy reinforcements. At the end, Blitz will gain the IC Scrambler program (see below).
- If you figure out that you've all been set up (by seeing the information at #5, #6, and #19, and by learning about Plotz), then Hasenkamp will stay on your side. You'll have to defeat two waves of enemy reinforcements (each with four enemies), but at the end Hasenkamp will give you the mystery box. When you hand it over to Blitz (in the Kreuzbasar), he'll gain the Hijack Commlink ability (see below).
Regardless of your choice, you'll immediately switch back to Blitz, who will be in the matrix in the room with the Auto Turret Nodes (#15). Plotz will be in the room as well, and he'll take control of two of the turret nodes. So you'll have two turrets on your side, and your enemies will have two turrets on their side. In the ensuing battle, you'll need to use Blitz to defeat Plotz and take control of all four turrets, while you and perhaps Hasenkamp fight in the real world.
Plotz will immediately summon an ESP, which will proceed to go after the turret nodes. You should counter by having Blitz summon his two ESPs, and have them go after nodes as well. But realize that as soon as Plotz dies, his ESP will disappear, so don't waste a lot of time chasing it around. Concentrate on Plotz, and kill him as quickly as possible.
When Plotz dies, one of two things will happen. If you didn't join forces with Hasenkamp, then Plotz will drop Plotz's Custom Software, which will give Blitz the IC Scrambler program. This program will allow Blitz to "charm" enemy IC in the matrix. If you did join forces with Hasenkamp, then Plotz won't drop anything, but Blitz will eventually get the mystery box, which will give him the Hijack Commlink ability. This ability will allow him to "charm" enemies in the real world.
To complete the mission, you'll just need to win the final battle (in the real world and the matrix), and leave the bank (via Exit B). When you arrive in the Kreuzbasar, you'll receive 2 karma points for your efforts.
Note: Blitz will only gain one out of the IC Scrambler program and the Hijack Commlink ability. There isn't any way for your main character to gain them, even if you're playing a decker.
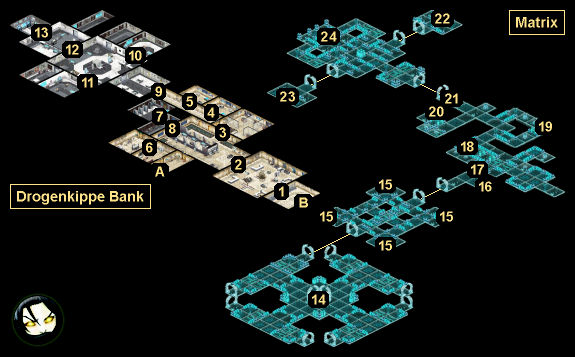
1 - Security Doors
These doors will start out locked. They'll only open at the end of the mission.
2 - Lobby
The lobby will start out locked. You'll only be able to enter it at the end of the mission.
3 - Office
You'll find two desks in this office:
- Albert Tripps' Desk. To log into the terminal here, you'll need Decking 4, or you'll need to enter the password "123456." The terminal will reveal that Albert Tripps doesn't do a lot of work. Hasenkamp will use this as an example that Plotz isn't a good leader.
- Neat Desk. With Strength 4, you'll be able to force open one of the desk's drawers, where you'll find a credstick worth around 100 nuyen (the amount is random).
4 - Office
On a desk in this office, you'll find
Cram.
5 - Office
This office will start our locked. To open it, you'll either need the Keycard from the Server Room (#7), or you'll need to put a drone through the drone port in the adjacent office (#4). Inside the office, you'll find financial information about Meat Grinder's projected income, but Hasemkamp will claim that it doesn't make sense.
6 - Office
You'll find three things of interest inside this office:
- Desk. From searching this desk, you'll learn that the Landenberg Ring is getting into moneylending. You'll also find a note mentioning Plotz and a "silent partner."
- Medical Supplies. You'll find an
Advanced Medkit here.
- Trash Can. When you root around the garbage here, you'll find a note from Jon Bergfalk to "A" complimenting him on the wonderful "juice" he passed around recently.
7 - Teller Area
The door to the teller area will start out locked. Only Blitz will be able to open it while he's in the matrix (at #18). Inside the area, you'll find an
ArmTech MGL-6 grenade launcher.
8 - Server Room
9 - Secure Area
The door to this area will start out locked. Only Blitz will be able to open it while he's in the matrix (at #20).
10 - Northern Guard Room
11 - Southern Guard Room
12 - Vault Antechamber
13 - Vault
14 - Starting Point
15 - Turret Nodes
16 - Alley Door Node
17 - First Firewall
18 - Teller Area Node
19 - Data Node
20 - Secure Area Node
21 - Second Firewall
22 - Door Control North Node
23 - Door Control South Node
24 - Vault Door Node
Exits
- Alley entrance.
- Main entrance.


