|
|
 Did we miss anything in this location? Is there something we didn't discover? Let us know!
Background
APEX. An artificial intelligence designed for Matrix warfare. The thought of it sends a chill down your spine.
Did we miss anything in this location? Is there something we didn't discover? Let us know!
Background
APEX. An artificial intelligence designed for Matrix warfare. The thought of it sends a chill down your spine.
For years, the shadows have been ripe with rumors of true Al. Names like "Mirage" and "Psychotrope" have fueled conspiracy boards on the Shadowland BBS since 2029. Most savvy shadowrunners dismiss these stories as bunk.
But from what Alice has told you, at least one of the stories is real. APEX is waiting for you, somewhere down in the basement of an abandoned Saeder-Krupp lab.
Unfortunately, you're going to have to wade through a lot of gang territory to get there....
--- Mission Midpoint ---
The elevator rumbles and clanks its way downward, into the guts of the old Saeder-Krupp development lab. Eighteen years ago, this place -- and the project that was being developed here -- disappeared from the record books. Thanks to Alice, you are one of the few people alive today who understand why.
Alice was clear about one thing: you are here because APEX wants you to be. If the Al hadn't wanted her to trace it here, she'd have wound up as dead as Monika. For better or worse, you're here at APEX's invitation.
The elevator grinds to a halt. The doors slide open, and your nostrils are assaulted by eighteen years' worth of stale air. APEX -- and the kill switch that will deactivate it -- await.
--- Mission Complete ---
Your trip back to the Kreuzbasar is a restless one. Now that APEX has been dealt with, the window of opportunity that you've been waiting for has opened. Harfeld Manor is vulnerable.
The video feed that the Al showed you circles over and over in your head. Vauclair, and Audran, and the strange woman in the containment device. The revelation that Vauclair runs the Harfeld estate. And his assertion that... something,.. was set to happen tonight.
The train glides to a stop. You push through the doors and onto the platform. There's no time to waste.
Karma Points
- [3] Defeat the spirits for Franz (#8).
- [12] Complete the mission.
Walkthrough
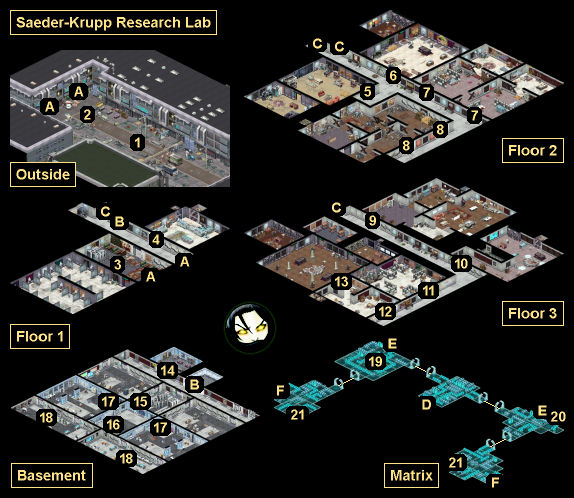
You'll begin this mission just outside the abandoned Saeder-Krupp research lab (#1). However, on your way to the entrance, you'll get stopped by Ullrich and his Arbeiter gang (#2). Ullrich will give you some background information on the lab: that a strange religious group called the Hub resides on the first floor, that the Arbeiters used to control the building until the Magnifikers took it away from them, and that the elevator leading to the basement has been disabled, with Ullrich holding one piece (the Elevator Control Chip) and Trithemius, the leader of the Magnifikers, holding the other (the Elevator Power Coupling).
Ullrich will then make you a deal. If you kill Magnifikers and collect their Magnifiker Amulets, then he'll pay you 200 (or 250 with Charisma 4) nuyen for each one. He'll also offer you his Elevator Control Chip if you kill Trithemius. If you have the Gang etiquette, then Ullrich will also promise you his Ganger's Key for killing Trithemius, which will allow you to open the safe in the Arbeiter armory in the basement (#14), plus open the three chests next to Ullrich, where you'll find a
Ganger Mask, a
Premium Medkit, and (if necessary) the Elevator Control Chip.
So when you enter the research lab (via Exit A), you'll need to find Trithemius. To learn his whereabouts, you'll need to talk to Parson, the "custodian" of the Hub (#3). He'll make you a deal. If you track down the Datajack Signal Converter stolen from him by Janet, then he'll tell you where the Magnifiker hideout is located. Threatening Parson for this information won't do you any good.
You'll find Janet's apartment on the second floor (#5). To unlock her door, you'll need Decking 6 or Charisma 6, or you'll need to know that the password is "Shark Tank" (which you can learn from #7 or #8). Inside the apartment, you'll have three ways to get the Signal Converter:
- You can attack Janet, or you can take the Signal Converter from her terminal without her permission, which will cause her to attack you. You'll have to fight Janet plus three of her friends, but the battle shouldn't be too tough. With Quickness 6, you'll be able to get the jump on Janet, which will allow you to attack first. Afterwards, if necessary, you'll just need to take the Signal Converter from Janet's terminal.
- You can tell Janet to "back down" and then use Strength 6 or Charisma 6 on her. This will cause her to give you the Signal Converter.
- You can use Intelligence 3 to suggest to Janet that you might be able to jury-rig something so she doesn't actually need the Signal Converter. When you examine her terminal, if you have Decking 8, then you'll be able to bypass the converter, making it unnecessary. Otherwise, if you have Intelligence 5, then you'll see a way to replace the converter with a more common Datajack Impulse Transmitter. Janet will tell you that Karl might have one.
When you talk to Karl (#4), he'll want you to pay 1000 nuyen for the transmitter. If you have Charisma 4, you'll be able to cut that price in half. If you have the Street etiquette, or if you examine the photo of Janet on the wall behind Karl and threaten Janet's health, then Karl will give you the transmitter for free.
Back in Janet's apartment, you'll be able to replace the Signal Transmitter with the Datajack Impulse Transmitter, and everybody will walk away happy.
When you deliver the Signal Converter to Parson (#3), he'll tell you that Trithemius' hideout is located on the third floor, in the back of a seemingly-abandoned apartment (#12). To access the hideout, you'll just need to press a button found in one of the bookshelves in the back room (#13).
When you meet with Trithemius, he'll try to convince you to work with him against the Arbeiters, and he'll promise you his Elevator Power Coupling in return. This will give you three ways to proceed:
- You can stick with Ullrich. For killing the Magnifikers in the hideout (#13) and elsewhere (#6, #10), you'll receive a dozen Magnifiker Amulets, which will earn you 2400 (or 3000) nuyen. When Trithemius dies, he'll drop Trithemius's Amulet, which will prove that he's dead, and Trithemius's Key, which will unlock the three outer rooms of the hideout. Inside the rooms, you'll find
Acid Stream II, an
Advanced Medkit,
Cram, the Elevator Power Coupling,
Flamethrower III, a
Force 4 Earth Elemental Fetish, and 210-375 nuyen total (the amounts are random).
When you return to Ullrich, if he gives you his Ganger's Key, then you'll find a
Ganger Mask, a
Premium Medkit, and the Elevator Control Chip in the three crates next to him. Otherwise, he'll just hand you the Elevator Control Chip.
- You can accept Trithemthius' counteroffer. This means you'll need to return to Ullrich and kill him and his men (perhaps turning in some Magnifiker Amulets first). Ullrich will drop his Ganger's Key when he dies, which will allow you to open the three crates next to him, where you'll find a
Ganger Mask, a
Premium Medkit, and the Elevator Control Chip. Then when you return to Trithemius, he'll reward you with a
Force 6 Toxic Elemental Fetish and the Elevator Power Coupling.
- You can kill both gangs. The most effective way to do this is to accept Ullrich's deal; kill all of the Magnifikers in the research lab (#6, #10), including Trithemius in the hideout (#13); turn in your dozen Magnifiker Amulets for Ullrich's bounty, and then kill Ullrich. This will give you all of the money and all of the loot from the two options above.
Note: The only way you'll be allowed to kill Ullrich is if you tell Trithemius that you're going to do it. So don't simply attack Trithemius. Talk to him first.
Regardless of your choice, you should end up with the Elevator Control Chip and the Elevator Power Coupling. These two items will allow you to repair the elevator (Exit B) and go down into the Basement.
Most of the Basement doors will start out locked -- except, oddly, the Arbeiter armory door (#14), which you'll be able to go right through. To unlock the other doors, you'll need to enter the central chamber and loot the clipboard and the key card that you'll find there (#15). The clipboard will give you detailed instructions for deleting APEX. The key card will allow you to open the locked doors.
When you approach the Main Control Terminal (#16), APEX will present itself to you -- as Monika -- and you'll learn that APEX absorbed Monika's memories when it fried her brain. APEX will then try to convince you to free it rather than delete it, and it'll even promise to help you during the final mission at Harfeld Manor. You'll have two ways to respond:
- You can free APEX. For this case, you'll need to jack into the matrix and hack two AI Control Nodes (#21). You'll have a variety of ways to enter the matrix (#16, #17, #18), but the easiest is to use the Secondary AI Control Terminals (#18) since they'll take you the closest to where you want to go (Exit F).
While you're in the matrix, you'll encounter Black and White IC, but APEX will always appear at your side as a second decker, so the battles should not be too tough. Just make liberal use of Degrade and Killer to wipe things out quickly. Each time you enter a "room" in the matrix, the IC will respawn, so try to do as little exploring as possible. Just jack into the room where you want to go, or run through the rooms on the way there. Only fight in rooms where you need to hack a node.
Jacking into and out of the matrix will dramatically increase the alarm timer. So use Suppression as much as possible. If the alarm goes off, then Parson (with 300 ip) will appear in the matrix, and you'll have to defeat him. But again, with you and APEX working together, Parson shouldn't pose much of a problem.
When you hack one of the AI Control Nodes (#21), the real world security forces in the research lab will kick into action, and you'll start seeing waves of attackers. Each wave will consist of one or more Heavy Security Drones (with 140 hp) and three or more Junkies (with 40 hp):
- Wave 1: One drone plus junkies from the west.
- Wave 2: One drone plus junkies from the west. One drone plus junkies from the east.
- Wave 3: Junkies from the west. Two drones plus junkies from the east.
- Wave 4: Two drones plus junkies from the west. Two drones plus junkies from the east.
Note: A new wave won't appear until you've defeated all of the drones in the current wave.
The drones will head for the Main AI Control Terminal (#16) and attack it. If they destroy it, then you'll lose the mission and have to load your game. Meanwhile, the junkies will mostly head for the Secondary AI Control Terminals (#18) and try to hack them. If they capture one, then you'll lose control of the associated AI Control Node in the matrix, and you'll have to go back in and hack it again.
In other words, you'll have to guard three terminals in the real world (#16 and #18). If you need some help with this, then you can enter the matrix and hack Turret Control Nodes (#19, #20). You'll only be able to have one set of turrets (east or west) active at a time, but the turrets are useful, especially against junkies.
After hacking both AI Control Nodes (#21), APEX will need time to overwrite its control sequences, so you'll have to keep defending the three terminals for several additional turns. We'd recommend focusing your attacks on the junkies first and then the drones. The junkies with their tasers are definitely the more annoying of the two, and the Main AI Control Terminal has over 100 hit points, which means it can take some abuse from the drones, provided you don't ignore it completely.
After protecting the Main Control Terminal for long enough, you'll need to interact with it. This will unshackle APEX and give it access to the matrix. At the same time, any remaining drones and junkies will stop attacking you. Then APEX will show you a live feed from Harfeld Manor. You'll see a strange woman in a containment cell, and you'll discover that Vauclair is the one who is in charge of the place.
Freeing APEX will give you three main benefits:
- A new heavy weapons companion named Panzerdrohne will become available. It'll add some dialogue (a pre-recorded message from APEX to Vauclair) during the final mission.
- APEX will make the final mission slightly easier. You'll get to skip a fight, you'll get to skip a matrix run, and you'll get auto turrets helping you out in a pair of battles. These bonuses are useful but not game-changing.
- APEX will give you an extra way to complete the final mission.
- You can delete APEX. For this case, you'll need to initiate the purging process described on the clipboard (#15). So you'll need to activate the two Secondary AI Control Terminals (#18), and then protect them and the Main AI Control Terminal (#16) until the process is complete.
To stop you, APEX will send waves of attackers at you. Each wave will consist of one or more Heavy Security Drones (with 140 hp) and three or more Junkies (with 40 hp):
- Wave 1: One drone plus junkies from the west.
- Wave 2: One drone plus junkies from the west. One drone plus junkies from the east.
- Wave 3: Junkies from the west. Two drones plus junkies from the east.
- Wave 4: Two drones plus junkies from the west. Two drones plus junkies from the east.
Note: A new wave won't appear until you've defeated all of the drones in the current wave.
The drones will head for the Main AI Control Terminal (#16) and attack it. If they destroy it, then you'll lose the mission and have to load your game. Meanwhile, the junkies will mostly head for the Secondary AI Control Terminals (#18) and try to hack them. If they capture one, then you'll have to re-activate it. The purging process will only advance while you're holding both secondary terminals.
In other words, you'll have to guard three terminals (#16 and #18). If you need some help with this, then you can enter the matrix (at #16 or #17) and hack Turret Control Nodes (#19, #20). You'll only be able to have one set of turrets (east or west) active at a time, but the turrets are useful, especially against junkies.
Note: When you're attempting to delete APEX, you'll only see three "rooms" in the matrix. The rooms with the AI Control Nodes (#21) won't be there.
Another Note: If for some reason you spend long enough in the matrix to trigger the alarm timer, then Parson (with 300 ip) will show up and attack you.
When the purging process is complete, you'll need to activate the Main AI Control Terminal (#16) and press the delete button. This will cause all of the drones and junkies to die. But it'll take a couple of minutes for APEX for disappear, and during that time it'll show you a live feed from Harfeld Manor. You'll see a strange woman in a containment cell, and you'll discover that Vauclair is the one who is in charge of the place.
To complete the mission, you'll just need to return to the elevator (Exit B). You'll automatically travel back to the Kreuzbasar, where you'll earn 12 karma points. Then when you meet with your team in the safehouse, you'll have a short pep talk, and you'll decide that it's finally time to return to Harfeld Manor. The next mission will end the game, so if you need any supplies or want to talk to anybody, you should do that before leaving.
To start the journey to Harfeld Manor, you'll need to use the exit in the safehouse.
1 - Starting Point
2 - Ullrich
3 - Parson
4 - Karl's Shop
Inside this shop, you'll meet Karl. He'll sell you a variety of healing supplies and drugs.
5 - Janet's Apartment
6 - Magnifiker Apartment
Inside this apartment, you'll encounter four Magnifikers -- two mages, a healer, and a conjurer. They'll drop Magnifiker Amulets when they die, which you'll be able to use with Ullrich's bounty (#2). In the back of the apartment, you'll also find the spells
Glue and
Powerbolt III.
7 - Hub Apartment
Inside this apartment, you'll find 10-75 nuyen (the amount is random),
Bliss, and a note with "Shark Tank" written on it.
8 - Displaced Residents
Inside this apartment, you'll meet Franz and his family, who were displaced from their apartment upstairs by Magnifiker spirits. Franz will ask you to remove the spirits for him. If you demand payment for this service, then he'll give you 500 nuyen. If you ask about Janet's apartment (#5), then he'll also promise to give you the password to her door.
Inside Franz's apartment (#9), you'll encounter five Magnifiker Free Spirits, but they'll be spread out enough so you won't have to fight them all at once. After defeating them, when you return to Franz, you'll earn 3 karma points, and you'll learn that Janet's password is "Shark Tank." Then Franz and his family will move back upstairs.
Note: Instead of helping Franz, you can lie to him and tell him that the spirits are dead when they actually aren't. He'll tell you the password, but you won't receive any karma points. Franz will also get killed when he opens his door.
9 - Franz's Apartment
When you first enter this apartment, you'll encounter five Magnifiker Free Spirits inside. But after destroying them and letting Franz (#8) know, he and his family will move back in. In the back of the apartment, you'll find a
Premium Medkit.
10 - Magnifiker Apartment
Inside this apartment, you'll encounter five Magnifikers -- four mages and a healer. After defeating them, you'll find a
Force 5 Nature Elemental Fetish and
Shadow in the back room.
11 - Hub Apartment
This apartment will start out locked. To enter it, you'll need to talk to the resident Communionist using the intercom next to the door. No matter what you say to him, he'll eventually let you in.
Inside the apartment, when you talk to the Communionist, if you pretended to be a spirit, and if you have the Street etiquette, then he'll give you
Jazz. If you told him that you're not a spirit, then he'll tell you all about the Hub, and he'll keep referring to the Communion as a living entity. If you try to convince him that the Hub is bad for him, then he'll attack you.
Also inside the apartment, you'll find
Cram in a dresser.
12 - Abandoned Apartment
You won't find anything in this apartment -- until after you've worked with Parson (#3), at which point you'll be able to interact with the bookcase in the back, which will open the secret door leading to the Magnifiker hideout (#13).
13 - Magnifiker Hideout
14 - Arbeiter Armory
Inside this chamber, you'll find an
Ares High-Explosive Grenade, a
BuMoNA Gold Trauma Kit, an
M79 Grenade Launcher, and a
Premium Medkit. With Decking 6 or the Ganger's Key from Ullrich (#2), you'll also be able to open a safe, where you'll find a
Remington Roomsweeper.
15 - Clipboard and Key Card
16 - Main AI Control Terminal
17 - Turret Control Terminals
18 - Secondary AI Control Terminals
19 - West Turret Control Node
20 - East Turret Control Node
21 - AI Control Nodes
Exits
- Lab entrance.
- Elevator.
- Stairwells.
- Main AI control jack-in point (from #16).
- Turret control jack-in points (from #17).
- Secondary AI control jack-in points (from #18).
|
|
|


