 Did we miss anything in this location? Is there something we didn't discover? Let us know!
Background
OTK International is a small-time software developer, and it shows. The company's main office is crammed up against the back wall of a massive shared office park, surrounded by competing businesses and larger corporations. A steady trickle of dead-eyed wageslaves flows in and out of the complex.
Did we miss anything in this location? Is there something we didn't discover? Let us know!
Background
OTK International is a small-time software developer, and it shows. The company's main office is crammed up against the back wall of a massive shared office park, surrounded by competing businesses and larger corporations. A steady trickle of dead-eyed wageslaves flows in and out of the complex.
The office park's main entrance is overflowing with hired security, but your forged keycard gets you past them easily enough. A few minutes later, you're walking the winding corridors toward OTK International.
You're only a few smashed computers away from putting Amsel's plan into motion.
--- Mission Complete ---
The U-Bahn ride home is smooth and uneventful. The high-ups at OTK International must be scrambling to try and recover their losses. It's only a matter of time before they make the call and Amsel's compromised data is uploaded to Knight Errant's commlinks.
You're going to be rolling into Aztechnology with one hell of an advantage. Not bad for a night's work.
Karma Points
- [1] Neutralize the wageslave (#1).
- [1] Fool or subdue the janitor (#3).
- [1] Download the paydata (#6).
- [4] Complete the mission.
Walkthrough
During the sub-mission
In Transit, you'll get a call from Paul Amsel. He'll tell you that "Frau Muller" would like to hire you for a job, and he'll allow you to pick the site for the meeting. Your choice won't make any difference. When you later talk to Muller, she'll divulge that she works for Aztechnology, which is researching an "evil" project called Bloodline. She'll then ask you to destroy their research facility and kill everyone inside, to ensure that the project never sees the light of day.
If you accept Muller's job, then when you return to Paul, he'll give you some bad news -- namely, that the combination of Aztechnology's security forces plus their Knight Errant response teams will be too much for you to handle. So before you can head out to the research facility, you'll first have to visit the software developer OTK International, where you'll need to compromise the software that the Knight Errants use. To help you out, Paul will give you a corporate ID card, which will get you (and you alone) into OTK International's offices.
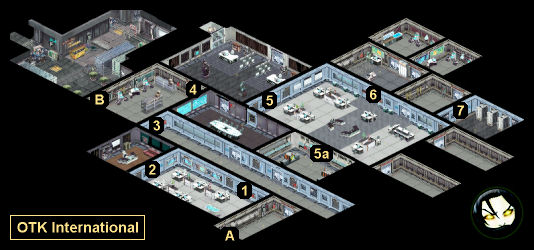
You'll begin the mission inside the OTK International facility (at Exit A). The first thing you'll want to do is re-connect with the rest of your team, so you should head west. Along the way, you'll spot a wageslave with his back turned toward you (#1). It's a good idea to neutralize this worker and then loot the adjacent office (#2). Between the two, you can find a lab coat and a Supervisor's ID Badge, which will make it easier to explore.
Inside the storage room (#3), you'll just need to open the side door (Exit B) to let in your team. However, around the same time, a janitor will enter the room, and she'll be surprised to see you. If you're wearing the lab coat (from #1), then you'll pretty much just need to be polite to the janitor for her to ignore you. If you don't have a disguise, then you'll need the Corporate etiquette, or you'll need Charisma 5, or you'll need to threaten the janitor to prevent her from calling security. If you attack the janitor, or if she figures out that you don't belong, then she'll trigger the alarm and race out of the room, and you'll have to fight your way through the rest of the mission. If the janitor survives and doesn't trigger the alarm, then you'll gain a karma point.
Next up, you'll need to enter the server room. The western door to the room (#5) will start out locked. To open it, you'll either need to send a drone through the port in the boardroom to the south, or you'll need to jack into the matrix in the office (#4). The southern door to the server room (#5a) will be guarded by a pair of drones. If you don't have the Supervisor's ID Badge (from #2), then they won't allow you to pass. If you try to open the door anyway, then they'll trigger the alarm and attack you, and you'll have to fight your way through the rest of the mission.
Inside the server room, one of two things will happen:
- If you haven't triggered the alarm yet, then the guards inside will ask to see your identification. If you have the Supervisor's ID Badge (from #2), or if you have the Security etiquette, then they'll allow you to work in the room.
You'll then need to jack into the matrix, where you'll encounter a mess of White IC. When you come to an intersection, going north will take you to the Secure Data Server Node. Hacking it will fry the servers, completing your main objective. Going east will take you to the Financial Data Server Node. Hacking it will give you 1 karma point plus Paydata: OTK Financial Data, which will eventually earn you 441 nuyen.
- If you've already triggered the alarm, or if you don't have any identification, then the guards in the server room will attack you, and you'll have to defeat them plus several waves of reinforcements. One of the waves will include a rigger, and when he shows up, he'll head straight for the drone control room (#6). If he makes it to the terminal there, then he'll wake up six drones and send them to attack you (in three waves of two). So it's a good idea to kill him ASAP.
You can also use the drone control terminal yourself. With Drone Control 4, you'll be able to blow up the six extra drones. With Drone Control 6, you'll be able to wake up the drones and send them after the security forces. The drone control terminal won't have any effect on the other drones in the facility.
One of the initial two guards in the server room will drop a Server Room Door Key when he dies. This key will allow you to reach the physical servers (#7), where you'll encounter two more hostile drones. Smashing the servers will complete your main objective for the mission.
With your main objective complete, you'll just need to exit the facility (at Exit B). When you return to the Kreuzbasar, you'll earn 4 karma points.
1 - Workroom
The first time you walk by this room, you'll spot a wageslave inside with his back turned to you. If you want, you can ignore him and then come back later. But whenever you decide to deal with him, you'll have three basic options:
- You can talk to the wageslave. This will only work if you have Charisma 4 (or later Charisma 5). After your greeting, the wageslave will realize that he's been working for too long, and he'll leave the complex. You'll earn 1 karma point.
- You can assault the wageslave, either sneaking up on him (before he spots you) or launching yourself at him (after he spots you). With Quickness 4, Close Combat 4, the Manabolt spell, or the Stunbolt spell, you can either kill the wageslave or knock him unconscious. For all of the above, you'll earn 1 karma point, and you'll find his lab coat, which you'll be able to use as a disguise (unless you're a dwarf, ork, or troll, and then the lab coat won't fit you). If you wrestle the wageslave to the ground (which has no requirements), then you won't receive the karma point or the lab coat.
- You can turn around and flee. This is a bad idea, as the wageslave will close and lock the door to his workroom, and he'll trigger the alarm, putting the facility's security forces on alert.
2 - Supervisor's Office
You'll find a locked drawer in this office. There are three ways to open it: with Strength 5, with Decking 5, or by guessing the login credentials "swilliams" (learned from examining the desk) and "0629" (learned from examining the calendar). When you open the drawer, you'll find a Supervisor's ID Badge inside.
3 - Storage Room
4 - Office
5 - Server Room
6 - Drone Control Room
7 - Servers
Exits
- Main entrance.
- Side entrance.


