 Did we miss anything in this section? Is there something we didn't discover?
Let us know!
Walkthrough
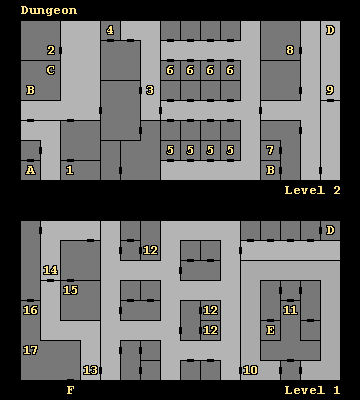
You'll need to make your way through the dungeon so you can eventually reach the Dreadlord's castle. While you're in the dungeon, you'll need to track down three keys, which will open up three doors in the castle. The Gold Key in this part of the dungeon can be found on Level 1 (#5).
1 - Umber Hulks
In this room you'll face off against four Umber Hulks.
2 - Pyrohydras
In this room you'll encounter four 12hd Pyrohydras. They'll be guarding six random items, 1000 platinum, 100 gems, and 4 pieces of jewelry.
3 - Fire Giant Patrol
You'll be attacked by Hell Hounds and Fire Giants here.
4 - Trap
When you enter this room, you'll spot the madman image, and once again he'll be hiding a trap. If you fail to detect or disarm the trap, then your party will get hit by about 15 points of damage. Regardless, you'll also find four random items in the room.
5 - Blind Man
In one of these cells you'll meet a blind man. He'll ask you if you're with or against the Black Circle. If you say "with" then the man will get angry at you, but nothing much else will happen. If you say "against" then he'll tell you his story, which you'll record as Journal Entry 13. He'll also give you a map to his treasure (#7), which you'll record as Journal Entry 52, and he'll tell you the code word "Nacacia" that you'll need to use to unlock it.
6 - Prisoner
In one of these cells you'll meet a prisoner who will gibber about a "huge, purple worm." You'll meet a Purple Worm later in the level (#11).
7 - Treasure Chamber
If you know the magic word "Nacacia" (which you can learn from the blind man at #5), then you'll gain access to the treasure here, and you'll find four Darts +3, a Quarter Staff +4, a Scimitar +4, a Staff Sling +3, and a Wand of Fireballs.
8 - Battle
In this room you'll encounter three BC Necromancers and five Fire Giants. If you advance or wait, then parlay, and then choose haughty or sly, then you'll trick the enemies into mentioning that "our leaders have set purple worms loose in an effort to stop some adventurers" -- that is, you. But no matter what you do, this encounter will always lead to a fight.
9 - Madman Image
You'll encounter the madman image again here. He'll scream so loudly that he'll actually do minor damage to your party. To stop the damage, you'll have to attack the image, which will cause him to disappear.
10 - Fire Giant Patrol
At this spot you'll encounter seven Hell Hounds and six Fire Giants.
11 - Purple Worms
This is where you'll finally encounter the Purple Worms that people (#6, #8) have been talking about. In fact, you'll face two of them. But despite the buildup, the worms aren't all that powerful. You should be able to defeat them with a minimum of effort.
12 - Huddled Masses
In two of these cells you'll meet a "huddled mass." The masses will die when you enter, but then their spirit will give you a hint about the Gold Key (#15) and the exit to the Western Crevasses (Exit F).
13 - Door Guards
When you go through the door here you'll get attacked by three BC Necromancer, two BC Wizards, and eight Ettins.
14 - Fire Guard Patrol
At this spot you'll encounter three BC Wizards and six Fire Guards.
15 - Gold Key
In this room you'll discover four Purple Worms guarding a Gold Key. The key will allow you to open up a door in the Dreadlord's castle. After the battle you'll automatically pick up the key (a quest item that won't show up in your inventory), and you'll also find 6 random items, 150 gems, and 2 pieces of jewelry.
16 - Fire Giant Patrol
This Fire Giant patrol will flee from the room to the south (#17), and you won't be able to stop them no matter what you decide to do.
17 - Purple Worms
You'll encounter five Purple Worms in this room.
Exits
- Stairs to
Dungeon Level 3.
- Two-way portal. The first time you use the portal, you'll have to fight seven 12hd Pyrohydras and then six Umber Hulks, but you'll end up finding six random items, 400 gems, and five pieces of jewelry.
- Portal to the
Well of Knowledge (3,12).
- Stairs between Levels 2 and 1. You won't have to solve a riddle or anything to use the stairs.
- Stairs leading to the Dreadlord's
Castle Level 1. When you first arrive at the stairs, you'll find them "choked with ice," with some BC Wizards, BC Necromancers, and Fire Giants desperately trying to burn their way through. When the enemies spot you, they'll turn around and attack, and the stairs will remain frozen until you've reached the castle by other means -- that is, by taking the detour through the crevasses (Exit F).
- Tunnel to the
Western Crevasses.