 Did we miss anything in this section? Is there something we didn't discover?
Let us know!
Walkthrough
Did we miss anything in this section? Is there something we didn't discover?
Let us know!
Walkthrough
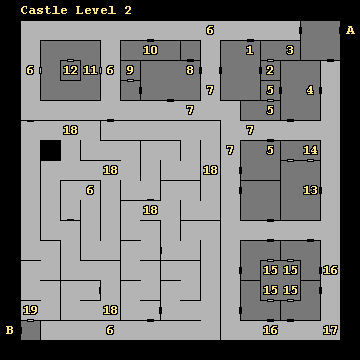
All you'll need to do on this level of the Dreadlord's castle is make your way up to
Level 3 (Exit B).
1 - Battle
In this room you'll face six Basilisks, four Cockatrices, and five Medusae.
2 - Ambush
When you enter this room, you'll get ambushed by six Cloud Giants and four Driders. Your opponents will get to move first, so this can be a difficult battle. Try to disrupt the Driders as much as possible or they'll decimate you with their Lightning Bolts.
3 - Cache
If you search or look in this spot, then you'll find an Elixir of Youth, a Long Bow +2, a Potion of Speed, and 100 gems.
4 - Battle
In this room you'll face five Cloud Giants and six Driders.
5 - Hydra Battles
In these spots you'll encounter either 12 Headed Hydras or 12hd Pyrohydras.
6 - Trap
7 - Patrol
In one of these spots you'll run into a patrol of Cockatrices, Driders and Medusae. On one of the bodies you'll discover a piece of paper letting you know that the day's password is "steeleye."
8 - Ambush
In this room you'll get ambushed by eight Driders.
9 - Cache
If you search or look in this spot, then you'll find a Potion of Invisibility, a Shield +2, a Trident +3, a Wand of Paralyzation, and 100 gems.
10 - Storm Giants
In this room you'll meet seven Storm Giants. They'll try to parlay with you and sell you a fake map of the maze located in the southwestern part of the level. If you buy the map then you'll record it as Journal Entry 36. If you wait or attack the Storm Giants instead, then at the end of the ensuing battle you'll find the true map and the fake map, and you'll record the true map as Journal Entry 66.
Note: Be careful if you fight the Storm Giants. Their Lightning Bolts can bounce around a lot in the narrow room where you'll face them.
11 - Basilisks and Cockatrices
If you enter this room without the amulet from the Cloud Giants (#13), then you'll discover "limitless numbers" of Basilisks and Cockatrices, and every step you take will trigger a battle against them. If you have the amulet, then the creatures will shy away from you, and you won't have to fight anything.
12 - Cache
When you enter this secret room you'll find Bracers of AC 3, a Hammer +4, a Scimitar +5, a Potion of Extra Healing, a Potion of Giant Strength, and 100 gems.
13 - Ambush
When you enter this room you'll get ambushed by six Cloud Giants. After the battle you'll find an amulet inscribed "for the basilisks." This amulet will allow you to walk around a room to the west (#11) without having to fight Basilisks and Cockatrices every step.
14 - Cache
When you enter this secret room you'll find two random items and 100 gems.
15 - Alchemical Laboratory
If you search or look in this room, then up to four times (in any of the four squares) you can find an Elixir of Youth, a Potion of Extra Healing, a Potion of Giant Strength, and Potion of Speed.
16 - Sargatha
In one of these two squares you'll encounter Sargatha again. If you chase her then you'll run into a teleporter trap (#17) and end up on
Dungeon Level 10. If you wait, then you'll have to battle Sargatha's minions: four Cockatrices, four Medusae, and six Storm Giants.
17 - Teleportation Trap
If you set off the trap, then you'll end up in a cell on
Dungeon Level 10.
18 - Iron Golems
At each of these places you'll encounter three Iron Golems. If you speak to them and say "steeleye" (learned at #7), then the golems will allow you to pass -- but they'll reappear each time you enter the square, and so you might want to attack them just to get them out of the way.
19 - More Iron Golems
At this spot you'll run into nine Iron Golems, and just like their compatriots (#18), they'll wait for you to say something. While you're pondering the situation, a magic mouth will appear on the wall nearby and tell you that the password for these golems is "fool." If you believe this and say "fool," then the golems will attack you. If you say "steeleye" instead, then you'll be allowed to pass.
Exits
- Stairs to
Castle Level 1.
- Stairs to
Castle Level 3.


