 Did we miss anything in this section? Is there something we didn't discover?
Let us know!
Walkthrough
Did we miss anything in this section? Is there something we didn't discover?
Let us know!
Walkthrough
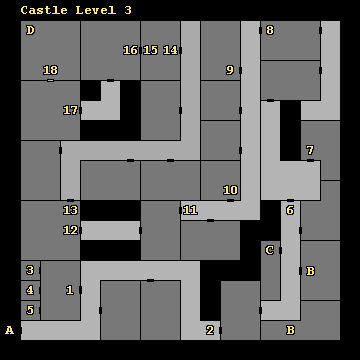
This is the final level of the castle. You'll only have one way to go, so you'll need to fight your way to the Dreadlord (#17), defeat him in battle, and then destroy the gem imprisoning his soul (#18). Doing so will complete the game, although you'll still be allowed to play and finish up any optional locations or battles you skipped along the way.
1 - Storm Giants
When you enter this room you'll face off against eight Storm Giants.
2 - Dreadlord Illusion
When you reach this spot, an illusion of the Dreadlord will appear and challenge you to a fight. If you attack it, then you'll get teleported away to a battle (#4). However, when you return, the illusion will still be there, and if you attack it again, then you'll get teleported to a different battle (#5). If decide to attack the illusion a third time, then you'll get teleported to a third battle (#6). After that, attacking the illusion will just repeat the sequence. To stop getting teleported away, you'll need to let the illusion attack you. That will cause it to disappear.
3 - Trap
When you appear in this chamber, you'll land on a spike trap, which will deal about 10 point of damage to your party, and then you'll get attacked by six Medusae.
4 - Trap
When you appear in this chamber, four Iron Golems will get some free swings at you, and your party will take about 30 points of damage. Then you'll have to fight the golems.
5 - Trap
When you appear in this chamber, six Iron Golems will attack you.
6 - Lightning Door
You'll discover that the door here is protected by lightning. If you attempt to pick the door then whichever character you select to try it will fail and take lightning damage. If you toss an object then it will disappear when it touches the door. If you bash the door, then the lightning illusion will disappear and you'll be able to walk through.
7 - Battle
In this room you'll face six Cockatrices, five Dread Guards, and four Iron Golems.
8 - Silver Door
You'll need to use the Silver Key (from
Dungeon Level 4) to unlock this door. If you use a different key, then you'll get attacked by five Iron Golems.
9 - Trap
You might need to be in search mode to detect this trap.
10 - Iron Statues
You'll find four iron statues in this room. If you smash the statues or read the inscription at their feet, then they'll turn into Iron Golems and attack you.
11 - Riddle Door
The answer to the riddle is "Oswulf." If you answer incorrectly or try to force the door then your party will take some damage.
12 - Sargatha
You'll finally get to fight Sargatha here -- plus four Banite Priests, four Cockatrices, and six Dread Guards. Sargatha is only slightly tougher than a regular Medusa, so this fight shouldn't be any more troublesome than any of the other fights in the castle.
13 - Gold Door
You'll need to use the Gold Key (from
Dungeon Level 1) to unlock this door. If you use a different key, then you'll get attacked by five 12hd Pyrohydras.
14 - Battle
When you enter this room you'll get attacked by a Golden Warrior plus four Banite Priests, six Dread Guards, and four Medusae. We'd recommend using fireballs to thin out the enemies and disrupt the priests, and then focus melee attacks and spells on the Golden Warrior. At the end of the battle you'll find a Girdle of Giant Strength, a Long Sword +5, Plate Mail +5, a Shield +5, and 6 pieces of jewelry.
15 - Brass Door
You'll need to use the Brass Key (from
Dungeon Level 7) to unlock this door. If you use a different key, then you'll get attacked by eight Medusae.
16 - Battle
When you enter this room you'll get attacked by six 16 Headed Hydras.
17 - Dreadlord
When you enter this room you'll finally get attacked by Dreadlord Eldamar. He'll have six Banite Priests and ten Storm Giants with him. Not surprisingly, the Dreadlord is tough. He starts with 135 HP and a -9 AC, he's immune to many spells (with one obvious exception being Magic Missile), and your ranged attackers probably won't be able to hit him.
For best results, you should buff up before starting the fight. Bless, Prayer, and Protection from Evil 10' Radius are good spells for your clerics to cast, while Enlarge, Globe of Invulnerability, and Haste are good for your mages. Then when the battle begins, use area effect spells from your mages to damage and disrupt the enemies, while your clerics (and perhaps paladins) cast Silence 15' Radius. If you can prevent the majority of the enemies from hitting your party with spells, then you'll have a good chance of winning. But if Lightning Bolts start bouncing through your ranks, and characters get held, then you're going to have a tough time.
At the end of the battle you'll find a Cloak of Displacement, a Ring of Invisibility, and a Ring of Protection +3.
18 - Battle
In this secret room you'll get attacked by six Medusae and a dozen Iron Golems. After the battle you'll destroy the gem containing Eldamar's soul, and he and his brother Oswulf will finally find peace. Congratulations for completing the game! If you're interested, then you can keep playing to build up your characters for Pools of Darkness, but nothing beyond this battle is required. Just be aware that all of the shops in
New Verdigris will be empty from now on (the townsfolk will be partying), so you won't be able to buy or identify anything.
Exits
- Stairs to
Castle Level 2.
- Two-way portal. The portal will take you to the Prison of Delights where you'll find some guarded treasure. If you attack the guards or attempt to take any of the treasure, then you'll have to battle six Iron Golems and six Driders. Afterwards, you'll find 9 random items, 8000 platinum, 104 gems, and 30 pieces of jewelry.
- Portal to the
Well of Knowledge (12,3).
- Portal to the
Well of Knowledge (12,12).


