 Did we miss anything in this section? Is there something we didn't discover?
Let us know!
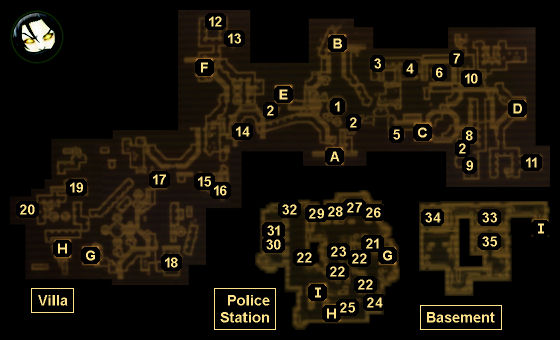
Overview
1 - Main Fountain
Did we miss anything in this section? Is there something we didn't discover?
Let us know!
Overview
1 - Main Fountain
This is where you'll start out in the area. After talking with Father Elijah, a hologram of Vera Keyes will appear in the fountain. She'll repeat the same invitation that you might have heard on your radio before coming to the casino. You'll learn more about Vera as you progress through the DLC. If you get stuck in the DLC, then you can return to the fountain to speak with Elijah again.
Inside the fountain you'll find 17
Sierra Madre Chips (which you can spend at vending machines, #2) and also the
Ace of Spades - Sierra Madre. The ace is a part of the
Dead Man's Hand challenge. Just outside the fountain on the northern side you'll find a copy of
Pugilism Illustrated.
2 - Vending Machines
When you first arrive at the casino, you won't be able to buy much at the vending machines other than
Doctor's Bags and basic pre-war food items. But as you explore the casino and its grounds, you'll find
Vending Machine Codes, which will allow you to buy better items, including
RadAway,
Stimpaks, and ammunition.
3 - Stash
Behind the column here you'll find a first aid box and a footlocker (likely containing an
Automatic Rifle).
4 - Gift Shop
Inside this gift shop, you'll find some
Sierra Madre Chips, and you'll be able to make some purchases (including two
Stimpaks) from the hologram vendor.
5 - Storage Closet
Inside this closet you'll find a first aid box, four bottles of
Dirty Water, and a bottle of
Purified Water.
6 - Courtyard
You'll encounter a Cloud in the courtyard -- but only in the center (where you'll find an ammunition box). If you skirt around the edges then you should remain safe.
7 - Stash (Rooftops)
In the corner of the rooftops here (reached via the upstairs room of the gift shop, #4), you'll find a first aid box, one of
Dean's Secret Stashes, an
Automatic Rifle, two doses of
RadAway, and more.
8 - Courtyard
On the ground here you'll find a
Laser Pistol and 80
Energy Cells.
9 - Abandoned Shop
Inside this shop you'll find a
Sierra Madre Helmet (on the counter).
10 - Storage Closet
Inside this closet you'll find a workbench, some crafting supplies, and a copy of
Fixin' Things (at the bottom of a locker).
11 - Abandoned Shop
Inside this shop you'll find a first aid box, one of
Dean's Secret Stashes, a
Police Pistol, a "very hard" locked cash register, and more.
12 - Stash
On the ground here you'll find a first aid box and two (probably empty) ammunition boxes.
13 - Home
Inside this Cloud-contaminated home, you'll find two
Stimpaks (in the shelves) and more.
14 - Home (Upstairs)
Inside this home (accessed via a board connecting it to the home across the street), you'll find a gun cabinet and a first aid box.
15 - Speared Skeleton
On the ground next to the skeleton you'll find a
Stimpak and some
Sierra Madre Chips.
16 - Stash
Behind the column here, you'll find a
Caravan Shotgun, some
20 Gauge Rounds, and one of
Dean's Secret Stashes.
17 - Fountain
Next to the fountain you'll find a terminal that will allow you to turn on a hologram in the fountain. The hologram will distract any ghosts in the area. Inside the fountain you'll find 17
Sierra Madre Chips.
18 - Home
On the upper floor of this Cloud-contaminated home, you'll find an
Acoustic Guitar (that isn't used for anything) and a
Patriot's Cookbook. If you follow the plank from the upstairs window, then you'll also find an ammunition box, a grenade box, and a first aid box.
19 - Storage Closet
Outside the closet, you'll need to deal with a tripwire connected to a bouquet of
Frag Grenades. Inside the closet you'll find a copy of
Fixin' Things (in a shelf) and a copy of
Programmer's Digest (on the floor).
20 - Home
Inside this home, you'll find a "hard" locked gun cabinet, a
Patriot's Cookbook (on the living room table), and
Sierra Madre Armor (in an upstairs shelf).
21 - Vending Machine Code
You'll find Vending Machine Code - "Steady" on the table here.
22 - Radios
You'll find four radios on the main floor of the police station. Three of them will be on top of desks while the last one will be underneath a desk. You'll need to turn off or destroy the radios to prevent them from triggering our collar.
23 - Holding Cell
This is where you'll meet Dog/God. See the quest entry for
Find Collar 8: "Dog" for information on how to get the cell open. In the back of the cell you'll find the
8 of Spades - Sierra Madre. This is one of the
Dead Man's Hand cards.
24 - Contraband Room
This room will start out locked. To get inside, you'll have to hack the "hard" security on the police chief's terminal (located right next to the door). Inside the room, you'll find a grenade box, an
Automatic Rifle, lots of
.308 Rounds, Vending Machine Code - ".357 Magnum Rounds," and more.
Note: If you read the "Prohibited Items" entry on the police chief's terminal, then you'll increment the
History's Sake challenge.
25 - Break Room
In this room you'll find a first aid box, plus a
Cosmic Knife, a
Sierra Madre Helmet, and a copy of
True Police Stories (all on the counters).
26 - Women's Bathroom
Inside this bathroom you'll find a first aid box (behind the door) and one of
Dean's Secret Stashes.
27 - Locker Room
Inside the locker room you'll find
Sierra Madre Armor (on a bench) and
C-4 Plastic Explosives and a
Detonator (in a "hard" locker).
28 - Maintenance Room
Inside this room you'll find a reloading bench and a copy of
Programmer's Digest (in a shelf).
29 - Men's Bathroom
Inside this bathroom, you'll find Vending Machine Code - ".308 Rifle Rounds" (on the ground next to the toilet).
30 - Cell
Inside this cell you'll find a bed that you can sleep on.
31 - Cell
This cell will start out locked with an "average" lock. Just outside the cell you'll find two bottles of
Purified Water. Inside the cell you'll find a copy of
La Fantoma and a pair of
Binoculars.
32 - Vending Machine Code
On top of the filing cabinets here, you'll find Vending Machine Code - "Weapon Repair Kit."
33 - Utility Room
You'll be within range of a radio in this room, but the radio is located in the room to the south (#35), and so you won't be able to do anything about it yet. Also in the room, if you climb up onto the metal boxes, then you'll find
Fixer, a
Milsurp Review, and
Tales of Chivalrie on top of some tall boxes.
34 - Storage Room
You'll find a copy of
Grognak the Barbarian on the floor here.
35 - Utility Room
Inside this room you'll find a radio and the Dog Command Tape (both on a table).
Exits:
- Exit from the
Villa. Going through this exit will return you to the
Abandoned BoS Bunker. You won't be allowed to use this exit until you've completed the DLC.
- Entrance to the
Sierra Madre Casino. You won't be allowed through this exit until you've completed the quest
Trigger the Gala Event.
- Entrance to the
Residential District.
- Entrance to
Salida del Sol. You won't be allowed into this district until you've completed the three "find collar" quests.
- Entrance to the
Medical District.
- Entrance to
Puesta del Sol. You won't be allowed into this district until you've completed the three "find collar" quests.
- Front door to the Police Station.
- Back door to the Police Station. You'll have to pick a "very easy" lock to use this door.
- Entrance to the Police Station Basement.


